Stack rack build

Collapse
This topic is closed.
X
X
 
  • Time
  • Show
Clear All
new posts
  • here.now
    Member
    • Jun 2008
    • 70

    Stack rack build

    Here's my newest project:

    Image not available

    I based this design off of:

    Image not available

    Credit is due to the original designer whom I don't know the name of.

    I built two so I'm able to stand my Modula up between them. TV will be mounted to the wall so it should give enough shelves for my components.
    I've attached some build pics. The risers between the shelves were made from 1.5"x3" of 3/4 Baltic birch stacked glued and brad nailed. I realized afterwords that it would have been easier to laminate strips of plywood then cut them into small pieces to save on time and make things more accurate.

    I plan on finishing with a clear coat but am not sure how or which one to use. I tested some polyurethane on a small piece and I didn't like the caramel color it left. My Natalie P's will be built of BB as well and finished in a clear finish so I want it to match. The only problem is they're being built by my pops in Wisconsin. I'd also like the clear coat to be hard and durable because the exposed edges are brittle and i don't want them to chip. Ideas anyone?

    That said I'd like to ramble on about some of the things I've learned as a novice wood worker. These are things that I'm sure everyone is going to go "well yeah" or "DUHH" but here we go.

    1)Cheap plywood is just that, cheap plywood. It's got more voids than Emmentaller. And isn't very structurally sound to boot.

    2)Excess glue equals excess sanding. Holy man my arms are sore.

    3)You can never have enough clamps.

    4)Speed square and large squares should be your best friends.

    5)You can't sand somethings square.

    6)Wood putty works wonders, if it matches and if it stains well.

    Anyway, I'll post some more pictures of the finishing process when I get there.
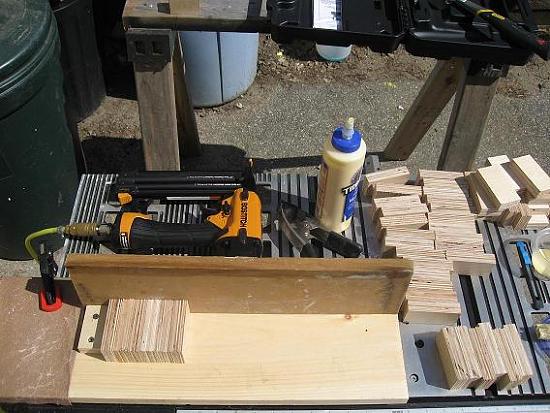
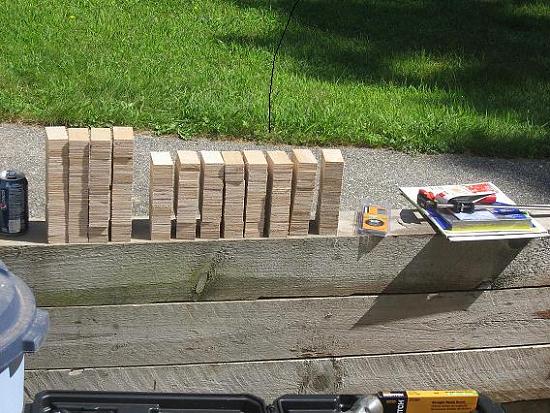
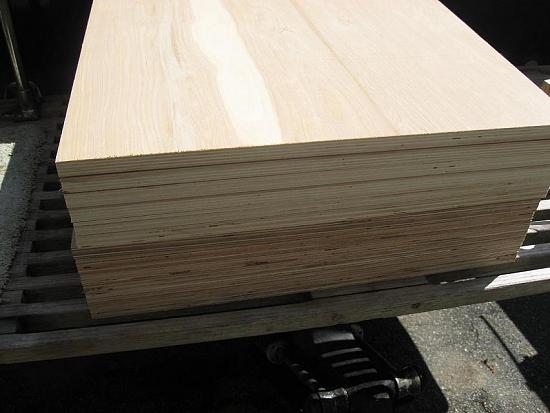
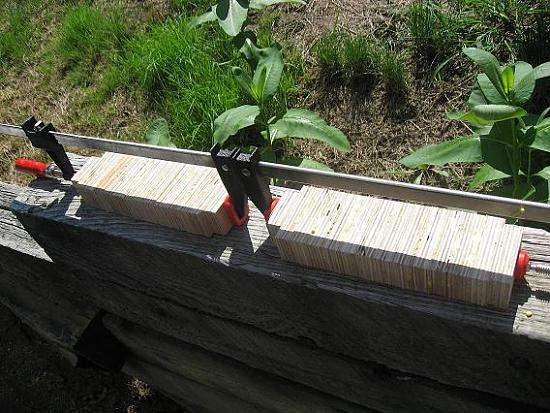
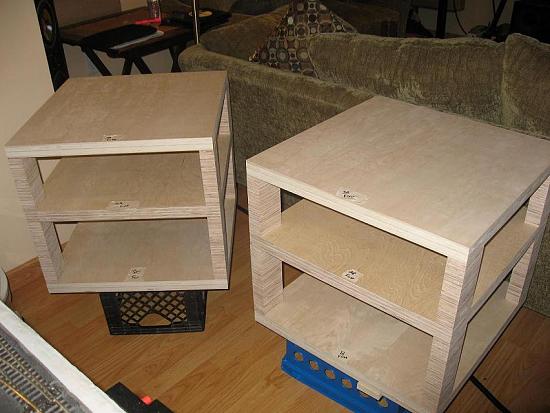
    Click image for larger version

Name:	IMG_5360.JPG
Views:	350
Size:	62.2 KB
ID:	870089

    Click image for larger version

Name:	IMG_5361.JPG
Views:	304
Size:	78.9 KB
ID:	870090

    Click image for larger version

Name:	IMG_5362.JPG
Views:	265
Size:	67.2 KB
ID:	870091

    Click image for larger version

Name:	IMG_5363.JPG
Views:	320
Size:	70.6 KB
ID:	870092

    Click image for larger version

Name:	IMG_5366.JPG
Views:	358
Size:	82.6 KB
ID:	870093
    Last edited by theSven; 18 August 2023, 15:09 Friday. Reason: Update image location and remove broken image links
    My Stack Rack Build
  • Bent
    Super Senior Member
    • Sep 2003
    • 1570

    #2
    I really like that.

    Comment

    • here.now
      Member
      • Jun 2008
      • 70

      #3
      Thanks Bent

      I do too that's why I had to build one.

      Here's more inspiration for my interpretation:

      Click image for larger version

Name:	gi.mpl?u=31915&f=DIY_Ikea_Lyte_Rack_007.jpg
Views:	41
Size:	134.4 KB
ID:	948399

      I'm considering putting the Dayton spike feet on the bottom to help with isolation and to give it a cool look. Otherwise I'll end up just putting one piece of "riser" on each corner. Input?

      I guess I built this for two reasons, first to match my new coming speakers and second to isolate my components from one another in hopes it will help with how my whole system sounds. Attached is a picture of my current setup. See the laptop wired to the side? Lol, yeah I'm trying to go for a cleaner look.

      Click image for larger version

Name:	IMG_5266.JPG
Views:	342
Size:	92.0 KB
ID:	853689
      Last edited by theSven; 18 August 2023, 15:10 Friday. Reason: Update image location
      My Stack Rack Build

      Comment

      • here.now
        Member
        • Jun 2008
        • 70

        #4
        Update

        Final sanding is done and I threw together a stand for my CC. Also some shots of my "shop". Yes it is a storage closet. Haha, I make do and play outside most of the time.

        Does anyone have advice on what clear coat to use? I may just leave them as is but am concerned about durability.

        Click image for larger version

Name:	IMG_5376.JPG
Views:	274
Size:	40.6 KB
ID:	853690

        Click image for larger version

Name:	IMG_5371.JPG
Views:	247
Size:	50.5 KB
ID:	853691

        Click image for larger version

Name:	5373.jpg
Views:	42
Size:	83.7 KB
ID:	948400
        Last edited by theSven; 18 August 2023, 15:11 Friday. Reason: Update image location
        My Stack Rack Build

        Comment

        • ThomasW
          Moderator Emeritus
          • Aug 2000
          • 10934

          #5
          Use water based polyurethane

          IB subwoofer FAQ page


          "Complicated equipment and light reflectors and various other items of hardware are enough, to my mind, to prevent the birdie from coming out." ...... Henri Cartier-Bresson

          Comment

          • here.now
            Member
            • Jun 2008
            • 70

            #6
            Originally posted by ThomasW
            Use water based polyurethane
            Brushed on? And how many coats do you suggest? For the edges do I need to do anything special? Also, is there a specific brand that you recommend that dries clear?

            Thanks Thomas
            My Stack Rack Build

            Comment

            • ThomasW
              Moderator Emeritus
              • Aug 2000
              • 10934

              #7
              The water based poly dries clear and doesn't yellow.

              Wipe-on, brush on, try test boards to see what you prefer.

              IB subwoofer FAQ page


              "Complicated equipment and light reflectors and various other items of hardware are enough, to my mind, to prevent the birdie from coming out." ...... Henri Cartier-Bresson

              Comment

              • here.now
                Member
                • Jun 2008
                • 70

                #8
                Originally posted by ThomasW
                The water based poly dries clear and doesn't yellow.

                Wipe-on, brush on, try test boards to see what you prefer.
                Just went out and got some Minwax Waterbased Polycrylic and a brush made for polycrylic. Test piece is drying as i type this.
                My Stack Rack Build

                Comment

                • Curly Woods
                  Senior Member
                  • Dec 2005
                  • 125

                  #9
                  Originally posted by here.now
                  Brushed on? And how many coats do you suggest? For the edges do I need to do anything special? Also, is there a specific brand that you recommend that dries clear?

                  Thanks Thomas
                  Edges or end grain should always be sanded to a much finer degree than the surfaces. If you normally go to 220 grit when finish sanding, use 320 or even 400 grit on all exposed end grain and edges. It almost burnishes the end grain and will not let it soak as much finish as it normally would if you did not do the extra steps.
                  Mike Mastin

                  Comment

                  • JonMarsh
                    Mad Max Moderator
                    • Aug 2000
                    • 15282

                    #10
                    A good idea to do that again after the first coat or two also.
                    the AudioWorx
                    Natalie P
                    M8ta
                    Modula Neo DCC
                    Modula MT XE
                    Modula Xtreme
                    Isiris
                    Wavecor Ardent

                    SMJ
                    Minerva Monitor
                    Calliope
                    Ardent D

                    In Development...
                    Isiris Mk II updates- in final test stage!
                    Obi-Wan
                    Saint-Saëns Symphonique/AKA SMJ-40
                    Modula PWB
                    Calliope CC Supreme
                    Natalie P Ultra
                    Natalie P Supreme
                    Janus BP1 Sub


                    Resistance is not futile, it is Volts divided by Amperes...
                    Just ask Mr. Ohm....

                    Comment

                    • Bent
                      Super Senior Member
                      • Sep 2003
                      • 1570

                      #11
                      Yup

                      I used minwax poly on my dual RL-p sealed sub, (IIRC, 9 coats) wiped on, left overnight, cloth buff, repeat. (fine sanded and tack-cloth after 2nd coat)

                      I found it quite nice to work with.

                      Comment

                      • here.now
                        Member
                        • Jun 2008
                        • 70

                        #12
                        Excellent, thanks everyone. I'm in the process of trying it on some test pieces so I can get down a routine of coating and sanding. Second coat is on already tonight. Seems to dry to sandability within 4 hours. I've got 220 grit, I'm not going for glossy I just wanted to bring out some of the depth in the wood and protect it. I'll post some pics when I get my first coat on the actual racks.
                        My Stack Rack Build

                        Comment

                        • here.now
                          Member
                          • Jun 2008
                          • 70

                          #13
                          Finished.

                          Ahh, much better.

                          Finishing went well, a lot of trial and error. I think that it could have been better if it was started correctly. I brushed on the first layer, and wiped on the other three. You can still see some streaks from the brush, maybe I didn't sand enough after the first layer, I'm not sure.

                          Anyway, they turned out better than I expected and I absolutely love how clean my system looks now. It may be high hopes but it seems as though things sound better too, more full and focused, less noise(this makes sense because no components are stacked and the wires are separated and not in coils).

                          Here's some pictures:

                          Click image for larger version

Name:	Finished.jpg
Views:	35
Size:	113.8 KB
ID:	948401

                          Click image for larger version

Name:	finished1.jpg
Views:	41
Size:	137.2 KB
ID:	948402
                          Last edited by theSven; 18 August 2023, 15:14 Friday. Reason: Update image location
                          My Stack Rack Build

                          Comment

                          • dsrviola
                            Senior Member
                            • Oct 2007
                            • 119

                            #14
                            Stack Rack

                            Looks great! Congratulations!

                            Comment

                            Working...
                            Searching...Please wait.
                            An unexpected error was returned: 'Your submission could not be processed because you have logged in since the previous page was loaded.

                            Please push the back button and reload the previous window.'
                            An unexpected error was returned: 'Your submission could not be processed because the token has expired.

                            Please push the back button and reload the previous window.'
                            An internal error has occurred and the module cannot be displayed.
                            There are no results that meet this criteria.
                            Search Result for "|||"