My Ochocinco MTM build...

Collapse
X
 
  • Time
  • Show
Clear All
new posts
  • CADman_ks
    Senior Member
    • Jan 2012
    • 497

    My Ochocinco MTM build...

    I'm getting ready to start building two sets of Ochocinco's.

    I'm going to be building my Ocho's different than the original design. Because of that, I thought that I would try and do something that I've never really done in the past, document what I'm doing, and try and be diligent about it. Hopefully this information is valuable to someone in the future. If someone else likes the looks of the way that I build these, then they shouldn't have to figure out a lot of stuff.

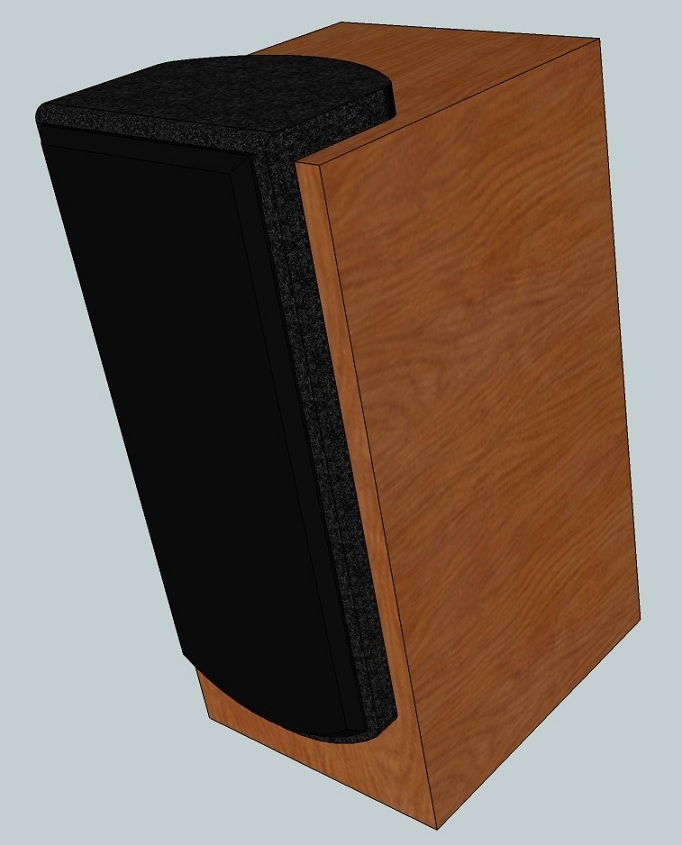
    With all of that being said, here's the "look" that I'm going after:

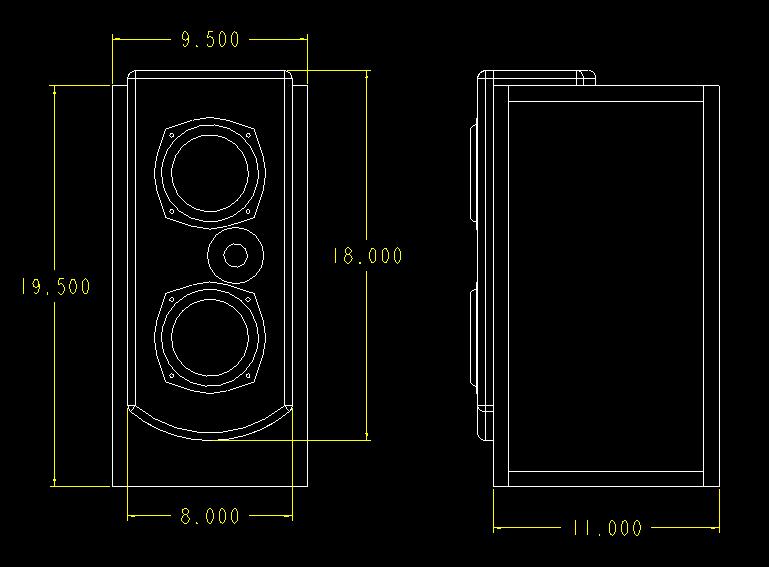
    Here's a shot of the dimensions:


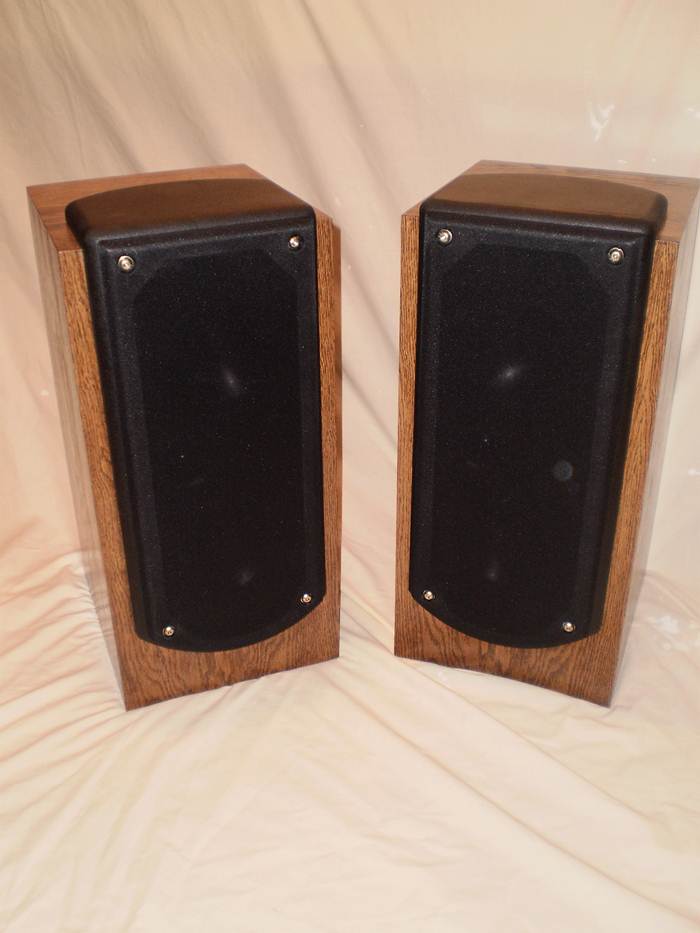
    And here is an image of what they are SUPPOSED to look like when they are done:


    One of my "requirements" for this build is that I MUST have grills, and I MUST have grills that are NOT easily removable, but obviously still removable.

    So, there will be two front baffle essentially, one that's about the same size as the original design, and the one that holds the drivers, and then the one that is the front of the actual box, that will be slightly wider, making the other baffle stick out by a material thickness. Then, I'll carry the front baffle to the top, which does nothing for design, other than looks.

    On edit: If you don't want to wade this whole thing to see what the final product looks like, here's a shot of them side by side:

    Last edited by theSven; 09 March 2023, 20:11 Thursday. Reason: Update image location
    CADman_ks
    - Stentorian build...
    - Ochocinco build...
    - BT speaker / sub build...
  • CADman_ks
    Senior Member
    • Jan 2012
    • 497

    #2
    Not off to such a great start...

    I went to the local lumber yard this morning, and things didn't start out well before I even walked out the door.

    I didn't realize that my wife needed to leave IN A HURRY, and she needed to be leaving soon. So, I hurriedly piled in the truck, and headed off to the lumber yard, so that I could get the MDF, and get back so that she could help me unload it before she had to leave.

    I get there, and it IS my lucky day, because they are NOT busy, which is typically NOT the case on a Saturday.

    I go to the lumber counter, and I order up one full sheet, and one sheet cut down to 30", because that's all I need.

    I go to the building that they cut the MDF at, and I had a feeling that I shouldn't have done that. Something in the back of my mind told me that I should go the building where the MDF is stored, and make sure, double damn sure that I get a GOOD piece of MDF, but I didn't.

    Shortly after I get to the cutting station, they arrive with two sheets. They take the top sheet, which looks GREAT, and quickly cut it down to the prescribed 30" wide, and we load the cut sheet and the full sheet onto the truck.

    I get home, my wife helps me unload and leaves.

    I started trimming the large panel down to a manageable size, and I notice on the edges of the full sheet that it looks like it has some banding marks. I think, "Well, that should be OK, because I'll be cutting that off. I just need to make sure that I cut that off.".

    I trim off a 97" piece about 9" wide, and when I pick it up, I realize what happened. They gave me the TOP sheet and the next sheet, and they CUT the next sheet. AND, they flipped them over, when they put them on the fork lift, so that I couldn't see the bad side, since it was down on the bottom. So I have the TOP of the stack that they have been moving stacks in and out of all the time. It's a pretty crappy piece of wood, and NOW I have the thing cut, so I can't hardly take it back.

    Hopefully, I can work around this, but this is one of those things that should take no brain power, and now I'm forced to spend a LOT more time carefully figuring out how to maximize this crappy piece of MDF...

    Dangit.... I knew that I should have went over there and told them that I didn't want any junk pieces off wood. I knew better...

    CADman_ks
    CADman_ks
    - Stentorian build...
    - Ochocinco build...
    - BT speaker / sub build...

    Comment

    • CADman_ks
      Senior Member
      • Jan 2012
      • 497

      #3
      End of day one...

      Well, I guess that it was a good day / bad day kind of thing.

      I actually got all of the pieces roughed out for both sets that I'm building.

      But, I cut on the wrong side of the mark for one of the pieces, and I don't have enough pieces big enough to remake it, so I had to join two pieces together to make a bigger piece that I'll then cut down.

      I said that the lumber that I got was pathetic. Here were some shots that I took after I had it cut up, and these are some of the better areas!

      This type of stuff was all over the back of the sheet:

      Click image for larger version

Name:	P3030025_opt.jpg
Views:	2663
Size:	72.2 KB
ID:	857325

      and this was one of the lovely banded edges:

      Click image for larger version

Name:	P3030027_opt.jpg
Views:	2700
Size:	56.0 KB
ID:	857326

      This is what happens when you let a piece fall out of your hands while your table sawing, and it hits the edge of the cast iron table saw table, which is pretty much unforgiving. For some reason, I was having a hard time today holding onto the MDF. It was like the sawdust on there was making it super slick and it wanted to fall out of my hands. I didn't experience this when I built my Stentorians, because it was cold outside, and I used some thin rubber coated gloves, and they gripped onto the MDF even when it had sawdust on it. But this is an OUCH!!! Luckily, I was able to cut this piece out of the finished boards, so it wasn't in play:

      Click image for larger version

Name:	P3030030_opt.jpg
Views:	2712
Size:	57.9 KB
ID:	857328

      When I did the build on my Stents, I used screws to hold the boxes together while the glue dried. That really worked out well for me, since I never did use any clamps to hold it together. While I do have some clamps, I'm more or less clamp poor at the moment. Because of the success that I had with the Stents, I decided to do the same thing again here. I lay out the lines, and then drill a small hole, and then a large hole for the head of the screw to go into. I suppose that you could say that it takes longer to do it this way, but the payoff comes in the end, because you can really put the box together quick, because you don't have to wait for the glue to dry. Here's a picture of one of the holes:

      Click image for larger version

Name:	P3030035_opt.jpg
Views:	2765
Size:	65.1 KB
ID:	857329

      Here was the progress at the end of the day. Not a bad pile of lumber, minus the two panels that I still need to trim down to size after the glue is set:

      Click image for larger version

Name:	P3030027 (2)_opt.jpg
Views:	2704
Size:	99.1 KB
ID:	857327
      Last edited by theSven; 09 March 2023, 20:12 Thursday. Reason: Update image location
      CADman_ks
      - Stentorian build...
      - Ochocinco build...
      - BT speaker / sub build...

      Comment

      • cjd
        Ultra Senior Member
        • Dec 2004
        • 5568

        #4
        Better the edge of the table than a moving saw blade.

        Looking fun.

        I was intending to make sawdust, but instead found myself with a sore throat and a bad headache. Ahh well. Got to just listen instead.
        diVine Sound - my DIY speaker designs at diVine Audio

        Comment

        • CADman_ks
          Senior Member
          • Jan 2012
          • 497

          #5
          Originally posted by cjd
          Better the edge of the table than a moving saw blade.

          ....
          TRUE!

          Originally posted by cjd
          ...Got to just listen instead.
          Funny you should mention listening. After bunging up this piece, I was a little shall we say peeved (to be politically correct). So I took a deep breath, went over to the shop stereo, and turned the volume knob up just a little. :T

          The nice , now louder sounds, coming out of the Stents quickly reminded me why I was doing this in the first place, and it wasn't all lost at that point, I just needed to take a deep breath, and lemonade out of lemons...

          CADman_ks
          CADman_ks
          - Stentorian build...
          - Ochocinco build...
          - BT speaker / sub build...

          Comment

          • CADman_ks
            Senior Member
            • Jan 2012
            • 497

            #6
            Originally posted by CADman_ks
            ... While I do have some clamps, I'm more or less clamp poor at the moment. ...
            Just to prove that I AM clamp poor, here's a shot of EVERY bar clamp that I own holding the panels together:

            Click image for larger version

Name:	P3030037_opt.jpg
Views:	2699
Size:	70.2 KB
ID:	857330

            I do have 3 hand squeeze clamps (don't know what they're called), but I never have used them for clamping up boards. Pipe clamps work a lot better.

            Hummmm.... That reminds me... Somewhere in the shop, I have another set of clamps that are NOT on a piece of pipe. I should probably find that sometime and get a piece of pipe in there...

            CADman_ks
            Last edited by theSven; 09 March 2023, 20:13 Thursday. Reason: Update image location
            CADman_ks
            - Stentorian build...
            - Ochocinco build...
            - BT speaker / sub build...

            Comment

            • ---k---
              Ultra Senior Member
              • Nov 2005
              • 5202

              #7
              If there weren't issues to overcome, the results wouldn't be nearly as satisfying.

              You're started... which is more than I can say about myself. We're all looking forward to seeing your progress.
              - Ryan

              CJD Ochocinco! ND140/BC25SC06 MTM & TM
              CJD Khanspires - A Dayton RS28/RS150/RS225 WMTMW
              CJD Khancenter - A Dayton RS28/RS150/RS180 WTMW Center

              Comment

              • CADman_ks
                Senior Member
                • Jan 2012
                • 497

                #8
                More Parts!!!

                Mailman arrived today with more parts! WOOHOO!!

                This is the first time that I've ordered something Erse. Seemed to work well, and the shipping was fast. It was actually cheaper for me to order these type parts from Erse, even with shipping, than it was for me to order everything else from PE with FREE shipping. They did short me one part that shows on my original order, but is not on my packing list as shipped or on backorder. I sent them an email, and I'm confident that they'll take care of it.

                Here's the stuff that I got today:

                Click image for larger version

Name:	P3050029_opt.JPG
Views:	2668
Size:	90.2 KB
ID:	857331


                I still did order my drivers from PE, though, which is always great as well. In this case, I have the tweeters already, but the drivers are backorder until MAY 5!!!:E:E:E

                At the rate I'm going and want to go on this project, I'll have the cabs done and waiting for drivers for a while!

                Started laying out the crossovers, but then I had to go and get the wife from work...

                CADman_ks
                Last edited by theSven; 09 March 2023, 20:13 Thursday. Reason: Update image location
                CADman_ks
                - Stentorian build...
                - Ochocinco build...
                - BT speaker / sub build...

                Comment

                • ---k---
                  Ultra Senior Member
                  • Nov 2005
                  • 5202

                  #9
                  May 5th? Och. That's rough. Hopefully something changes and you get them sooner.
                  - Ryan

                  CJD Ochocinco! ND140/BC25SC06 MTM & TM
                  CJD Khanspires - A Dayton RS28/RS150/RS225 WMTMW
                  CJD Khancenter - A Dayton RS28/RS150/RS180 WTMW Center

                  Comment

                  • CADman_ks
                    Senior Member
                    • Jan 2012
                    • 497

                    #10
                    Originally posted by ---k---
                    May 5th?...
                    OH!! My bad. It's NOT May 5th. IT'S MAY 8TH!!!! :banghead:

                    Click image for larger version

Name:	ScreenShot042.jpg
Views:	2672
Size:	37.9 KB
ID:	857332

                    Maybe it's the Chinese New Year or something...

                    What ya gonna do??? :huh:

                    CADman_ks
                    Last edited by theSven; 09 March 2023, 20:14 Thursday. Reason: Update image location
                    CADman_ks
                    - Stentorian build...
                    - Ochocinco build...
                    - BT speaker / sub build...

                    Comment

                    • CADman_ks
                      Senior Member
                      • Jan 2012
                      • 497

                      #11
                      Busbar question...

                      I like to have decent looking crossovers. I know. It doesn't make the speakers sound any better, and no one ever sees them, BUT, I would know.

                      I've looked at the schematic, and the pics of ---k---'s crossover, and I'm going to rearrange things a little bit differently. However, the size of the resistors, doesn't lend itself well to a whole lot of variation. Those things are HUGE compared to all of the other components.

                      I'd like to use a solid piece of wire for my negative busbar. Something like a piece of 12GA from a piece of romex. I'm assuming that this should be the same as using stranded wire like ---k--- used.

                      Before I proceed, I just wanted to make sure...

                      CADman_ks
                      CADman_ks
                      - Stentorian build...
                      - Ochocinco build...
                      - BT speaker / sub build...

                      Comment

                      • cjd
                        Ultra Senior Member
                        • Dec 2004
                        • 5568

                        #12
                        12ga? Where's the overkill in that?!

                        Yeah, that'll work out just fine. Just keep the inductor relationshiphs correct relative to each-other and you'll be all set.

                        And let's see, 5 and 8 seem to be numbers that sync with this project a little, no? At least, I do think that Ocho and Cinco ... *ahem*

                        Anyhoo... Maybe there's a reason.
                        diVine Sound - my DIY speaker designs at diVine Audio

                        Comment

                        • CADman_ks
                          Senior Member
                          • Jan 2012
                          • 497

                          #13
                          Originally posted by cjd
                          12ga? Where's the overkill in that?!

                          ...
                          LOL!!

                          No overkill, just some pieces of Romex I have laying around. 8)

                          Ya know, someone once told me, "That if something is worth doing, it's worth doing right." (It was probably Confucius that told me that 8))

                          Maybe that's the MO that I'm operating under making the XO's look nice? I don't know.

                          And, while it's worth doing "right", there's still a part of me that is a cheap bastard, and I'm always looking for ways to recycle "crap" to make it into something else. And, I have a WHOLE bunch of pieces of 12GA Romex about 24" long from when I installed the main panel in my shop. I couldn't bear to throw them away, so I've kept them all this time. I have to use it for something! Hence the need to use some 12GA Romex for a busbar.

                          Should be stout, not??? :T

                          CADman_ks
                          CADman_ks
                          - Stentorian build...
                          - Ochocinco build...
                          - BT speaker / sub build...

                          Comment

                          • ---k---
                            Ultra Senior Member
                            • Nov 2005
                            • 5202

                            #14
                            Are you calling my crossovers ugly??? :P just kidding.

                            There are probably an infinite number of ways to arrange the crossover. Feel free to lay it out differently. I think laying these things out can be a bit of an art form. When I do mine, I'm trying to balance: 1) logical layout that can be easily checked against the schematic, 2) size, trying to keep it as compact as possible, 3) spacing and arrangement of the inductors. It doesn't always work out...

                            If you split the mid and tweeter crossovers up onto two boards, it might make it cleaner. I don't know what you're look for..

                            Be careful with the resistors. IIRC, the leads aren't the strongest and I broke several when tweaking. I think I was able to keep all Erse in the photos, but the a few of the boxes have NTE resistors from Fry's. No biggie for me, but if you don't have a local supplier of resistors....

                            In general, I don't see a problem with using solid wire as long as you can get a good solder connection to it. But be careful with thick wire such 12GA. It takes a lot of heat to get thicker wire to solder. Some of the parts you're soldering to it are very small and can't always take that heat. With the right techniques, I don't think it is a problem.
                            - Ryan

                            CJD Ochocinco! ND140/BC25SC06 MTM & TM
                            CJD Khanspires - A Dayton RS28/RS150/RS225 WMTMW
                            CJD Khancenter - A Dayton RS28/RS150/RS180 WTMW Center

                            Comment

                            • CADman_ks
                              Senior Member
                              • Jan 2012
                              • 497

                              #15
                              Originally posted by ---k---
                              Are you calling my crossovers ugly??? :P just kidding.

                              ...
                              Nope. At the end of the day, yours work JUST as good as mine, and you'll spend a lot less time on them than I will. All it really needs to do is work.

                              Originally posted by ---k---
                              ...I think laying these things out can be a bit of an art form. ...
                              This is an excellent way to say it, and in some respects, that's sort of where I'm going with it. Making them look pretty, in some sick sense of the word, makes me feel like I'm feeding my artistic side.

                              Originally posted by ---k---
                              ...

                              In general, I don't see a problem with using solid wire as long as you can get a good solder connection to it. But be careful with thick wire such 12GA. It takes a lot of heat to get thicker wire to solder. Some of the parts you're soldering to it are very small and can't always take that heat. With the right techniques, I don't think it is a problem.
                              That's good to know on the Erse resistors.

                              I'm most concerned about getting them together. I think that I should be able to tell if the solder joint is cold lapped. I'll probably scuff up the wire as well with a Scotch-brite or sandpaper, so that the surface is a little bit rougher. That should help as well...

                              Thanks for the input!!!

                              CADman_ks
                              CADman_ks
                              - Stentorian build...
                              - Ochocinco build...
                              - BT speaker / sub build...

                              Comment

                              • cjd
                                Ultra Senior Member
                                • Dec 2004
                                • 5568

                                #16
                                I used a shield, sinks, and a torch to solder the cap banks in the WWMTM to the bus wire. And separate flux. Cleaning the copper is a must. I have a much better soldering setup now so might not need the torch.

                                C
                                diVine Sound - my DIY speaker designs at diVine Audio

                                Comment

                                • CADman_ks
                                  Senior Member
                                  • Jan 2012
                                  • 497

                                  #17
                                  Originally posted by cjd
                                  I used a shield, sinks, and a torch to solder the cap banks in the WWMTM to the bus wire. And separate flux. Cleaning the copper is a must. I have a much better soldering setup now so might not need the torch.

                                  C
                                  Maybe this won't work, but I have a big Weller soldering iron that I was going to use to do this with. It's appears to get things pretty hot pretty quick. Not torch, quick, but still pretty quick. I used to have a locking pair of needle nose somewhere, that if for no other reason I could use a sink. I wonder where those are. ???? :scratchhead:

                                  CADman_ks
                                  CADman_ks
                                  - Stentorian build...
                                  - Ochocinco build...
                                  - BT speaker / sub build...

                                  Comment

                                  • ---k---
                                    Ultra Senior Member
                                    • Nov 2005
                                    • 5202

                                    #18
                                    I use a big Weller soldering gun now. Try it and see how it goes. We're probably being overly cautious. At least your not trying to weld 12GA wire to a tweeter. That would could be very very difficult. Solid wire might be easier than stranded.
                                    - Ryan

                                    CJD Ochocinco! ND140/BC25SC06 MTM & TM
                                    CJD Khanspires - A Dayton RS28/RS150/RS225 WMTMW
                                    CJD Khancenter - A Dayton RS28/RS150/RS180 WTMW Center

                                    Comment

                                    • cjd
                                      Ultra Senior Member
                                      • Dec 2004
                                      • 5568

                                      #19
                                      Originally posted by ---k---
                                      Solid wire might be easier than stranded.
                                      Sorta. 12ga isn't much fun to solder, ever. Stranded heats up the close strands very quickly, and once the solder flows it carries the heat, so it helps. But often as not you still get half a joint that's good, and half that's mediocre.

                                      The key for me is making sure I use solder only to hold the joints together, not to make the connection.

                                      The prettiest crossover layouts I've seen tend to use solder to actually make the connection - no twisting of wires prior, far too often. I test every crossover before I touch the solder. Do this, and it'll be fine.

                                      DO use a sink on caps. Because if you twist first, you can not heat up the copper and THEN touch the cap wire to the hot spot. Any old pliers with a rubber band around the handles can do the job.
                                      diVine Sound - my DIY speaker designs at diVine Audio

                                      Comment

                                      • CADman_ks
                                        Senior Member
                                        • Jan 2012
                                        • 497

                                        #20
                                        Originally posted by cjd
                                        ...

                                        The prettiest crossover layouts I've seen tend to use solder to actually make the connection - no twisting of wires prior, far too often. I test every crossover before I touch the solder. Do this, and it'll be fine.
                                        ...
                                        OH CRAP!!! This is how I made my Stent XO's. I used the solder to make the connection. As far as I can tell, the XO's are working, or should I say, the sound is coming out what appears to be good to me. I never thought that this would be a problem.

                                        But, if I don't actually use the solder to make the connection with the busbar, I don't see how else I would do it. In that case, I can't actually twist them together.

                                        Originally posted by cjd
                                        ...

                                        DO use a sink on caps. ...
                                        Good to know. I did not use a heat sink on my Stents, and probably should have. I did find those clamping pliers, so I can use them...

                                        CADman_ks
                                        CADman_ks
                                        - Stentorian build...
                                        - Ochocinco build...
                                        - BT speaker / sub build...

                                        Comment

                                        • CADman_ks
                                          Senior Member
                                          • Jan 2012
                                          • 497

                                          #21
                                          Last nights progress...

                                          I would have posted this last nite, but I couldn't get on. I don't know if it was my provider, or the site was down.

                                          Last nite I was able to get all of the main cabinet pieces completed. Now all I have to do is just assemble them. Supposed to be cold here over the next couple of days, so I'll either need to wait, or do it inside.

                                          I had to fix my router last nite before I could continue using that. I posted here that I was having troubles with it:

                                          DIY (Do it yourself): Cabinetry, speakers, subwoofers, crossovers, measurements. Jon and Thomas have probably designed and built as many speakers as any non-professionals. Who are we kidding? They are pros, they just don't do it for a living. This has got to be one of the most advanced places on the net to talk speaker building, period.


                                          I got the part a couple of weeks back, and I had never needed my router, up till now, so I put it in last nite. Here's what an electronic module looks like in a DW621, if you're never seen one:

                                          Click image for larger version  Name:	P3060041_opt.JPG Views:	4806 Size:	44.8 KB ID:	857336

                                          But one thing that does suck about life, is that it sucks getting old. I can't remember crap, anymore, or so it seems. I could NOT find my home-made circle cutter for my router. I KNEW where it was, and I knew where it was supposed to be, and it was not there. I "remembered", that I had put it some place "special" the last time that I used it, so that I didn't lose it. It was lost.

                                          BUT, as I searched around in vein, for the missing jig, I DID find those missing pipe clamps that don't have the pipe on them, and a bonus, I had TWO that were missing, not just one!!:


                                          Click image for larger version  Name:	P3060052_opt.JPG Views:	2506 Size:	64.4 KB ID:	857337

                                          I FINALLY did find the circle jig, and it was NOT where I thought that I had put it, and it really wasn't were it should have been. I don't really know what I was thinking when I put it where it was. After getting it set up for the new circle size, it worked pretty well. The rest of the evening was pretty uneventful.

                                          I could show you the pile of lumber, but it pretty much looks like the last pile, it just has some holes in it now...

                                          CADman_ks
                                          Last edited by theSven; 02 May 2023, 11:51 Tuesday. Reason: Update htguide url
                                          CADman_ks
                                          - Stentorian build...
                                          - Ochocinco build...
                                          - BT speaker / sub build...

                                          Comment

                                          • CADman_ks
                                            Senior Member
                                            • Jan 2012
                                            • 497

                                            #22
                                            Tool recommendation...

                                            I was using this tool last nite, and I thought that I would pass this along to others. You can take it or leave it.

                                            As I stated early on, I like to put cabs together with screws. But, one of the things that comes with that, is that you have to drill a LOT holes in the panels before you start, you our risk splitting out the MDF. Even I were using birch plywood, I would still pre-drill everything.

                                            One of the tools that I use to mark all of the holes with is an automatic center punch that I picked up from HarborFreight for a mere couple of bucks, literally:

                                            Click image for larger version

Name:	P3060038_opt.JPG
Views:	2701
Size:	48.6 KB
ID:	857338

                                            In order to use it, you just line up the point to the mark and push down. A spring loaded "action" in there drives the center punch into the wood:

                                            Click image for larger version

Name:	P3060036_opt.JPG
Views:	2455
Size:	57.2 KB
ID:	857339

                                            What you're left with, is a nice little "dent" in MDF, that grabs your drill point rather nicely and centers up the bit:

                                            Click image for larger version

Name:	P3060037_opt.JPG
Views:	2373
Size:	31.8 KB
ID:	857340

                                            Even if you don't use the screw together cab method, this is still a great tool to have in your arsenal. Puts a nice dimple in MDF or birch, and it's very quick to do a bunch of holes.

                                            CADman_ks
                                            Last edited by theSven; 09 March 2023, 20:17 Thursday. Reason: Update image location
                                            CADman_ks
                                            - Stentorian build...
                                            - Ochocinco build...
                                            - BT speaker / sub build...

                                            Comment

                                            • ---k---
                                              Ultra Senior Member
                                              • Nov 2005
                                              • 5202

                                              #23
                                              You might be old and forgetful, but you're once again making me feel guilty for sitting around watching tv and posting on internet forums instead of making progress on my speaker project. :T
                                              - Ryan

                                              CJD Ochocinco! ND140/BC25SC06 MTM & TM
                                              CJD Khanspires - A Dayton RS28/RS150/RS225 WMTMW
                                              CJD Khancenter - A Dayton RS28/RS150/RS180 WTMW Center

                                              Comment

                                              • CADman_ks
                                                Senior Member
                                                • Jan 2012
                                                • 497

                                                #24
                                                Originally posted by ---k---
                                                You might be old and forgetful, but you're once again making me feel guilty for sitting around watching tv and posting on internet forums instead of making progress on my speaker project. :T
                                                LOL... :W
                                                CADman_ks
                                                - Stentorian build...
                                                - Ochocinco build...
                                                - BT speaker / sub build...

                                                Comment

                                                • CADman_ks
                                                  Senior Member
                                                  • Jan 2012
                                                  • 497

                                                  #25
                                                  CAP tolerance???

                                                  I was getting ready to build my XO's tonite, and all of the sudden I realized that one of my resistors is a 16ohm, and not a 5!!

                                                  I don't understand. I have (4) 6ohm, which I need, but I have (3) 5ohm, and (1) 16ohm. I could understand if they read the 16 as a 6, but somehow it's in place of a 5.

                                                  So, at the minimum, that means I can't build at least one XO, until I get that replaced.

                                                  But, since I had the multi-meter out checking that, I decided that I should check all of the components.

                                                  The resistors are pretty close, and probably within tolerance.

                                                  The MET caps (4.77uF) are very close, and definitely within tolerance. However, the NP caps are much higher than what they are supposed to be. I have some 8uF that are running 9.5, and I have one 16uF that is running 19.4! Is this normal for NP's?, and can I get them replaced, or should I even worry about it? I don't think that I have one NP cap that is even inside of the tolerance that they state on the cap of +/- 5%.

                                                  CADman_ks
                                                  CADman_ks
                                                  - Stentorian build...
                                                  - Ochocinco build...
                                                  - BT speaker / sub build...

                                                  Comment

                                                  • cjd
                                                    Ultra Senior Member
                                                    • Dec 2004
                                                    • 5568

                                                    #26
                                                    NP caps do that. It's the main reason I recommend poly.
                                                    diVine Sound - my DIY speaker designs at diVine Audio

                                                    Comment

                                                    • CADman_ks
                                                      Senior Member
                                                      • Jan 2012
                                                      • 497

                                                      #27
                                                      Originally posted by cjd
                                                      NP caps do that. It's the main reason I recommend poly.
                                                      I take it that means that these will be OK to use, but obviously not ideal?

                                                      Is it really off that far, or is that my meter won't measure them correctly?

                                                      CADman_ks
                                                      CADman_ks
                                                      - Stentorian build...
                                                      - Ochocinco build...
                                                      - BT speaker / sub build...

                                                      Comment

                                                      • CADman_ks
                                                        Senior Member
                                                        • Jan 2012
                                                        • 497

                                                        #28
                                                        Crossover building nite...

                                                        ...well, at least a start. It did get cold(er) here tonight, so I moved operations inside.

                                                        I did finally manage to get one done. One of four, and at this point, I could only do three anyway, since I'm one resistor short now.

                                                        I gotta tell ya. I have no idea who the flippin' idiot was that suggested the idea of a busbar, but that guy has NO clue what he's talking about. :crazy:

                                                        All in all, I guess, once I got going, it's not really all that bad. The resistors in this crossover don't really lend themselves well to any kind of decent placement, so at the end of the day, I basically have the same layout as the original design, but with a busbar. :B

                                                        I personally think that my Stent XO's look better than these, but I guess they will have to do.

                                                        Here's a pic of the completed XO, and what the different circuits are for:

                                                        Click image for larger version

Name:	P3070053_opt.JPG
Views:	2423
Size:	80.1 KB
ID:	857341

                                                        Close-up of the completed job, including the now infamous 12GA busbar:

                                                        Click image for larger version

Name:	P3070056_opt.JPG
Views:	2384
Size:	63.9 KB
ID:	857342

                                                        CADman_ks
                                                        Last edited by theSven; 09 March 2023, 20:17 Thursday. Reason: Update image location
                                                        CADman_ks
                                                        - Stentorian build...
                                                        - Ochocinco build...
                                                        - BT speaker / sub build...

                                                        Comment

                                                        • CADman_ks
                                                          Senior Member
                                                          • Jan 2012
                                                          • 497

                                                          #29
                                                          Originally posted by CADman_ks
                                                          ...

                                                          I don't think that I have one NP cap that is even inside of the tolerance that they state on the cap of +/- 5%.

                                                          ...
                                                          I did find the owner's manual for my meter, and the tolerance on this range of capacitance values is +/- 3.5% for my meter. So, I guess that makes my TOTAL percentage that I could be off 8.5%.

                                                          Obviously, it's not a high dollar meter. Just one of those digital RadioShack models. I think that this is the first time that I've even tried reading capacitance.

                                                          The readings did come down a little bit after I changed the batteries in it as well. I didn't realize at first that the low battery indicator was on. But, even after changing batteries, they were all still higher than they should have been....

                                                          CADman_ks
                                                          CADman_ks
                                                          - Stentorian build...
                                                          - Ochocinco build...
                                                          - BT speaker / sub build...

                                                          Comment

                                                          • ---k---
                                                            Ultra Senior Member
                                                            • Nov 2005
                                                            • 5202

                                                            #30
                                                            I had the NPE caps in mine too. Mine were probably just as far off... or maybe not. I did NPE to hit a specific price point. But poly or mylar are a better.

                                                            If it were me, I would twist the crossovers together and listen to them. After I had listen to them and was satisfied with the sound, then I would solder them up. If something doesn't sound right, then consider upgrading the caps.
                                                            - Ryan

                                                            CJD Ochocinco! ND140/BC25SC06 MTM & TM
                                                            CJD Khanspires - A Dayton RS28/RS150/RS225 WMTMW
                                                            CJD Khancenter - A Dayton RS28/RS150/RS180 WTMW Center

                                                            Comment

                                                            • CADman_ks
                                                              Senior Member
                                                              • Jan 2012
                                                              • 497

                                                              #31
                                                              Originally posted by ---k---
                                                              I had the NPE caps in mine too. Mine were probably just as far off... or maybe not. I did NPE to hit a specific price point. But poly or mylar are a better.

                                                              If it were me, I would twist the crossovers together and listen to them. After I had listen to them and was satisfied with the sound, then I would solder them up. If something doesn't sound right, then consider upgrading the caps.
                                                              I knew that you had used the same caps, and that was part of my thought process as well, that yours were probably off as far as mine. CJD, also said that it was typical for NPE's to be off. I figured with all of this, it couldn't be that bad. Yours worked.

                                                              But, it's ultimately too late at this point, because I got all of the crossovers done tonight, except for the one that's still missing the resistor. And, I don't have drivers at this point, either, so I just went for it.

                                                              Here's the pics of the completed crossovers:

                                                              Click image for larger version

Name:	P3080060_opt.jpg
Views:	2374
Size:	93.7 KB
ID:	857343

                                                              CADman_ks
                                                              Last edited by theSven; 09 March 2023, 20:18 Thursday. Reason: Update image location
                                                              CADman_ks
                                                              - Stentorian build...
                                                              - Ochocinco build...
                                                              - BT speaker / sub build...

                                                              Comment

                                                              • BeerParty
                                                                Senior Member
                                                                • Oct 2008
                                                                • 475

                                                                #32
                                                                A small suggestion: you might want to put labels on the wires indicating which is input, tweet, and woofer. I just used some old address label material for mine.

                                                                Here is a photo showing one of my crossovers installed with the labels:
                                                                Click image for larger version

Name:	2011-10022stuffing.jpg
Views:	82
Size:	142.8 KB
ID:	929363
                                                                Last edited by theSven; 09 March 2023, 20:18 Thursday. Reason: Update image location
                                                                Chris

                                                                My Statement Monitors Build
                                                                My AviaTrix Build

                                                                Comment

                                                                • CADman_ks
                                                                  Senior Member
                                                                  • Jan 2012
                                                                  • 497

                                                                  #33
                                                                  Originally posted by BeerParty
                                                                  A small suggestion: you might want to put labels on the wires indicating which is input, tweet, and woofer. I just used some old address label material for mine.
                                                                  ...
                                                                  LOL!

                                                                  I did that on my Stents when I built them, and I'll do that here before I install these in the final boxes. At this point, I know EXACTLY which run is which.

                                                                  Over the last two nites, I've become pretty intimate with these things, especially after building (4) of them!!!

                                                                  You can see in the picture where I've at least marked the "+" side of the wires that I have ran at the moment. That will at least keep me from figuring that out later on as well...

                                                                  CADman_ks
                                                                  CADman_ks
                                                                  - Stentorian build...
                                                                  - Ochocinco build...
                                                                  - BT speaker / sub build...

                                                                  Comment

                                                                  • CADman_ks
                                                                    Senior Member
                                                                    • Jan 2012
                                                                    • 497

                                                                    #34
                                                                    Have you seen my missing crown stapler???

                                                                    LOL!!!

                                                                    I have quite a few tools. And, since I don't need them ALL, ALL the time, I make it known to people that they are free to borrow them from me anytime they want, as long as I don't need them. And, I don't mind at all lending them out, because I'm not using them. I don't demand that people bring them back after 1 day, nor do I charge them rent, or expect anything out of them. Somebody might as well use them when I'm not.

                                                                    But the real problem is, again, I'm getting old. And to that end, I can't remember who I let borrow this damn thing, so now when I need it, I have no clue who to call to see if they are done with it. And to make matters worse, I actually don't remember lending this thing to anyone, so now I'm concerned that it's truly lost somewhere. But, I have no idea where that could be either. I just flat out don't know. :M

                                                                    I have started labeling all of my tools at least, but that doesn't help ME remember where they are at. That's just a reminder to the guy that has it, that it's mine. I've kidded myself about setting up a tool checkout sheet in the shop, and I'm seriously thinking that I might need to do that.

                                                                    Man, I hate the fact that I can't remember who in the world has this stupid thing, or where it might be...

                                                                    DO YOU HAVE MY MISSING STAPLER? Call 1-800-MISSING-CRAP at your earliest convenience.

                                                                    CADman_ks
                                                                    CADman_ks
                                                                    - Stentorian build...
                                                                    - Ochocinco build...
                                                                    - BT speaker / sub build...

                                                                    Comment

                                                                    • cjd
                                                                      Ultra Senior Member
                                                                      • Dec 2004
                                                                      • 5568

                                                                      #35
                                                                      One thing I just remembered about these particular Dayton drivers: make sure that they naturally seat fully - you may have to knock down the edge of the driver cutout as there's a small blip in the frame right before it goes to the basket.

                                                                      I've stopped lending out my tools. I can't even put them away properly myself, and lose them. I don't know how many pairs of flush cutters I have now.

                                                                      C
                                                                      diVine Sound - my DIY speaker designs at diVine Audio

                                                                      Comment

                                                                      • CADman_ks
                                                                        Senior Member
                                                                        • Jan 2012
                                                                        • 497

                                                                        #36
                                                                        Originally posted by cjd
                                                                        One thing I just remembered about these particular Dayton drivers: make sure that they naturally seat fully - you may have to knock down the edge of the driver cutout as there's a small blip in the frame right before it goes to the basket.
                                                                        ....
                                                                        That's good to know. That should be easy to do if I need to do that. I did look at the print, and I think that the size that was on the drawing should allow it to drop in. But there might be some part of the basket that's not shown on the drawing.

                                                                        CADman_ks
                                                                        CADman_ks
                                                                        - Stentorian build...
                                                                        - Ochocinco build...
                                                                        - BT speaker / sub build...

                                                                        Comment

                                                                        • BeerParty
                                                                          Senior Member
                                                                          • Oct 2008
                                                                          • 475

                                                                          #37
                                                                          Originally posted by CADman_ks
                                                                          Over the last two nites, I've become pretty intimate with these things, especially after building (4) of them!!!
                                                                          I know exactly how you feel...

                                                                          The 5 crossovers I build for my AviaTrix build:
                                                                          Click image for larger version

Name:	2011-09028crossovers.jpg
Views:	166
Size:	138.6 KB
ID:	929364
                                                                          Last edited by theSven; 09 March 2023, 20:19 Thursday. Reason: Update image location
                                                                          Chris

                                                                          My Statement Monitors Build
                                                                          My AviaTrix Build

                                                                          Comment

                                                                          • CADman_ks
                                                                            Senior Member
                                                                            • Jan 2012
                                                                            • 497

                                                                            #38
                                                                            Originally posted by BeerParty
                                                                            I know exactly how you feel...

                                                                            The 5 crossovers I build for my AviaTrix build:
                                                                            LOL!!

                                                                            Nice lookin' crossovers.

                                                                            You're labeling puts me to shame.

                                                                            CADman_ks
                                                                            Last edited by theSven; 09 March 2023, 20:19 Thursday. Reason: Update image location
                                                                            CADman_ks
                                                                            - Stentorian build...
                                                                            - Ochocinco build...
                                                                            - BT speaker / sub build...

                                                                            Comment

                                                                            • CADman_ks
                                                                              Senior Member
                                                                              • Jan 2012
                                                                              • 497

                                                                              #39
                                                                              Urgent!! Update!!

                                                                              Originally posted by CADman_ks
                                                                              ...

                                                                              DO YOU HAVE MY MISSING STAPLER? Call 1-800-MISSING-CRAP at your earliest convenience.

                                                                              ...
                                                                              WOOHOO!!! The prodigal stapler has returned. Well, it's not technically home yet, but it is in the family.

                                                                              It's in hiding at the father-in-laws.

                                                                              I called him on a whim, because I DO remember letting him use it. BUT, that was ages ago, and I would have figured that I would have needed since then. He didn't think he had it, but he would look. Sure enough, he still had it from this project that we did over at his house a long time ago!

                                                                              Anyhow, at least I know where it is now. Now, I just need to go over there and get it, before I forget where it's at AGAIN!!!

                                                                              CADman_ks
                                                                              CADman_ks
                                                                              - Stentorian build...
                                                                              - Ochocinco build...
                                                                              - BT speaker / sub build...

                                                                              Comment

                                                                              • CADman_ks
                                                                                Senior Member
                                                                                • Jan 2012
                                                                                • 497

                                                                                #40
                                                                                Glued and screwed...

                                                                                Today, I was able to get my boxes completed in the rough. I still need to trim the fronts and backs, since they were oversized, and after that I need to fill holes and sand smooth.

                                                                                Here's some pics of today's progress...

                                                                                It's kind of hard to tell in this picture, but my joints are very square. It does pay to take the time to get everything 90deg BEFORE you start:

                                                                                Click image for larger version

Name:	P3100066_opt.JPG
Views:	1048
Size:	53.3 KB
ID:	857347

                                                                                Other end of tri-square:

                                                                                Click image for larger version

Name:	P3100065_opt.JPG
Views:	1133
Size:	52.1 KB
ID:	857348

                                                                                Also, when everything is square, you end up with boxes that are square as well. These measurements are from one corner to the other, and then opposing corners. This particular box, they are identical. All (4) of the boxes were +/- .03 from the measurement that you see here, and no one box was more than about .04 out corner to corner:

                                                                                Dimension 1:

                                                                                Click image for larger version

Name:	P3100072_opt.JPG
Views:	1060
Size:	44.8 KB
ID:	857349

                                                                                Dimension 2:

                                                                                Click image for larger version

Name:	P3100073_opt.JPG
Views:	1076
Size:	46.1 KB
ID:	857350

                                                                                (continued in next post)...
                                                                                Last edited by theSven; 09 March 2023, 20:20 Thursday. Reason: Update image location
                                                                                CADman_ks
                                                                                - Stentorian build...
                                                                                - Ochocinco build...
                                                                                - BT speaker / sub build...

                                                                                Comment

                                                                                • CADman_ks
                                                                                  Senior Member
                                                                                  • Jan 2012
                                                                                  • 497

                                                                                  #41
                                                                                  Glued and screwed (continued)...

                                                                                  Here's a picture of the boxes with all the sides on, and the tops off. I finished machining the remaining parts for the accent pieces while these dried a little bit before I put the tops on:

                                                                                  Click image for larger version

Name:	P3100075_opt.JPG
Views:	1132
Size:	53.6 KB
ID:	857351

                                                                                  Everything that you see there was done with this ONE clamp, and I could have done it without this clamp, if I would have had to. The clamp just made life a little bit easier. The only time that I ever used the clamp was when the side pieces were splayed OUT instead of in. In that case, I would put the clamp on there to tighten it up, so that I didn't have to hold all of that with my hands. On the cabinet where the sides were splayed in slightly, I would need to bow them out to get the other side in, and in that case, a clamp is not needed:

                                                                                  Click image for larger version

Name:	2012-03-10_16-24-46_37_opt.jpg
Views:	1109
Size:	92.0 KB
ID:	857352

                                                                                  And here is the picture of the all-glued up cabinets:

                                                                                  Click image for larger version

Name:	P3100076_opt.JPG
Views:	1041
Size:	49.6 KB
ID:	857353

                                                                                  I said in one of my earlier posts that I personally like the screw together method. With this method, you can build a cabinet really really quickly. Yes, you might have to do a little more finishing later on, but, getting to completely glued cabinets can happen pretty quickly.

                                                                                  I did everything that you see in the first picture in 2 hours. I left them dry in this state for about an hour, before I put the fronts on. It then took me 30 minutes to put the 4 fronts on.

                                                                                  So, in 2 1/2 hours, I was able to build (4) completely glued cabinets. Because the screws hold panels in position, and are NOT in your way like clamps, you don't have to wait for the glue to completely dry before moving onto the next step. And, on top of that, I was NOT hurrying at all to get this complete. I was taking my time, and making sure that pieces were lined up before I screwed them together, and I test fit both the tops and bottoms, so that actually took additional time. In my case, because I knew pretty much how square my cabinets were, I probably could have skipped the dry fitting step, but I wanted to get a feel on each piece how much was hanging over before I screwed it on. I did NOT measure any of that, I just used my fingers to make it feel like the extra hanging off was about the same all the way around.

                                                                                  I really like this method, and I think that it's a nice method if you're someone who has a limited tool budget, and you don't want to blow your budget just on clamps. It's also a good way to try out a hobby that you may find you don't like. In that case, you wouldn't have broke the bank buying clamps that you may never use again. But, I realize that there's not much chance of that happening either, since this hobby is actually pretty addicting...

                                                                                  YMMV...

                                                                                  CADman_ks
                                                                                  Last edited by theSven; 09 March 2023, 20:21 Thursday. Reason: Update image location
                                                                                  CADman_ks
                                                                                  - Stentorian build...
                                                                                  - Ochocinco build...
                                                                                  - BT speaker / sub build...

                                                                                  Comment

                                                                                  • ---k---
                                                                                    Ultra Senior Member
                                                                                    • Nov 2005
                                                                                    • 5202

                                                                                    #42
                                                                                    Those look great! It is going to be painful to wait until May for the drivers.

                                                                                    I agree that the glue and screw method can be a lot quicker. I did my brother's with a brad nailer and it went really fast.
                                                                                    - Ryan

                                                                                    CJD Ochocinco! ND140/BC25SC06 MTM & TM
                                                                                    CJD Khanspires - A Dayton RS28/RS150/RS225 WMTMW
                                                                                    CJD Khancenter - A Dayton RS28/RS150/RS180 WTMW Center

                                                                                    Comment

                                                                                    • CADman_ks
                                                                                      Senior Member
                                                                                      • Jan 2012
                                                                                      • 497

                                                                                      #43
                                                                                      Originally posted by ---k---
                                                                                      Those look great! It is going to be painful to wait until May for the drivers.

                                                                                      ....
                                                                                      You aren't kiddin'... :M

                                                                                      Originally posted by ---k---
                                                                                      ... I did my brother's with a brad nailer and it went really fast.
                                                                                      I can't speak directly to this, because I haven't done this large scale, but I had an issue using brads with MDF, and so I didn't try anymore. I was going to put my braces in with staples originally (remember the prodigal stapler story?), but switched to brads because I figured that would work just as good for what it had to do.

                                                                                      Just holding the pieces together, and nailing it, the brad woudl actually slightly push the brace away from the outer panel, leaving me with a small gap in there. I ended up changing to screws then to hold it together.

                                                                                      I wonder is MDF isn't so dense that the nail has a hard time going in there, and so it starts pushing it apart? I've done this same thing a LOT with wood, and I've never really had this same problem. Maybe it was just the way that I was holding it, and since I couldn't really grap it, I couldn't put enough pressure on it to keep there???

                                                                                      I don't know. It's all speculation on my part, because I only tested with one part basically...

                                                                                      CADman_ks
                                                                                      CADman_ks
                                                                                      - Stentorian build...
                                                                                      - Ochocinco build...
                                                                                      - BT speaker / sub build...

                                                                                      Comment

                                                                                      • CADman_ks
                                                                                        Senior Member
                                                                                        • Jan 2012
                                                                                        • 497

                                                                                        #44
                                                                                        Originally posted by CADman_ks
                                                                                        ...

                                                                                        I said in one of my earlier posts that I personally like the screw together method. With this method, you can build a cabinet really really quickly. Yes, you might have to do a little more finishing later on, but, getting to completely glued cabinets can happen pretty quickly.

                                                                                        ...
                                                                                        I just remembered something that I was going to add this yesterday and forgot.

                                                                                        I think that this method would / should work as well with birch ply. One thing, though, that I would caution you about, is that the edges may "wonder" around a little bit. When you try to predill the holes for the screws in the mating panel, the drill bit may find it's home in the middle of one of the layers, and that may not be where you really want to be. You might want your drill bit to be in exactly where the two layers come together.

                                                                                        I've never used screws to build speakers, but I have done it with other projects and birch ply, and I've experienced this.

                                                                                        That is one of the nice things about using screws with MDF. It won't move around on you, since the MDF is one "solid" piece.

                                                                                        Again, YMMV...

                                                                                        CADman_ks
                                                                                        CADman_ks
                                                                                        - Stentorian build...
                                                                                        - Ochocinco build...
                                                                                        - BT speaker / sub build...

                                                                                        Comment

                                                                                        • CADman_ks
                                                                                          Senior Member
                                                                                          • Jan 2012
                                                                                          • 497

                                                                                          #45
                                                                                          I just had one of those epiphanous moments when I realized that we have ONE more hour of daylight, (Well not technically, but I get one more hour AFTER I get off of work, is maybe a better way to put it) AND, to top it off, the weather is outstanding here today.

                                                                                          Tonight will be the first time that I've actually been able to work on / build speakers outdoors!

                                                                                          I'm looking forward to that...

                                                                                          CADman_ks
                                                                                          CADman_ks
                                                                                          - Stentorian build...
                                                                                          - Ochocinco build...
                                                                                          - BT speaker / sub build...

                                                                                          Comment

                                                                                          Working...
                                                                                          😀
                                                                                          😂
                                                                                          🥰
                                                                                          😘
                                                                                          🤢
                                                                                          😎
                                                                                          😞
                                                                                          😡
                                                                                          👍
                                                                                          👎
                                                                                          Searching...Please wait.
                                                                                          An unexpected error was returned: 'Your submission could not be processed because you have logged in since the previous page was loaded.

                                                                                          Please push the back button and reload the previous window.'
                                                                                          An unexpected error was returned: 'Your submission could not be processed because the token has expired.

                                                                                          Please push the back button and reload the previous window.'
                                                                                          An internal error has occurred and the module cannot be displayed.
                                                                                          There are no results that meet this criteria.
                                                                                          Search Result for "|||"