Woodworking advice...

Collapse
This is a sticky topic.
X
X
 
  • Time
  • Show
Clear All
new posts
  • Steve Manning
    Moderator
    • Dec 2006
    • 1886

    #46
    Practising what you preach .......

    Well after suggesting to Jon that he add an Oneida Cyclone to his dust collecting setup, I did just that myself. I got the Super Dust Deputy for my birthday and added it as a pre-stage to my Delta dust collector. All I can say is, get one if you already have a single stage unit. I used the setup for the first time yesterday, planing and jointing some cypress lumber. No clogging at all, a first, and no dust in the filter bag, meaning the filter will stay clean far longer, with less mess on the floor overall. Well worth the investment even though you loose a little floor space.

    I mounted both the Delta and cyclone on a new platform that's on wheels and it actually rolls around nicer than the Delta did by itself. Here's a few pic's of how it turned out .....

    Click image for larger version

Name:	DSC_0760_resize.jpg
Views:	1
Size:	36.3 KB
ID:	858620

    Click image for larger version

Name:	DSC_0764_resize.JPG
Views:	1
Size:	77.3 KB
ID:	858621

    Click image for larger version

Name:	DSC_0772_resize.jpg
Views:	1
Size:	45.4 KB
ID:	858622
    Hold on to your butts - It's about to get Musical!


    WEBSITE: http://www.smjaudio.com/

    Comment

    • Steve Manning
      Moderator
      • Dec 2006
      • 1886

      #47
      Custom bevels on round surfaces ..... Pt1

      Not sure of how much interest there might be in this, but I figured for those that might be making speaker stands with a round base and want to bevel the edge, this might be useful for you. I'm making a small stand for my remotes to sit next to my listening chair and needed to put a bevel on a couple of edges. The angles are non standard, so you either make them standard and buy a big router bit or come up with another way of making your non standard bevel. This is what I came up with for my table saw that I considered to have a very low finger removal potential ......

      Make a fixture that will straddle your rip fence .....

      Click image for larger version

Name:	DSC_1510_resize.JPG
Views:	1
Size:	81.5 KB
ID:	859231

      The angle that the large "face" is attached at is the same as your desired bevel, which is completely up to you ....

      Click image for larger version

Name:	DSC_1512_resize.jpg
Views:	1
Size:	43.5 KB
ID:	859232

      I made circle templets initially to make my circles using my Jasper circle gig which leaves an 1/8" hole in it's center.

      Click image for larger version

Name:	DSC_1513_resize.jpg
Views:	1
Size:	31.3 KB
ID:	859233

      I ran a nail (could use a screw or whatever, the disc needs to rotate when done) through the hole into the center of the jig face, which should also be aligned with the center of your saw blade.

      Click image for larger version

Name:	DSC_1515_resize.JPG
Views:	1
Size:	85.0 KB
ID:	859234

      I then marked a line on the edge of my board to give me what I wanted left as an edge. With double stick carpet tape I attached my board to the nailed disc. You then line up your mark with the blade teeth. When your done lock down your fence and have the jig clamped in place so it does not move. Make sure your blade is not making contact with the work piece and check the rotation of the disc, you will be rotating into the blades rotation, CW if you look at it from the side.

      Click image for larger version

Name:	DSC_1518_resize.JPG
Views:	1
Size:	72.7 KB
ID:	859235
      Hold on to your butts - It's about to get Musical!


      WEBSITE: http://www.smjaudio.com/

      Comment

      • Steve Manning
        Moderator
        • Dec 2006
        • 1886

        #48
        Custom bevels on round surfaces ..... Pt 2

        Be forewarned this is going to make a mess! Turn on the saw a raise the blade until it contacts the work piece, rotate the disc, (again into the blade), raise the blade (I did one turn on the crank), spin the disc, repeat , repeat, etc., until you cut all the way through. The first one I cut I had to stop and remove my riving knife since it started rubbing the wood and stopped things from turning, so I would remove that before you start (pinching is not an issue so this not a safety issue). That stopping and resetting up gave me a fair bit of burning (also using cherry), but the second disc was much cleaner.


        Click image for larger version

Name:	DSC_1521_resize.JPG
Views:	1
Size:	87.7 KB
ID:	859236

        Click image for larger version

Name:	DSC_1525_resize.JPG
Views:	1
Size:	86.2 KB
ID:	859237

        Some of the mess even with the dust collector running .....

        Click image for larger version

Name:	DSC_1526_resize.jpg
Views:	1
Size:	53.9 KB
ID:	859238

        After some clean up with a scraper and some sanding. The two discs are 9.5" and 12" in dia. The bevel is at 18 degrees.

        Click image for larger version

Name:	DSC_1529_resize.JPG
Views:	1
Size:	79.2 KB
ID:	859239
        Hold on to your butts - It's about to get Musical!


        WEBSITE: http://www.smjaudio.com/

        Comment

        • BobEllis
          Super Senior Member
          • Dec 2005
          • 1609

          #49
          Thanks for that, Steve.

          Comment

          • JonMarsh
            Mad Max Moderator
            • Aug 2000
            • 15272

            #50
            Pretty cool, Steve! Better not let GF see that, or she'll come up with something interesting for me to do with that technique!
            the AudioWorx
            Natalie P
            M8ta
            Modula Neo DCC
            Modula MT XE
            Modula Xtreme
            Isiris
            Wavecor Ardent

            SMJ
            Minerva Monitor
            Calliope
            Ardent D

            In Development...
            Isiris Mk II updates- in final test stage!
            Obi-Wan
            Saint-Saëns Symphonique/AKA SMJ-40
            Modula PWB
            Calliope CC Supreme
            Natalie P Ultra
            Natalie P Supreme
            Janus BP1 Sub


            Resistance is not futile, it is Volts divided by Amperes...
            Just ask Mr. Ohm....

            Comment

            • Steve Manning
              Moderator
              • Dec 2006
              • 1886

              #51
              Recommended Finish

              I thought I would pass along to those looking for an easy finish to work with. I just finished building a small table for remotes and beverages for my room and went the spray route for the first time. I used some of this finish for the first time as well. Since it's waterborne it was super easy to work with ...... cleanup was at the end of the day and consisted of running a can of hot water through the sprayer and your done, no nasty fumes or any of that mess. It has a quick drying time 45 minutes or so and your ready to sand and spray the next coat. By the end of the day you can have 5 coats of finish and your done. It also does not yellow the wood as is typical with an oil base finish.

              Here's a few pictures of how it turned out .....


              Click image for larger version

Name:	DSC_1544_resize.JPG
Views:	1
Size:	94.0 KB
ID:	859370

              Click image for larger version

Name:	DSC_1549_resize.jpg
Views:	1
Size:	39.0 KB
ID:	859371

              Click image for larger version

Name:	DSC_1551_resize.jpg
Views:	1
Size:	41.8 KB
ID:	859372

              Click image for larger version

Name:	DSC_1568_resize.jpg
Views:	1
Size:	28.7 KB
ID:	859373
              Hold on to your butts - It's about to get Musical!


              WEBSITE: http://www.smjaudio.com/

              Comment

              • JonMarsh
                Mad Max Moderator
                • Aug 2000
                • 15272

                #52
                I'd looked at that General Finishes product once before and wondered how it was- thanks for posting your comments.

                Now, about the table- how about a few comments on the design and construction? If GF sees this, she'll want me building a few of them!
                the AudioWorx
                Natalie P
                M8ta
                Modula Neo DCC
                Modula MT XE
                Modula Xtreme
                Isiris
                Wavecor Ardent

                SMJ
                Minerva Monitor
                Calliope
                Ardent D

                In Development...
                Isiris Mk II updates- in final test stage!
                Obi-Wan
                Saint-Saëns Symphonique/AKA SMJ-40
                Modula PWB
                Calliope CC Supreme
                Natalie P Ultra
                Natalie P Supreme
                Janus BP1 Sub


                Resistance is not futile, it is Volts divided by Amperes...
                Just ask Mr. Ohm....

                Comment

                • Steve Manning
                  Moderator
                  • Dec 2006
                  • 1886

                  #53
                  Originally posted by JonMarsh
                  Now, about the table- how about a few comments on the design and construction? If GF sees this, she'll want me building a few of them!
                  Let me scale down a few pictures and I'll get them posted.
                  Hold on to your butts - It's about to get Musical!


                  WEBSITE: http://www.smjaudio.com/

                  Comment

                  • Steve Manning
                    Moderator
                    • Dec 2006
                    • 1886

                    #54
                    Table Details

                    Jon ....... Basic design concept for the table was to go with something just big enough to hold remotes and a drink while listening since I had removed the coffee table from in front of the listening position. I think the Seattle space needle must of been on my mind as well, since it sort of has similar lines? The table is only 21" tall, top is 12" in diameter and the bottom is 9.5", both are an inch thick. The woods I used were cherry and maple, obviously what ever floats your boat in that department.

                    Laminated 2 boards together for top and bottom to get required width, matching grain patterns as best a possible. Used jasper jig to cut required disc diameters for flush routing. See prior pictures for how to bevel the discs edges, pick what ever angle you want, I used ~17 degrees as I recall and left ~3/8" of an edge .......

                    Click image for larger version

Name:	DSC_1507_resize.JPG
Views:	1
Size:	84.1 KB
ID:	859386

                    Used dowels to hold things together .......

                    Click image for larger version

Name:	DSC_1533_resize.JPG
Views:	1
Size:	99.4 KB
ID:	859384

                    Center column was glued up first .....

                    Click image for larger version

Name:	DSC_1534_resize.jpg
Views:	1
Size:	47.7 KB
ID:	859385

                    Top and bottom were attached one at a time to insure squareness .....

                    Click image for larger version

Name:	DSC_1539_resize.jpg
Views:	1
Size:	52.8 KB
ID:	859387

                    That's the readers digest of things. I did a SketchUp drawing first to get proportions right visually and that gave me all the dimensions I needed while I was at it. Let me know if you have any questions and if your GF really wants some and your too busy with all those speakers projects my rates are pretty cheap
                    Hold on to your butts - It's about to get Musical!


                    WEBSITE: http://www.smjaudio.com/

                    Comment

                    • JonMarsh
                      Mad Max Moderator
                      • Aug 2000
                      • 15272

                      #55
                      Hey, that looks really cool! :T

                      Thanks for posting so much detail- it gives me ideas about how to proceed, and of course I can use my own CAD tools to model it first. OK, I just scrolled up further and saw the part about how you did the bevels... tricky, but clever!
                      the AudioWorx
                      Natalie P
                      M8ta
                      Modula Neo DCC
                      Modula MT XE
                      Modula Xtreme
                      Isiris
                      Wavecor Ardent

                      SMJ
                      Minerva Monitor
                      Calliope
                      Ardent D

                      In Development...
                      Isiris Mk II updates- in final test stage!
                      Obi-Wan
                      Saint-Saëns Symphonique/AKA SMJ-40
                      Modula PWB
                      Calliope CC Supreme
                      Natalie P Ultra
                      Natalie P Supreme
                      Janus BP1 Sub


                      Resistance is not futile, it is Volts divided by Amperes...
                      Just ask Mr. Ohm....

                      Comment

                      • bostonmurf
                        Senior Member
                        • Jul 2014
                        • 170

                        #56
                        a little tip i found useful, if you need to drill accurate straight holes and dont have a drill press ive been using this http://www.amazon.com/gp/product/B00...?ie=UTF8&psc=1
                        works wonders for mounting speakers or spikes.
                        Attached Files

                        Comment

                        • Renron
                          Senior Member
                          • Jan 2008
                          • 749

                          #57
                          To help keep boards (and sawdust) from sticking to your tablesaw, give it a double coat of johnson's past wax. The one in the yellow can. Make sure the first coat is dry, buff it off and apply the second coat, buff it off when it dries too. It won't transfer to the wood and it really helps the wood slide without sticking. I use it on my Table saw blades too. BTW, the BEST blade I've ever owned is a Forrest blade, very expensive but worth it, stays sharp longer and cuts clean enough that no sanding is usually needed on that cut edge.

                          Couple of thoughts on finishes while I'm at it. Dewaxed shellac sticks to everything and is compatible with every type of finish. Great prep/ pre stain sealer. Really helps out with blotching woods like Alder and Cherry.
                          Buy a decent HVLP spray gun, can be a turbine or compressed air delivery system. Practice on scrap, not the final piece!
                          I use glossy finishes for all my under coats. If I want a matte or semi-gloss look, that's what goes on last. Gloss coats allow the grain to show through better and provides a deeper looking finish.
                          95% of the time I use water based finishes, they dry quicker (more coats) and clean up is much easier. (Don't have to worry about the water heater blowing you up either) General Finishes is my preferred WB, but Target Coatings comes in a close second.
                          Ardent TS

                          Comment

                          • knowledgebass
                            Senior Member
                            • May 2013
                            • 159

                            #58
                            Here's some more, 'right tool for the job' advice. Use a centering bit to align your driver holes. I used one like this:
                            Shop Woodworking Hand & Power Tools Collection on Lee Valley. Browse our selection of Reliable Tools for any Woodworking project.


                            The resulting holes weren't deep enough (the bits I linked to are meant for pre-drilling small hinges) and I had to then drill again with a conventional bit to get a reasonable depth. However, the starter holes and subsequent overdrilling was perfectly aligned in the center of the woofer holes and no damage was done to the woofer. I didn't know these existed until I came across someone using them in a Tech Talk thread, so maybe helpful to some people here. $7 well spent for me.

                            Comment

                            • JonMarsh
                              Mad Max Moderator
                              • Aug 2000
                              • 15272

                              #59
                              Nice tool, and thanks for the recommendation! :T
                              the AudioWorx
                              Natalie P
                              M8ta
                              Modula Neo DCC
                              Modula MT XE
                              Modula Xtreme
                              Isiris
                              Wavecor Ardent

                              SMJ
                              Minerva Monitor
                              Calliope
                              Ardent D

                              In Development...
                              Isiris Mk II updates- in final test stage!
                              Obi-Wan
                              Saint-Saëns Symphonique/AKA SMJ-40
                              Modula PWB
                              Calliope CC Supreme
                              Natalie P Ultra
                              Natalie P Supreme
                              Janus BP1 Sub


                              Resistance is not futile, it is Volts divided by Amperes...
                              Just ask Mr. Ohm....

                              Comment

                              • Steve Manning
                                Moderator
                                • Dec 2006
                                • 1886

                                #60
                                Originally posted by knowledgebass
                                Here's some more, 'right tool for the job' advice. Use a centering bit to align your driver holes. I used one like this:
                                Shop Woodworking Hand & Power Tools Collection on Lee Valley. Browse our selection of Reliable Tools for any Woodworking project.


                                The resulting holes weren't deep enough (the bits I linked to are meant for pre-drilling small hinges) and I had to then drill again with a conventional bit to get a reasonable depth. However, the starter holes and subsequent overdrilling was perfectly aligned in the center of the woofer holes and no damage was done to the woofer. I didn't know these existed until I came across someone using them in a Tech Talk thread, so maybe helpful to some people here. $7 well spent for me.
                                I've been wanting to pick up a set of these ....... I've been using a set of these in the mean time that work rather well for getting things lined up. http://www.harborfreight.com/28-piec...-set-3577.html
                                Hold on to your butts - It's about to get Musical!


                                WEBSITE: http://www.smjaudio.com/

                                Comment

                                • JonP
                                  Senior Member
                                  • Apr 2006
                                  • 690

                                  #61
                                  Wow, if you get that many, graded that fine, (64ths?!?) for that little... a pretty good alternative for accurate drill marking.

                                  Knowledgebass... a neat suggestion, think I'll get some as well. FYI for everybody, I just noticed that Eagle, the company of a thousand router bits, (and more stuff) has similar ones for a buck more, price for 3 sizes the same... but it's hard to say which one is the better: http://www.eagleamerica.com/product/...s_and_hardware

                                  And, while I'm on Eagle, they sent me a email a little while ago, they have some "buyout" Bosch bits, selling out fast, now down to only two in the collection. I got the laminate (really a short flush trim bit) and the flat end 1/2" diameter. (now sold out) Where can you get any bit for 3 for $10? http://www.eagleamerica.com/product/...m_medium=email Don't wait if interested, there were 4 types available about 6-7 days ago...

                                  Comment

                                  • Steve Manning
                                    Moderator
                                    • Dec 2006
                                    • 1886

                                    #62
                                    Sealing MDF

                                    For those of us that are still using mdf and still putting up with how to seal it before finishing ....... I ran across this today and figured I'd pass it along. http://www.rustoleum.com/product-cat...surface-sealer I have not tried it yet myself but from what I've found, it seems to do a very good job at sealing mdf as well as drywall issues.
                                    Hold on to your butts - It's about to get Musical!


                                    WEBSITE: http://www.smjaudio.com/

                                    Comment

                                    • knowledgebass
                                      Senior Member
                                      • May 2013
                                      • 159

                                      #63
                                      Here's my wet sanding how-to/experience from my Ansonica build. Remember if you sanding or scraping you're probably making dust. Doing this stuff by hand in some ways is cleaner than using the powered equivalents, but you should still wear a mask to protect your lungs (and something on your eyes isn't a bad idea either!).

                                      How do you get a professional result if you don't have professional tools? Well, my Ansonica finish was all hand applied. Spray equipment and sanding gear would have definitely moved things a long quicker but I'm extremely pleased with what I accomplished here. I've done a few wood working projects, all but the Ansonica are non-speaker related, and some still don't have finish on them, but this is likely my best finishing work yet. I'm a hobbiest and incrementally my wood working (and knowledge) improves with each piece I complete. I have to say that wet sanding was a quantum advance in my finishing process. Pieces I've done without wet sanding still look good at a few feet, but compared to this finish, it's just obvious the wet sanding has resulted in a closer to perfect result. I think I'll use this technique on all of my wood working projects now.

                                      The photos I'm posting are from the doors used to seal up the backs of my speakers. I just happened to get photos of the doors at each stage. I started with veneering the baltic birch plywood. It's bad enough that the backs will rarely be seen once the speakers are in place, but the inside doors will definitely never be seen but it was also my first time veneering so it was good practice. My doors are unsupported so I had to veneer both sides (more practice). In a box, corners support the flat pieces so it can't curl and so you don't need to veneer the inside of a box. I treated both sides of each door the same for practice, and to prevent the doors from curving.

                                      I won't cover how to do it here, but you've followed one of the zillion guides for veneering, or you've got some nice figure on your plywood, now you need to make that veneer pop. So you've selected your preferred finish (General Finishes water base poly in my case) and you get right to applying it. Well, if you have an open grain wood like my veneer then you can count on applying approximately 100 coats to get a smooth finish (common examples would be oak for open, maple for closed grain). Or, you can use a grain filler, something that is meant to level the wood surface. There are many products sold for this purpose, but I used an epoxy meant for surface finishing. Epoxy is pretty difficult to sand. I went through scraping the surface with cabinet scrapers, and then sanding, using something like 20 sheets of 180 grit. Wet sanding should work well here as well and probably use less paper if you can find it with an appropriate grit. What I didn't want was a super thick finish making my wood look like plastic.

                                      So here's the veneer before filling (the one picture not of the doors). If you look toward the bottom of the photo near the centre there's a rough looking patch that is the open grain of the wood.

                                      Click image for larger version

Name:	14432495855_840b442c0f_z.jpg
Views:	93
Size:	111.8 KB
ID:	939808

                                      And after epoxy, nice and shiny but not at all smooth.

                                      Click image for larger version

Name:	14801120691_cff2ac9c5c_z.jpg
Views:	93
Size:	103.7 KB
ID:	939809

                                      So I did the primary prep work with a scraper to knock down the high spots. The cabinet scraper would just kind of peel thin layers of epoxy off.

                                      Click image for larger version

Name:	14617572349_b62a45fb96_z.jpg
Views:	94
Size:	103.2 KB
ID:	939810

                                      A closeup of the 'curls.' You can see the 'white' areas are the high points that have been knocked back.

                                      Click image for larger version

Name:	14824069123_51b80808e6_z.jpg
Views:	93
Size:	107.2 KB
ID:	939811

                                      Next up is 180 sand paper on the epoxy, and as soon as I had something resembling flat I switched to 240. Wet sanding here probably wouldn't be a bad idea. I went through a lot of paper. The epoxy really builds on standard paper quickly.

                                      Click image for larger version

Name:	14801864074_4cfa7bb69a_z.jpg
Views:	95
Size:	80.3 KB
ID:	939812

                                      A this point you're ready to start your finishing schedule. I now wish I had done another coat of epoxy. There were a couple high spots I sanded through and I'm likely the only one that would find them now but it would have probably resulted in a better finish.
                                      First up on my schedule was shellac. Honestly. A few coats of this is a perfectly fine finish. And a lot of my next steps are getting back to something that looks like this after putting on some poly. Shellac is just not as durable on its own.

                                      Click image for larger version

Name:	14617609568_298fbbc155_z.jpg
Views:	93
Size:	81.9 KB
ID:	939813

                                      And then it was onto the many coats of poly. I applied the shellac and poly with a cotton rag (old t-shirt). I fold it up into a pad and apply in the direction of the grain. Here I have 6 or 7 coats. Sanding between coats, at 320, last one was 400 I think. The pad puts it on a lot thinner than the brush would. And head on it doesn't look bad like this but you can tell there's a finish on there as it has it's own weight/thickness. I took these photos at an angle where I though the imperfections (mostly streaks) were visible, if only slightly. Otherwise, pretty shiny and even like you want.

                                      Click image for larger version

Name:	16528472525_6a231366c1_z.jpg
Views:	90
Size:	98.9 KB
ID:	939814

                                      Click image for larger version

Name:	16340970170_99e80a407a_z.jpg
Views:	93
Size:	120.8 KB
ID:	939815

                                      OK. So here we are with the wet sand cut. So what I do is cut my strips to the size of my block (1/4 sheet) and soak them in a plastic container for ~10 minutes. We have hard water so I used some from our reverse osmosis so I wouldn't have to deal with streaking from the hard water too. I wipe the piece down with the a wet rag and clean water. To sand, I bought myself a sanding block and honestly, maybe I should have started with this part, but I used the Preppin' Weapon. No affiliation here, and that link is to the manufacturers web site, but they seem to be available at all our favourite wood working stores. And that thing is awesome. So anyway, wet the piece, take your wet sand paper, and using straight, long strokes sand. Be careful along the edges because wet sanding cuts really fast for what you think it should. Wipe off with a different rag to check your progress. Put your clean water on again and repeat. You also need to rinse your paper frequently to remove the buildup there frequently. And change the paper for some fresh, pre soaked paper as soon as it starts corning.

                                      Click image for larger version

Name:	15908266633_e2b3328d30_z.jpg
Views:	94
Size:	113.1 KB
ID:	939816

                                      So you can see there's still some streaking, but that's about where I left it. It's actually quite flat at this point. The next step could be finer sanding with some micro mesh or equivalent paper. I had some FFFF (4F) pumice so that's what I used. So I just flood the piece with some water on a rag and then generously sprinkle some pumice on.

                                      Click image for larger version

Name:	15905860384_92e672738d_z.jpg
Views:	94
Size:	122.2 KB
ID:	939817

                                      Working with the direction of the grain, pull the pumice off. It will go kind of pasty and you kind of want to work it evenly over the entire surface. I used a piece of felt folded.

                                      Click image for larger version

Name:	15905860384_92e672738d_z.jpg
Views:	92
Size:	122.2 KB
ID:	939818

                                      Wipe it all off with a rag to check your progress.

                                      Click image for larger version

Name:	16341892920_8bd53f8f23_z.jpg
Views:	91
Size:	80.3 KB
ID:	939819

                                      And here we have the result before wax. You could go finer with Rottenstone, or some event finer micromesh/paper.

                                      Click image for larger version

Name:	16528307182_d4ca7d0544_z.jpg
Views:	92
Size:	71.3 KB
ID:	939820

                                      And it looks like I didn't get a photo of the waxed door so here's the side of my speakers. The one on the left is unwaxed, the right is waxed. =)

                                      Click image for larger version

Name:	15278097687_71db83f8bb_z.jpg
Views:	92
Size:	60.8 KB
ID:	939821

                                      And one more to get the satiny richness. The white wash on the speaker is the tile floor in my basement.

                                      Click image for larger version

Name:	15464666265_33c6ce22f3_z.jpg
Views:	96
Size:	64.9 KB
ID:	939822

                                      From what I understand you can do this with about any finish. You want to make sure your finish is well cured before doing this. I had let my poly cure at least one week. Depending on the finish you might need to use something other than water for the lubricant, but water is about as easy as it gets to clean up.
                                      Last edited by theSven; 10 June 2023, 17:25 Saturday. Reason: Update image location

                                      Comment

                                      • Renron
                                        Senior Member
                                        • Jan 2008
                                        • 749

                                        #64
                                        Bob,
                                        Here is a good explanation for the different types of blades available. Some of this I just learned.
                                        BTW, this was NOT meant for you, it was meant for anyone who wants to know whats available in blades and how to chose the best one(s) for their applications.
                                        Choose complementary blades for perfect results. In the dark ages of woodworking, before carbide, you never used the same blade for ripping and crosscutting. Cutting plywood required yet another blade. Today, hybrid blades allow you to avoid blade changes entirely—unless you want absolutely perfect results. Then it’s better to have more than one blade. I’ll...

                                        Ron
                                        Ardent TS

                                        Comment

                                        • ergo
                                          Senior Member
                                          • Mar 2005
                                          • 676

                                          #65
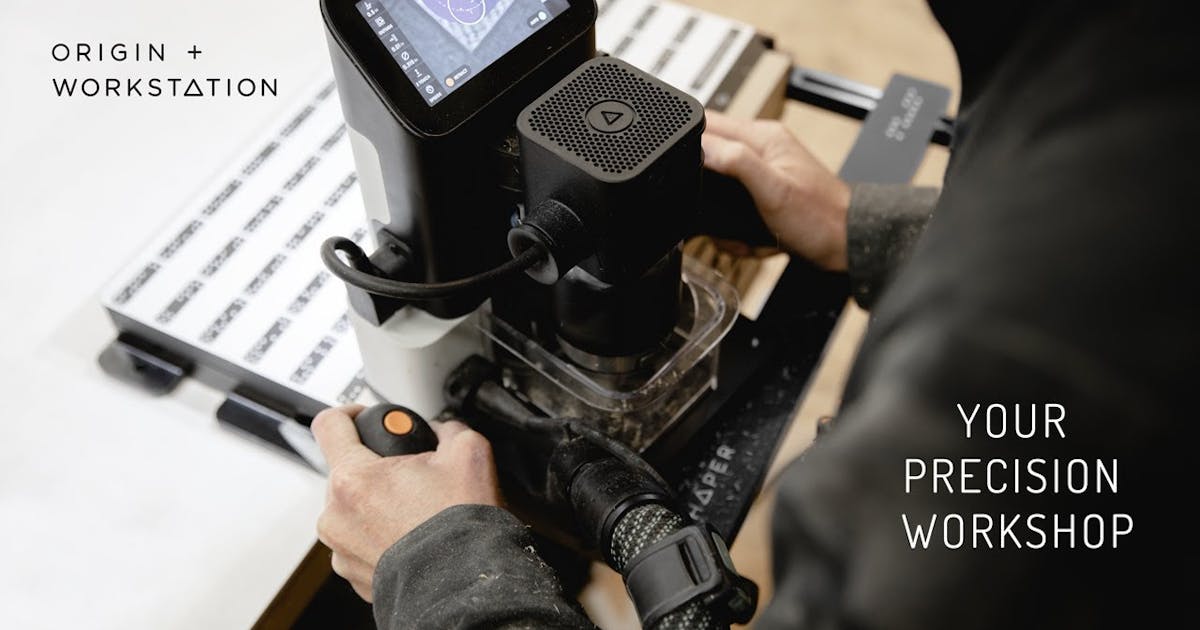
                                          A very interesting 'intelligent router base'
                                          Shaper Origin + Workstation combine computer-guided accuracy with hand-held familiarity. Cut with unparalleled precision, flexibility and efficiency.

                                          Comment

                                          • Carl V
                                            Senior Member
                                            • Apr 2005
                                            • 269

                                            #66
                                            Originally posted by ergo
                                            A very interesting 'intelligent router base'


                                            https://shapertools.com/#Howitworks

                                            Indeed...thanks

                                            Comment

                                            • Steve Manning
                                              Moderator
                                              • Dec 2006
                                              • 1886

                                              #67
                                              Originally posted by ergo
                                              A very interesting 'intelligent router base'
                                              https://shapertools.com/#Howitworks
                                              That's a slick little system Ergo ...... I ran across a video on that last week. It could be rather handy for speaker work. Then I got an email today, it appears Powermatic is also getting into cnc.
                                              Hold on to your butts - It's about to get Musical!


                                              WEBSITE: http://www.smjaudio.com/

                                              Comment

                                              • ergo
                                                Senior Member
                                                • Mar 2005
                                                • 676

                                                #68
                                                That Powermatic CNC looks good. Though without any real display that shows your toolpaths in NC code it does need one to work out a very controlled process. In that sense having a PC with control software is still good for hobby use as one sees what gets loaded to the machine etc.

                                                All these technologies are getting more attainable all the time. The waveguide thread pointed me too check out the Fusion 360 CAD/CAM. It does have some very unique features and especially the fact that it is a single bundle of CAD/CAM. I will be trying out to use that to generate the machine code for my CNC in coming weeks.

                                                6 years back when I bought the machine the good CAM softwares cost me some 1500EUR. Now one can do that + more with 'free for hobby' tools like the Fusion 360.

                                                Click image for larger version

Name:	pamkgagcbemjlhnd.jpg
Views:	1
Size:	103.1 KB
ID:	862260

                                                Comment

                                                • JonMarsh
                                                  Mad Max Moderator
                                                  • Aug 2000
                                                  • 15272

                                                  #69
                                                  The most interesting thing about all these tool and software developments is how it allows dedicated "hobbyists" to use techniques and tools which only a few years back were only available to companies; in many cases, to large companies.

                                                  Steve sent me the info on the smart router; it's very interesting looking, but at the moment I'm not in the market for spending $1500 to pre-order a smart router. Still, it's fascinating...
                                                  the AudioWorx
                                                  Natalie P
                                                  M8ta
                                                  Modula Neo DCC
                                                  Modula MT XE
                                                  Modula Xtreme
                                                  Isiris
                                                  Wavecor Ardent

                                                  SMJ
                                                  Minerva Monitor
                                                  Calliope
                                                  Ardent D

                                                  In Development...
                                                  Isiris Mk II updates- in final test stage!
                                                  Obi-Wan
                                                  Saint-Saëns Symphonique/AKA SMJ-40
                                                  Modula PWB
                                                  Calliope CC Supreme
                                                  Natalie P Ultra
                                                  Natalie P Supreme
                                                  Janus BP1 Sub


                                                  Resistance is not futile, it is Volts divided by Amperes...
                                                  Just ask Mr. Ohm....

                                                  Comment

                                                  • Steve Manning
                                                    Moderator
                                                    • Dec 2006
                                                    • 1886

                                                    #70
                                                    Originally posted by ergo
                                                    That Powermatic CNC looks good. Though without any real display that shows your toolpaths in NC code it does need one to work out a very controlled process. In that sense having a PC with control software is still good for hobby use as one sees what gets loaded to the machine etc.

                                                    All these technologies are getting more attainable all the time. The waveguide thread pointed me too check out the Fusion 360 CAD/CAM. It does have some very unique features and especially the fact that it is a single bundle of CAD/CAM. I will be trying out to use that to generate the machine code for my CNC in coming weeks.

                                                    6 years back when I bought the machine the good CAM softwares cost me some 1500EUR. Now one can do that + more with 'free for hobby' tools like the Fusion 360.

                                                    [ATTACH=CONFIG]26372[/ATTACH]
                                                    I know exactly what your talking about Ergo as far as the controlled process goes ..... I ran a 6 axis electron beam welder for ~ 6 years and to say the technology was a bit behind the times is an understatement. I had to code the "tool" path by hand, so any geometry that on the complicated side could take a while to get the G-Code all written. Then came the dry runs and debugging before you closed up the vacuum chamber that the parts sat in for the actual weld. Once you lit the thing off you also could not really look at was going on either ..... poking metal with a 50 KeV electron beam tends to get rather brite as well as hot, 2468 C was the melting point for niobium.

                                                    I'm interested to see how your coding turns out with Fusion ..... the more I use it the more I'm liking it, but at this point I don't have a cnc to test it out on.
                                                    Hold on to your butts - It's about to get Musical!


                                                    WEBSITE: http://www.smjaudio.com/

                                                    Comment

                                                    • Steve Manning
                                                      Moderator
                                                      • Dec 2006
                                                      • 1886

                                                      #71
                                                      A little additional info on the Shaper Origin ...... I sent an email off to the company and got a response, figured I'd share.

                                                      Hey Steve,
                                                      Thanks for the kind words!

                                                      To answer your questions:
                                                      - The Z axis has a total travel of 1.75 inches. Do note that the bit's depth of cut is a limiting factor.
                                                      - 3D milling functionality is something we may pursue, but is not currently in the works. We are focusing primarily on the core functionality of Origin at the moment, so I don't want make any promises on timing for 3D milling, as it is not currently a priority.
                                                      - Origin supports most 1/4 inch shank router bits or end mills.

                                                      Let me know if I can answer any other questions!

                                                      Best,
                                                      Noah @ Shaper
                                                      Hold on to your butts - It's about to get Musical!


                                                      WEBSITE: http://www.smjaudio.com/

                                                      Comment

                                                      • Renron
                                                        Senior Member
                                                        • Jan 2008
                                                        • 749

                                                        #72
                                                        My son sent me that link, interesting but out of my budget. (wish I had a budget, even a small one would be nice)
                                                        It is amazing how fast technology is advancing to the hobby level
                                                        Ron
                                                        Ardent TS

                                                        Comment

                                                        • Steve Manning
                                                          Moderator
                                                          • Dec 2006
                                                          • 1886

                                                          #73
                                                          Originally posted by Renron
                                                          My son sent me that link, interesting but out of my budget. (wish I had a budget, even a small one would be nice)
                                                          It is amazing how fast technology is advancing to the hobby level
                                                          Ron
                                                          I know what you mean about budget Ron ...... a CNC router has been taunting me for a while now.
                                                          Hold on to your butts - It's about to get Musical!


                                                          WEBSITE: http://www.smjaudio.com/

                                                          Comment

                                                          • Renron
                                                            Senior Member
                                                            • Jan 2008
                                                            • 749

                                                            #74
                                                            Steve, Yep, me too. and a 3d printer
                                                            Ardent TS

                                                            Comment

                                                            • rj45
                                                              Member
                                                              • Jun 2006
                                                              • 31

                                                              #75
                                                              Originally posted by kbzx35
                                                              Actually looking for advice and methods. I've noticed many diy designs resembling the avalon Isis and was wondering what the best method is to make those angled cuts on the sides of the front baffle? Any advice will be well received. thanks!
                                                              Dudes - Experts - Lurkers ---

                                                              I's also very interested in this aspect of making baffles.
                                                              I recently cut one and it was not quite as perfect as it should have been.
                                                              Most sites I've found on the Internet for making compound angel cuts do not apply to building speakers.

                                                              Any good examples, folks?

                                                              Comment

                                                              • BobEllis
                                                                Super Senior Member
                                                                • Dec 2005
                                                                • 1609

                                                                #76
                                                                Jon's original Ardent thread has some pictures of his jig. He used a large compound miter saw on his Isiris project IIRC. I have some jig in action pictures in my build thread as well. You can even use a handsaw, just mark the taper on top and sides. At least with my all bamboo baffle I found a power plane cutting 1/32" or less to work quite well. Not sure how it would work on BB ply, but if the knives are sharp and you take a fine cut I'd think it would work.

                                                                Why did I have a taper jig and use a power plane? Because one of my cabinets had a slight taper and my baffles were cut slightly overwide. The net result once I'd trimmed the baffle flush to the cabinet was a grossly undersized facet much shorter than the one on the other side. At that point my cabinet outweighed my table saw and there was no way to use the jig to fix it. I marked the facet edges I wanted, which was a cut almost 3/8" deep. The plane knocked it out in far less time than I spent setting up the taper jig for a cut. Next time I'm going to the plane from the start.

                                                                Comment

                                                                • TEK
                                                                  Super Senior Member
                                                                  • Oct 2002
                                                                  • 1670

                                                                  #77
                                                                  Are you referring to angled baffels as on the Ardents?
                                                                  There has been used many metods, table saw, belt sander, electrical planers, circular saw with guide as well as regular hand saw (preferrable japanese saw to get a accurate cut)
                                                                  -TEK


                                                                  Many of the great achievements of the world were accomplished by tired and discouraged men who kept on working...

                                                                  Comment

                                                                  • Steve Manning
                                                                    Moderator
                                                                    • Dec 2006
                                                                    • 1886

                                                                    #78
                                                                    Router with a surfacing bit is another option.
                                                                    Hold on to your butts - It's about to get Musical!


                                                                    WEBSITE: http://www.smjaudio.com/

                                                                    Comment

                                                                    • rj45
                                                                      Member
                                                                      • Jun 2006
                                                                      • 31

                                                                      #79
                                                                      Thanks, Bob, Tek and Steve - I see now that power planers are very reasonably priced, and a much better alternative
                                                                      to a table saw and large jig. For safety, I'll trade a large spinning blade (table saw) with a small spinning blade (planer)
                                                                      any day. Another bonus for the planer is that it only removes a little stock with each pass - so it's harder to screw up
                                                                      that precious baffle.

                                                                      Comment

                                                                      • TEK
                                                                        Super Senior Member
                                                                        • Oct 2002
                                                                        • 1670

                                                                        #80
                                                                        A power planer is very efficient. I used it when I made this yesterday:
                                                                        Click image for larger version

Name:	IMG_6905.jpg
Views:	1
Size:	99.2 KB
ID:	862516
                                                                        I have also used it to make Ardent baffels (I think I used it for my subs).
                                                                        Just draw the lines on the sides so that you get guidelines that tells you how far down to plane and get to it!
                                                                        Looking forward to see the result :-)
                                                                        -TEK


                                                                        Many of the great achievements of the world were accomplished by tired and discouraged men who kept on working...

                                                                        Comment

                                                                        • Renron
                                                                          Senior Member
                                                                          • Jan 2008
                                                                          • 749

                                                                          #81
                                                                          Originally posted by TEK
                                                                          Are you referring to angled baffels as on the Ardents?
                                                                          circular saw with guide
                                                                          Pussies,
                                                                          Circular saw by hand!. Just kidding guys, all the above methods are good ideas. Hell, I think I used them all except the router.
                                                                          Circular saw by hand / Japanese pull saw / Power planer / Belt sander / Flat block hand sanding / then double / triple checked for flatness in multiple directions. My first cut was high centered by ~ 1/16" Flattened with PP then hand flat blocked. It HAS to be prefect or it will show.
                                                                          Ron
                                                                          Ardent TS

                                                                          Comment

                                                                          • Steve Manning
                                                                            Moderator
                                                                            • Dec 2006
                                                                            • 1886

                                                                            #82
                                                                            Originally posted by Renron
                                                                            Pussies,
                                                                            Circular saw by hand!. Just kidding guys, all the above methods are good ideas. Hell, I think I used them all except the router.
                                                                            Circular saw by hand / Japanese pull saw / Power planer / Belt sander / Flat block hand sanding / then double / triple checked for flatness in multiple directions. My first cut was high centered by ~ 1/16" Flattened with PP then hand flat blocked. It HAS to be prefect or it will show.
                                                                            Ron
                                                                            I figured you being a real man Ron you would be using a chain saw.:B
                                                                            Hold on to your butts - It's about to get Musical!


                                                                            WEBSITE: http://www.smjaudio.com/

                                                                            Comment

                                                                            • Renron
                                                                              Senior Member
                                                                              • Jan 2008
                                                                              • 749

                                                                              #83
                                                                              True story,
                                                                              I was working on a multi million dollar home in Incline Village, Nevada 35 years ago, 4 stories with a golden elevator. No joke.
                                                                              The kitchen cabinets were solid cherry custom made and installed. The owner decided he wanted two ovens instead of one, so out came the "finish chain saw" and we made room for the second oven. It was both tragic and satisfying at the same time. I wish I had a camera back then. Opulent doesn't even begin to describe this home. This home is where the saying; "Is perfect good enough?", "Only if you can't do better" came from. True story.
                                                                              Ron

                                                                              We now return you to your wreggurrarry scheduled program.
                                                                              Ardent TS

                                                                              Comment

                                                                              • Steve Manning
                                                                                Moderator
                                                                                • Dec 2006
                                                                                • 1886

                                                                                #84
                                                                                Originally posted by Renron
                                                                                True story,
                                                                                I was working on a multi million dollar home in Incline Village, Nevada 35 years ago, 4 stories with a golden elevator. No joke.
                                                                                The kitchen cabinets were solid cherry custom made and installed. The owner decided he wanted two ovens instead of one, so out came the "finish chain saw" and we made room for the second oven. It was both tragic and satisfying at the same time. I wish I had a camera back then. Opulent doesn't even begin to describe this home. This home is where the saying; "Is perfect good enough?", "Only if you can't do better" came from. True story.
                                                                                Ron

                                                                                We now return you to your wreggurrarry scheduled program.
                                                                                Thanks for sharing Ron .... that is way cool.
                                                                                Hold on to your butts - It's about to get Musical!


                                                                                WEBSITE: http://www.smjaudio.com/

                                                                                Comment

                                                                                • Wayman
                                                                                  Member
                                                                                  • May 2014
                                                                                  • 89

                                                                                  #85
                                                                                  Hi,

                                                                                  I would like to refinish some smaller 2-way cabinets. I think they have walnut veneer.

                                                                                  Is there a "best" method to strip the existing finish off of the veneer?

                                                                                  Thanks, Wayne

                                                                                  Comment

                                                                                  • TEK
                                                                                    Super Senior Member
                                                                                    • Oct 2002
                                                                                    • 1670

                                                                                    #86
                                                                                    If you want to strip the finish you have to be careful not to strip the veneer as well.
                                                                                    Do you know what the existing finish is?
                                                                                    -TEK


                                                                                    Many of the great achievements of the world were accomplished by tired and discouraged men who kept on working...

                                                                                    Comment

                                                                                    • Wayman
                                                                                      Member
                                                                                      • May 2014
                                                                                      • 89

                                                                                      #87
                                                                                      TEK,

                                                                                      I have no idea about the existing finish. They are an older pair of Totem cabs given to me. Quite well made tho.

                                                                                      Cheers, Wayne

                                                                                      Comment

                                                                                      • TEK
                                                                                        Super Senior Member
                                                                                        • Oct 2002
                                                                                        • 1670

                                                                                        #88
                                                                                        I think I would have tried to sand them down. The problem will be that it probably will be very easy to sand through the veneer.
                                                                                        What do you want to accomplish by refinish them? What kind of improvement are you looking for?
                                                                                        Can you, or do you want to, reveneer them as well?
                                                                                        -TEK


                                                                                        Many of the great achievements of the world were accomplished by tired and discouraged men who kept on working...

                                                                                        Comment

                                                                                        • Wayman
                                                                                          Member
                                                                                          • May 2014
                                                                                          • 89

                                                                                          #89
                                                                                          The finish is not in very good condition but there are blemishes in the veneer as well.

                                                                                          Probably end up re-veneering them. It would be good practice.

                                                                                          Cheers, Wayne

                                                                                          Comment

                                                                                          • TEK
                                                                                            Super Senior Member
                                                                                            • Oct 2002
                                                                                            • 1670

                                                                                            #90
                                                                                            Then it's easy :-)
                                                                                            You could just sand or scrape it down. It might however be worth trying to use heat to loosen the veneer and get the whole veneer of that way.
                                                                                            -TEK


                                                                                            Many of the great achievements of the world were accomplished by tired and discouraged men who kept on working...

                                                                                            Comment

                                                                                            Working...
                                                                                            Searching...Please wait.
                                                                                            An unexpected error was returned: 'Your submission could not be processed because you have logged in since the previous page was loaded.

                                                                                            Please push the back button and reload the previous window.'
                                                                                            An unexpected error was returned: 'Your submission could not be processed because the token has expired.

                                                                                            Please push the back button and reload the previous window.'
                                                                                            An internal error has occurred and the module cannot be displayed.
                                                                                            There are no results that meet this criteria.
                                                                                            Search Result for "|||"