
Went looking at veneer today. Seriously thinking about veneering the sides now.
-
-
Are you sure that you want to veneer these buties?
With the way you have fixed the front baffel, combined with having baltic birch on the side panels, maybe you could sand them down , maybe give them some tint and keep the natrual look they have now? Just a tought...-TEK
Many of the great achievements of the world were accomplished by tired and discouraged men who kept on working...
Comment
-
I agree. Those will look fantastic with a little stain and finish.Comment
-
I am planning to leave the front baffles intact. I've got a lot of wood furniture in my house in the birch/maple style so a different veneer would really make these stand out (in a good way). Looking at Mozambique with a bit of a curly figure.
Edit: Here's a couple images that are representative of what I'm looking at. First is a good shot showing the colour and grain contrast. This image is from A&M Woods, which is local to me and where I'm planning to actually purchase.
Image not available
What their photo doesn't show well is the figure or curl of the wood. This photo is from Rose Bud Veneers and is actually a paper backed veneer but it shows the long slips and figure which is very representative of the raw veneer I was looking at on Saturday.
Image not availableComment
-
Knowledgebass,
Nope, never leaned them back, really enjoying them though. Others have stopped by and also enjoying them - a bit hit!!
Nice tone, full range, balanced sound with extended low end.
[another winter storm headed here (east coast) worst winter in a long time]Comment
-
Very nice, lots of contrasting color in the grain as well. I too have a lot of birch and maple and think it's good to put in some contrast. :TComment
-
My veneer tests so far have been going well. I am doing both sides of the rear speaker panels (both sides since it's unsupported, wouldn't want it to warp later). I did one side but forgot to get final photos after trimming and didn't do any setup. I had a small gap at the bottom that I think would be very repairable with a sliver of veneer but this is the side facing in so I'm not going to bother.
I used my dozuki to trim to length and router trim bit to trim edges prior to taping. I clamped the veneer between mdf and using a climbing cut (right to left - reverse of what you would normally do with a router), I prepared the edges for joining.
Basically, I followed the taping procedure described on Joewoodworker exactly.
Couldn't find my roller so I used that duct tape. Here's the clamps photo.
The clamp sandwich from top to bottom, hardwood cauls, 3/4" plywood, 1/2" mdf, wax paper, veneer, UF glue, 3/4" plywood speaker door, waxpaper, 1/2" mdf. Cabinet scraper to remove the bulk of tape and glue followed by some hand sanding to finish the cleanup. Really happy with how this is turning out.
Downside to the UF glue is the really long dry times. I should have one panel with both sides completed by tonight.
Sides I hope to start next weekend. First, I need a few more clamps.Comment
-
Looking very good! :T This is reminding me of my first Ardent build, and veneering the front panels prior to laminating up the baffles. Some very nice looking veneer, those should be great once you've got them finished!the AudioWorx
Natalie P
M8ta
Modula Neo DCC
Modula MT XE
Modula Xtreme
Isiris
Wavecor Ardent
SMJ
Minerva Monitor
Calliope
Ardent D
In Development...
Isiris Mk II updates- in final test stage!
Obi-Wan
Saint-Saëns Symphonique/AKA SMJ-40
Modula PWB
Calliope CC Supreme
Natalie P Ultra
Natalie P Supreme
Janus BP1 Sub
Resistance is not futile, it is Volts divided by Amperes...
Just ask Mr. Ohm....Comment
-
Impressive work so far. Looking forward to seeing the final product.Comment
-
What I've been up to:
My DIY veneer press!
Reinforcement.
A little precaution. Ideally there will be enough glue for a few drips, but if there's too much glue I don't want it ruining the baffle.
Two sheets from my flitch to stitch the sides together. I have a fair amount extra. Hopefully I won't need it.
1/2" MDF, 3/4" plywood, 2x material cauls. The 2x4 cauls are for my special clamps
All my secrets revealed.
Those are spare tire jacks. I would have liked a third but I could only find one in addition to the one from my car! Plus all the clamps I could find and four new ones. I could have use a couple more but I think I got it.
Comment
-
-
Cool! Nice work!
Veneering is like that Paul Simon song... 50 ways to leave your lover! About as many ways to get it done- work with the one that creates the best zen state for you and gets the results you want!
How come no one has ever written "Zen and the Art of Veneering" yet? :Wthe AudioWorx
Natalie P
M8ta
Modula Neo DCC
Modula MT XE
Modula Xtreme
Isiris
Wavecor Ardent
SMJ
Minerva Monitor
Calliope
Ardent D
In Development...
Isiris Mk II updates- in final test stage!
Obi-Wan
Saint-Saëns Symphonique/AKA SMJ-40
Modula PWB
Calliope CC Supreme
Natalie P Ultra
Natalie P Supreme
Janus BP1 Sub
Resistance is not futile, it is Volts divided by Amperes...
Just ask Mr. Ohm....Comment
-
I'm loving this, even double headed nails in the gussets for quick tare down.:T That veneer is going to be special.Comment
-
One down, one to go (actually half to go, first side of the second speaker is in the press).
Still need to sand the edges and scrape the tape off.
Coming out well so far. I went with a slip match with the figure sloping to the front.
Comment
-
Everything is out of the press. I have enough veneer left to do another couple speakers in the same style. I think I'll make a narrow side table for beside the chaise and wall. Maybe I'll do a matching coffee table as well although the reversible kid's Lego/craft table is doing the job now. Maybe I should hang onto it for a couple Marsala's and a centre...
Scraped the tape off of one of the speakers. The seams came out nice, no significant glue bleed through, no significant lifts, everything is very flat. Good! Had a couple edges lift slightly from my file trimming work on the first side I did (just knew as soon as it happened) but the second speaker came out about perfect. For the lifted edges I slipped some super glue in which is very thin/runny and clamped. I'm working on a little something special for the finish to cover up the mitre seam at the top of the baffle. It would have been much easier to leave it as is and fill with epoxy but my spouse insisted. Aesthetically I believe this change is a win! I did a final sanding dress-up and might be doing some epoxy-filling on the first one by the end of the week. I may actually have something finished by the end of the month. It may not be two speakers and it may only be one finishing stage, but it feels like I'm getting really close now!
I even received a very positive compliment from my spouse. I don't think I've won her over on the the size but she thinks they look really good so win! I've done a few other true wood working projects, one that was bigger and took longer, but I think she really understands the complexity of this build, and when I show her the kind of steps I'm taking to make these things come out great, I think she appreciates the whole result more and more.
I forgot to share this a couple weeks ago while prepping for the veneer. Anyone thinking of doing a translaminated baffles, can expect these kinds of chips to happen on your edges. One happened while cutting the facet. The other probably happened at the store where they did the initial trimming to size to get the panels in my car. The colour variations on the plys are the result of different grain orientations (if you look closely at my baffles you can even tell that my outside panels are slightly different colours from being 10° off axis relative to the internal parts from the panel). If you just fill it with putty it's not going to look right when you stain or finish it. The following photos show a chip out of the veneer through two layers. I had to true up the chip to get it square, take a chunk out of another piece of plywood and shape it to be roughly the same size, glued it in place with super-glue, and promptly covered 80% of it with veneer. Now It's pretty much invisible.
And another example with an irregular shape that is in a more prominent location all the way through to the final result with the patch covered in veneer.
Comment
-
Yeah those tear outs suck! Last weekend, I attempted to have Lowes cut down a sheet of ply for a toy box project. They destroyed it. I should have walked away with tearouts along the whole length. Makes your tearouts look like not an issue. It was infuriating paying good money for the nice oak double veneer ply and see that happen. But, I planned on timing at home and was in a hurry so I let it go. My table saw at home has an expensive Frued plywood saw blade. I think I paid around $60 for it. I went slow and made sure I feed it straight. No tearouts on what I cut, but that isn't always the case.
I look forward to seeing the finished speakers.Comment
-
I had to fix a couple bits where my veneer chipped out like that. Not perfect, but... oh well. Glue levels on ply are just barely adequate (and to be fair, you have to be within that "adequate" spec - too much is a problem just as bad as too little...) and sometimes...
That box side with the tape sure looks promising. These should be awesome when complete.diVine Sound - my DIY speaker designs at diVine AudioComment
-
Really awe inpisiring build !! Very much appreciate you sharing.Comment
-
Long over due for a post. It's been slow progress, but the results have been positive. Lots of prep on the veneer. Scrapping tape and sanding:
Then the big question, what to do with this seam. This is the mitre joint seam from the way the speaker is constructed:
It's actually not so bad from across the room. Zooming in on a photo, it's obviously very visible. I figured I could fill it in some and obscure it a bit. My wife didn't like it and actually came up with the the solution. An inlay.
Cut with a handsaw and set with epoxy. It's rosewood guitar banding.Also had lots of chips of plywood to fill in. Little bits of wood with grain in the correct orientation placed with crazy glue:
And then trim it off and scrap flat.
Also scrape the rosewood inlay flush:
Shiny:
Applied epoxy. My epoxy was pretty old and didn't go on too smooth. The important part is it hardened. To make shorter work of the smoothing, I scraped the bumps with a cabinet scraper. The shiny parts are the low, still glossy epoxy. The matte is the high points that have been cut down:
And then scraped some more (note the scraper with the shavings of epoxy - yes I was wearing a respirator although the scraping is far less messy than sanding):
My sanding strategy was to start at 180 after scraping. I ran the shop vac the whole time, regularly, regularly cleaning the paper, and changing it probably every two minutes.My block used 1/6th of a sheet and i think I used one sheet per side and front. Final sanding was done at 220 which at this point went really quick. Cleaned with some shellac thinner (alcohol) and ready for poly:
And now you're up to date. Still working out what to do for feet/plinth but I have an idea formulating.
I've got epoxy applied to the doors and should have them up to speed by the weekend (I hope), and maybe have the first application of poly early next week.Comment
-
Hit a snag with my finishing schedule. There's a couple spots where the epoxy under the poly is behaving differently. I think these are spots that may have been a hair lower and the epoxy just levelled out across it? I'm not sure if more poly will obscure it, or just accentuate it more. I think the answer would have been to apply some shellac before the epoxy as a kind of toner coat. The epoxy I'm using is meant as a top coat so it's clear but perhaps the poly is just "more" clear, causing a lens effect with the light. I had considered starting with a shellac coat but thought I might sand through in high spots while doing the final levelling on the epoxy, negating the toner benefits. Second, I wanted the better adhesion of the epoxy to wood contact on a couple gaps/cracks that I was filling in the baffle. Third, some people say not to put poly over shellac (even dewaxed) and just as many say it's fine. Right now I've hit pause while I consider what to do. I think I might just do some targeted scrapping to remove or feather out the lens looking blotches. Maybe I'll get some tint to mix with the poly and do a toner layer. I wipe the water based poly on with a cotton cloth so my coats are really thin.Comment
-
I think it is looking great. Sorry for the difficulties. Can you provide a link for the epoxy you used? I've never heard of epoxy as a top coat.Comment
-
Sounds like you need to build some tone with the poly. Varathane Professional water based has some tint added to mimic the oil based Professional amber tint. It's not clear, more of a brown creamy color not amber but it should level out the finish over the epoxy. Maybe buy a small pint and try it over an epoxy sample board. The other thing I have done is to use some natural stain over the epoxy, it is just linseed oil based.
Image not availableComment
-
Another option is to knock off the poly and just use this:

I used some on mine when I ran out of 205 and it looked fantastic on the bamboo. It's hard enough that you could wet sand it to whatever sheen you want.Comment
-
I figured out the problem. I've read that people don't like poly because it makes wood look plastic. I've always liked to use it because I can wipe it on with a cloth a get really good results. That said, I've only ever used it on clear wood (birch, maple etc.). What I was seeing was the little bit of epoxy that was helping to level things out was wetting the wood, and the poly wasn't leaving this kind of shiny blotchy spots. When people say the poly makes wood look plastic, what they are saying is it doesn't wet the wood.
After much sanding, I've got a couple coats of shellac on and it looks terrific. I've probably removed >90% of the epoxy I put on at this point, but with the shellac, the figure/curl in the mozambique is really popping. The epoxy did fill some gaps in the baffle and around the inlay so it wasn't a total loss
If all goes well I should have an update with photos later this week.
I did find a way to recover my crystallized epoxy. I found a page on West Systems website that indicate that the resin will last a long time but it might crystallize. The hardener will yellow over time as well but does not make it less effective. West Systems indicated that heating the epoxy up to 125degF would be enough to melt the epoxy. I put the epoxy in my bbq (not lit of course!) whic gets full sun much of the day and just let the sun do the work. Sure enough, the resin is crystal clear again with very few chunks now. Wish I had known this before I used it!Comment
-
I can't wait to see these finished (and I'm sure I'm not the only one!)
I'm at that love/hate place with shellac right now, but am hoping a permanent workshop where I can install a LOT more lighting may help - not to mention practice. But the results are worth it.
CdiVine Sound - my DIY speaker designs at diVine AudioComment
-
I got 3 applications of shellac during the week and 5 applications of poly on the week. I had wipe both of them with rags made from an old cotton shirt and sand or scrape (or both) between coats to level it out. I found my really fine scrapper helpful for cleaning up any runs.
I think I have the finish at a level now where I could leave it and do nothing more and be happy. I'll have to check it out tomorrow but looks really really promising. I'm hoping this is it for the application and the next step will be a light sand and polish. Still need to finish up the doors for the back and lots of interior assembly to finish. Not to mention cross over boards to finish up. I got a start sort of on the grills this weekend (quite a ways to go there, one magnet didn't line up so I'll need to plug and redrill). I have no firm decision yet for the feet but have a could ideas. At this rate I might finish these in under a year. When I started building last September I figured I would have them done by Christmas - of course I didn't say which year...
Comment
-
cjd,
I am finally getting around to finishing these (2 years later). Just wanted to confirm, is this the correct crossover schematic? You mentioned dropping C5 to 10uF. Is this still correct/any other changes?
Thanks!Comment
-
Comment
-
Oh boy, I'm in trouble! Another little boy just joined the family! Everyone is currently sleeping so in case I disappear for a while, here's where I'm at on the build:
The towers have been shellac'd.
These are further along now. I actually finished the poly a week ago and it looks fantastic. I plan to finish by wet sanding, rottenstone, and some food safe wax to help keep off little finger prints. Then I'll be lining with some pieces of wool rug that my wife wants to get rid of and adding required cross brace members, running the wiring and loading the drivers! I have two of six cross over boards completed, hope I can finish the rest up before I'm ready to wet sand.
Here's a brief tutorial on how I dealt with the epoxy:
Here's the rear panel. The epoxy has a nice gloss finish but isn't very smooth.
I target the high spots with a scraper and sandpaper
The scraper removes these nice epoxy curls. Who knows how much sand paper this would have taken. My guess is a lot.
Start scraping the full length of the panel to make it even. I'm done here:
Sand with 180 grit sandpaper.
Sand with 220 grit sandpaper.
At this stage, if things still aren't perfectly flat, you probably need to apply another coat of epoxy. Knowing what I know now, I probably would have done this to the sides and tops of my speaker. This probably would have eliminated the problems I had with uneven filling under the poly. You can see in my examples above that I didn't get it perfect, but these photos are the back door to the speaker, and the side that faces inside the cabinet at that (pretty fancy doors I think!). Here's the outward facing side with a bit of shellac before any more sanding.
I think it would be possible to get a really nice finish with epoxy if you were patient with the sanding. It clogs paper faster than you would believe. I basically ran my shop vac (wear a respirator if you try this please) and cleaned the surface and the paper frequently using Norton 3X paper. As soon as any corns formed I just tossed the paper and moved to the next piece rather than building heat and burnishing the surface. Wet sanding would probably work well but I didn't get there or try to go above 220.Comment
-
Great looking builds! I'm glad they sound great. On that note, for those that have built or have heard them, what level of speaker in the commercial market would be competitive with these? Trying to get an idea if I can replace my RTi12's with them for now.Comment
-
I have no idea but doesn't look like you've attracted any other responses. Let's discuss it.
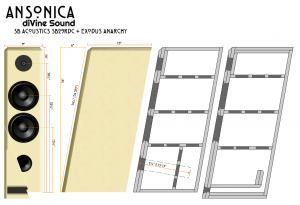
I had to look up what the RTi12 is. Looks like it's a three way (3.5 way?) with a WWWMTM alignment. I couldn't find any plots etc. of the RTi12. If nothing else, it's likely capable of going louder than the Ansonica. Just based on the number of drivers. I don't recall there being a calculated sensitivity for the Ansonica but the max SPL was modeled as just >100dB with just 70 watts (Anarchy hits xmax) and a starting sensitivity in the mid 80's. RTi12 has a sensitivity rating of 90dB and is supposedly capable of taking 500 watts so I would expect it to go much louder. RTi12 F3 is given as 30Hz vs. Ansonica (mid 20's).
It's when you start looking at the physical size of the speakers that you realize what is so special about the Ansonica. The RTi12 has three 7" woofers (probably really only 6.5" like the Ansonica since the box is only 7.75" wide and constructed from 3/4" MDF according to literature - there just isn't room for a true 7" woofer in 6.25" internal space) in order to hit F3 of 30Hz. The Ansonica does better with two 6.5" woofers. In fact, the Ansonica does better with two drivers and a box that is half the size! As previously discussed, this comes at a cost. The Ansonica can go low for its size, but it can't go as loud as some other designs. As a result, it's difficult to compare the Ansonica directly to the RTi12 as they fill different roles. I came to this realization before starting my build be decided it would be loud enough for me in my space.
In terms of equivalent value, I've seen lots of numbers thrown around about how much you would need to spend on commercial offerings to get the same SQ as a DIY build. The most common numbers thrown around seem to fall in the three to five times the money and I've even seen claims as high as 10 times - which does seem a little optimistic. On my Ansonica build I've spent on the order of ~$800 USD on materials (drivers, cross over parts, wood, glue, no tools), so if we conservatively say three times then you could budget $2,400/pair. If you factor in that the Anarchy drivers went for $90 each as little as 15 months ago (now $65/each, I paid $50/each on sale), and that I really didn't go all out on the capacitors, estimating a build cost of $1,000/pair in materials isn't out of the question with a conservative budget of $3,000/pair of equivalent store purchased speakers. All of this ignores what your ears tell you. I think common sense should dictate that you could build a no compromises speaker for less than Polk could sell you one. The value comes from how well it's implemented. CJD is a well respected designer. The Ansonica was a well received design. CJD was even using it in his listening room (perhaps superseded by the Nebblio now or the metal cone version in production). The three times value is therefore, I feel, a possibility for this design. Of course all this assumes you can pull off a finish you're happy with and don't factor in the value of your time to complete the build! I think I've been a good model for that in my now year long adventure detailed in this thread!
OK, so I can't speak directly to the sound quality, but hopefully that gives you an idea of whether the Ansonica is a good fit for you. If you start a thread about what your requirements are you might get some suggestions for other builds that will fit your needs. The downside being you'll probably get more suggestions than you need and just confuse the situation.Comment
-
Well, before I came back and read this I decide to just build them and find out. I've already got 12 Anarchy's sitting around and everybody seems to love CJD's designs. I bet they found great!
I wasn't so concerned about comparing them to my RTi12's, I'm just mostly looking for something with better SQ. The RTi12's will surely play louder as you pointed out. Especially with my RB-1091 mono blocks pushing them. I just want better, more lifelike SQ. The other drivers will wait until somebody builds a 3-way with anarchy's (coming soon I hope).
Now, curved ansonica's vs MDF vs Ply, need to figure that out. I love the looks of the curved ansonicas but it looks like I would need to design my own enclosure and figure out how to cut a 10 degree angle on the top and bottom curved panels for it to be corrected.Comment
-
Since you have the drivers (and a lot of them), that changes everything!
There is a three way coming. I thought I saw a post somewhere indicating that CJD was looking to make the box for this one easier to assemble than the Nebbiolo so more people could build it. I also thought I saw a post hinting it may be made available as a kit but can't find it now so I may just be spreading baseless rumours at this point. ops:
ops:
Comment
-
I've heard that he plans to build a three way. I'm excited!Comment
-
I am now looking at building these but think I want to go the route of other then laminated ply for the baffle. What's going to be the best way to get a good finish (veneer maybe) for the front baffle but still do the beveled edges required for the design? If I make the box out of MDF is that going to hurt sonic quality? How about hardwood?Comment
-
I used hardwood on mine for the baffle. I'll post a link to my build in a little while so you can see how I did it.Comment
-
MDF is horrible to work with IMO but fine sonically. Hardwood is just a potential moisture challenge to work with.diVine Sound - my DIY speaker designs at diVine AudioComment
-
I did solid hardwood maple baffles on my Ochocino TM Towers (plywood sides). That was like two years ago. They live at a lake house that is pretty humid in the summer and unheated in the winter. So far they are holding up well. I sometimes wonder if we worry too much.Comment
-
I used solid Ash baffles on a curved Anarchy/Dayton 2-way and they still look like they did four years ago when I built them.
Comment
-
Those are absolutely gorgeous.Comment
-
Comment
-
Sorry for the delay, here's a link to my Ansonica build.
I still love how these babies sound!
-GComment
-
Here's PassingInterest's thread. His build threads are always incredibly well done:

What do mean by laminate? Do you mean translaminations like this?
There is an example of the former by CJD earlier in the thread using pins to line the laminations up and by myself using gusto, glue and my bar clamps (and maybe just a little bit of luck in retrospect).
A search for 'translam' on this forum and others will likely turn up more examples.Comment
-
 Kevin posted some info on a new driver Anarchy . You got to see the you tube video of this thing. :E
 -
 Well it looks like the Anarchy 6.5 is on the shelves and again no off axis graphs. Looking at the supplied SPL graph it looks like another low cross tweeter will be needed. It looks like.
 -
 I will soon start on a Rick Craig design for an Anarchy/Dayton TM.
I'm linking to the build here, because I think there might be some interest in seeing the Curvomatic in action. It will be used to curve the cabinet sides.
You can find more info at www.curvomatic.com
...17 February 2012, 09:38 Friday -
 Saw several posts on the Anarchy Woofers here and though some like to see what my buddy and I came up with.
A 80 liter dual chamber, 48" tall mtmmm with a Dayton RS28 F tweeter. As some mentioned, need a tweeter that will go low, e.g. xoed over at 1,100hz here. I think the combination... -
 Well, here are my opinions on what I saw and heard at the CES this
year.
I'll start off with best 2 ch sound. I think it was a tie between
Burmester and Alon. Burmester offer an incredibly musical system
(that is also gorgeous). While some of the demos were dts cd's,...
Comment