Helios mk2 - The Two Towers

Collapse
X
 
  • Time
  • Show
Clear All
new posts
  • Bear
    Super Senior Member
    • Dec 2008
    • 1038

    Helios mk2 - The Two Towers

    When last we left our intrepid adventurer, a bunch of orcs had attacked Middle Earth with a virus causing Bjorn to flee to his bathroom to make speakers. Much like this opening, that effort really didn't turn out well. Here's the original thread, including some of the discussion of the Helios design itself.


    Also, I just saw that Meniscus has the kit (and the write-up/plans) on its website. It looks like the final published dimensions are closer to my approximations, below.


    To re-cap that thread, I made the first cabinet in the bathroom of my apartment, and it turned out okay, but it was much larger (deeper) in real life than I wanted. I did try to make a second cabinet, but I could not repeat the success that I had with cabinet Home So, I ended up converting the second mk1 cabinet into a dual-opposed subwoofer box, because that's what was feasible by the time I cleared out The Yips.

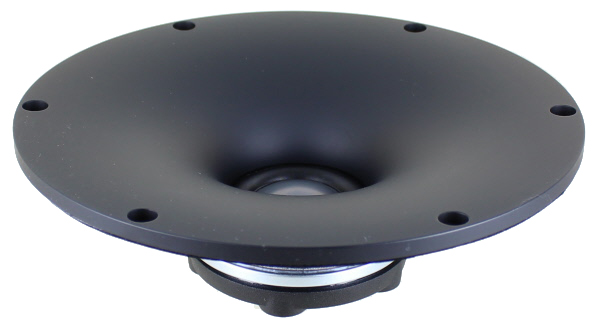
    The mark 2 version is a wide-but-shallow small tower, with approximately 38 liters of net volume, and exterior dimensions of 11.5w x 37.5h x 9d. As-designed, Helios specifies 35L of internal volume, but that is before the substantial amount of internal bracing which is at least another liter or two of volume (I'd guess two...). I'm sticking with the ScanSpeak 26W passive radiator because it has improved low bass output (in simulations) vs the as-designed SBA passive radiator, and it does so with a smaller cabinet foot print (27cm vs 29cm). Using a different PR is really what allows this tower to work without resorting to some other extreme option. Finally, the cabinet construction is all carbonized vertical bamboo, and it is a mix of both single ply and three ply versions. Both have a nominal thickness of 19mm, or 0.748". I primarily used Northwest Bamboo to source my raw material.

    Click image for larger version  Name:	Helios Tower.jpg Views:	1 Size:	46.0 KB ID:	872531

    Before I dive into either the design modifications or the build discussion, here's the current progress as photographed from the workshop of the San Diego Fine Woodworker's Association. I'm incredibly pleased that I have a resource like this available to me. Highly recommended for those within striking distance of Miramar and the 805.

    Click image for larger version  Name:	IMG_9547.jpg Views:	1 Size:	61.3 KB ID:	872530

    In making the shift from a monitor to a tower, I'm making changes to two design elements. The first is obvious because it's one of the biggest rules among the DIY speaker community: don't change the baffle! The second issue is one that will be less obvious to people, and it can matter a fair bit, as well: changing the depth. Changing the baffle dimensions and layout affects the diffraction signature of the design. In practical terms, the change in the baffle will alter both the frequencies and amplitudes of the baffle-induced constructive and destructive interference. More on this in a moment....

    The change to the depth of the cabinet changes the frequency and amplitude of the effects of the rear wave of the drivers. Since (mid)woofers are not acoustically opaque front-to-rear, the rear wave can have an audible effect on the overall speaker performance. While I do not have any simulation tools at-hand to quantify this, based upon how the discussion went a long time ago when the Grimm LS-1 was launched into the market, I would expect to see higher amplitude rear wave effects (less absorption) with a shallower cabinet, but with those rear wave issues happening at a higher frequency. In this case, the half-wavelength should move from about 566Hz based upon the original design to closer to 1kHz in my mk2 tower. With a Fc around 1300 Hz, the move up to 1kHz may not create too much of a penalty.

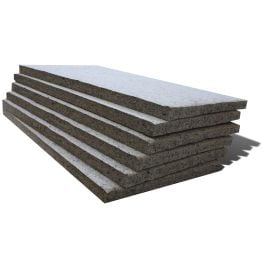
    One will also note that the original design did not include any stuffing or surface treatment of the rear wall of the cabinet. Thus, the original design took a "let the chips fall where they may" attitude towards this rear wave issue. For the mk2, I have Sonic Barrier in inventory, and based upon Augerpro's findings in the construction methods thread, I'm likely to invest in some denim insulation, as well. Lacking a reliable modeling tool, I'll skip further commentary on this second issue until I've made more progress on the build.

    Now, let's talk diffraction...

    Click image for larger version  Name:	Diffraction Sim.png Views:	1 Size:	27.4 KB ID:	872529

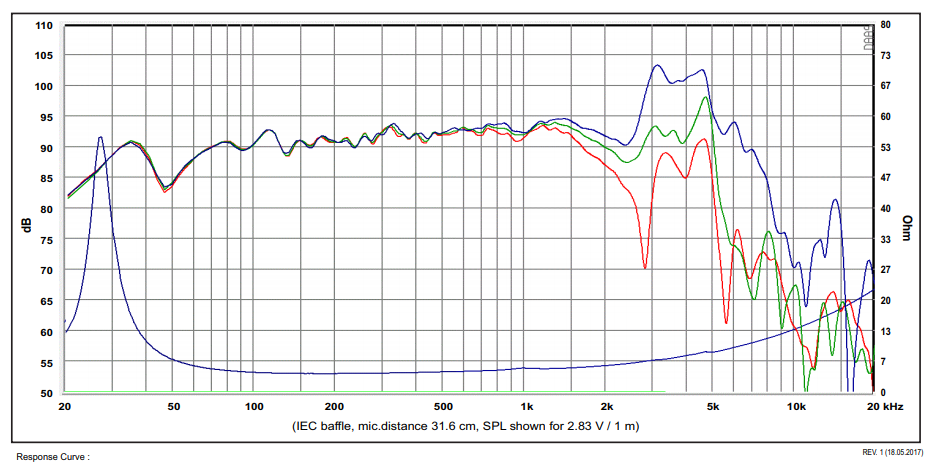
    Using Jeff's Diffraction & Boundary Simulator (because it's fitting that I use his tools, plus I'm an Excel junkie), I put together the chart, above, showing five different scenarios overlaid on one another.
    1. Scenario 1 is the predicted diffraction of a 29mm dome tweeter placed 4.375" below the centerline of the speaker (edit: apparently 4.44 is the official number, which is 4 7/16 rounded to two decimal places). This is my guess about where the tweeter centerpoint is located in the original design. It's pretty ugly.
    2. Scenario 2 is the diffraction effect changing the 29mm dome to a 15cm driver (close to the usable diameter of the wave guide). This is much better, obviously.
    3. Scenario 3 expands the baffle from 11.1" to 11.5". There is almost no difference compared to the original design.
    4. Scenario 4 models the as-built cabinet, with the tweeter being 5.75" below the top of the cabinet. Ouch. That may be an expensive aesthetic choice.
    5. Scenario 5 maintains the 11.5x37.5 tower baffle, but moves the tweeter back to being just 4.375" below the top of the cabinet.


    Based upon the simulations, above, I would expect to see about 1dB of more extreme (positive and negative) swings in diffraction between about 500Hz and 2kHz. The major deviations are between 500 - 900 HZ (excess SPL), but this is more than a half octave below the 1.3kHz Fc - so it will be -12dB or so below the design level. Between this and the directional nature of the waveguide's output, I'm optimistic that it might not be audible. If I had kept the original spacing, then the deviation would have been less than half of the as-built simulation. Also, as mentioned above, a waveguide increases the directivity of the tweeter, which should reduce the interaction with the baffle even further than what should be predicted by the increased effective radiating area alone (I'm guessing here).

    All of that is great in theory, but I don't know that I could hear it and having such a big tweeter so close to the top of the cabinet just looked a bit odd to me. Aesthetics won out on this decision, and if I need to "fix it in post", then that's what I'll have to do.

    Net-net: changing the baffle width had a trivial effect. However, changing the baffle height and the placement of the tweeter does seem like it will have a measurable effect.
    Last edited by theSven; 09 April 2023, 04:53 Sunday. Reason: Update htguide url
    Welcome to Rivendell, Mr. Anderson.
  • JonMarsh
    Mad Max Moderator
    • Aug 2000
    • 15271

    #2
    Baffle modeling is an under sung hero or necessary evil, depending on who you talk to... especially if you want to consider modifying an existing design, as opposed to fundamentally taking the same drivers and doing a new design with all new measurements, one should exercise some caution.

    I have used EDGE quite often, and I hear ET has modeled the new NatalieP Ultra using it, and coming to some interesting conclusions and directions for when he can proceed with an actual construction and test... I think time doing that carefully is well spent considering the surprising level of impact that may occur, especially in regions near the crossover. I think your "optimism" in this case is well justified..

    Best of luck, and keep us posted!
    the AudioWorx
    Natalie P
    M8ta
    Modula Neo DCC
    Modula MT XE
    Modula Xtreme
    Isiris
    Wavecor Ardent

    SMJ
    Minerva Monitor
    Calliope
    Ardent D

    In Development...
    Isiris Mk II updates- in final test stage!
    Obi-Wan
    Saint-Saëns Symphonique/AKA SMJ-40
    Modula PWB
    Calliope CC Supreme
    Natalie P Ultra
    Natalie P Supreme
    Janus BP1 Sub


    Resistance is not futile, it is Volts divided by Amperes...
    Just ask Mr. Ohm....

    Comment

    • Bear
      Super Senior Member
      • Dec 2008
      • 1038

      #3
      Originally posted by JonMarsh
      Baffle modeling is an under sung hero or necessary evil, depending on who you talk to... especially if you want to consider modifying an existing design, as opposed to fundamentally taking the same drivers and doing a new design with all new measurements, one should exercise some caution.

      I have used EDGE quite often, and I hear ET has modeled the new NatalieP Ultra using it, and coming to some interesting conclusions and directions for when he can proceed with an actual construction and test... I think time doing that carefully is well spent considering the surprising level of impact that may occur, especially in regions near the crossover. I think your "optimism" in this case is well justified..

      Best of luck, and keep us posted!
      Thanks! I just bought a new set of components for the as-designed crossover. Consistent with the "learning experience" with the mk1 design overall, that set of crossovers had too much carbon in the end joins from melting sheathing. Supra cable from Madisound just isn't good for soldering. I'll try the Eurobus thing with this build and compare. The cabinets turned out better than I had a right to expect (but not hope!), and I'd like to slow down and do things right the rest of the way.
      Welcome to Rivendell, Mr. Anderson.

      Comment

      • JonMarsh
        Mad Max Moderator
        • Aug 2000
        • 15271

        #4
        Originally posted by Bear
        The cabinets turned out better than I had a right to expect (but not hope!), and I'd like to slow down and do things right the rest of the way.

        Man, this is a concept that is always on my mind the farther you get into a project- it's the whole issue of "yield loss" and how much can be salvaged from the previous work if something goes sideways...

        Yours ares looking very nice at this point...


        I think ET is grappling with that a bit after discovering that the new RS52 aren't really as much like the original ones as he thought they would be... there's a certain pucker factor in having a nice pretty set of cabinets that are almost built around (for all practical purposes) a rather specific choice of drivers, and if that choice get's "broken", then what do you do? There's no equivalent to the DA25 or the AS168 you could drop into those holes... and very few worth warm spit to consider for the RS52AN.

        But there is hope...
        Last edited by theSven; 09 April 2023, 04:53 Sunday. Reason: Update image url
        the AudioWorx
        Natalie P
        M8ta
        Modula Neo DCC
        Modula MT XE
        Modula Xtreme
        Isiris
        Wavecor Ardent

        SMJ
        Minerva Monitor
        Calliope
        Ardent D

        In Development...
        Isiris Mk II updates- in final test stage!
        Obi-Wan
        Saint-Saëns Symphonique/AKA SMJ-40
        Modula PWB
        Calliope CC Supreme
        Natalie P Ultra
        Natalie P Supreme
        Janus BP1 Sub


        Resistance is not futile, it is Volts divided by Amperes...
        Just ask Mr. Ohm....

        Comment

        • Bear
          Super Senior Member
          • Dec 2008
          • 1038

          #5
          Originally posted by JonMarsh
          Man, this is a concept that is always on my mind the farther you get into a project- it's the whole issue of "yield loss" and how much can be salvaged from the previous work if something goes sideways...

          Yours ares looking very nice at this point...
          Thanks! That is quite the compliment coming from you. The 1" roundover bit is what really saved my bacon on this. I'll post those pictures soon enough. I've got a couple of spots where I guess I lifted or tilted the cabinet when using the big roundover bit, and there is a bit of stress thinking about what can go wrong in trying to correct it. For a simple set of monkey coffins, they are basically what I was aiming to achieve.

          I think ET is grappling with that a bit after discovering that the new RS52 aren't really as much like the original ones as he thought they would be... there's a certain pucker factor in having a nice pretty set of cabinets that are almost built around (for all practical purposes) a rather specific choice of drivers, and if that choice get's "broken", then what do you do? There's no equivalent to the DA25 or the AS168 you could drop into those holes... and very few worth warm spit to consider for the RS52AN.

          But there is hope...
          I'll follow that with interest. The MD60N looks to have an identical diameter, but the most optimistic bit of information I can find on availability says that it's a month out. I'll definitely be curious to see the droids that ET has on order from Sienar Heavy Industries!
          Welcome to Rivendell, Mr. Anderson.

          Comment

          • Bear
            Super Senior Member
            • Dec 2008
            • 1038

            #6
            Basic Construction Photos

            I have mentioned the SDFWA shop in before, and I will mention it again. This place changes a lot of things for me. There are two 10" SawStop table saws, a couple of CNC machines, a sliding compound miter saw, jointer, etc. A lot of the toys that I would be hard-pressed to shoe-horn into a garage. Once the shop opened back up, I just needed to get my shop safety certification, and I could start the mark 2 build in earnest.

            Back in my bathroom phase, I had gotten kinda-sorta-maybe close on getting the various pieces cut to length and square. But it wasn't good enough. The first step was to size and square the boards on the table saw. Note: my as-built dimensions were drawn after I knew what was salvageable, not necessarily what was planned. I was aiming for a touch larger (taller), if I'm honest.

            Click image for larger version

Name:	IMG_9412.jpg
Views:	1
Size:	115.7 KB
ID:	865601

            The single-ply wood came in a 12" nominal width, and the interior baffle only needed to be 10" wide. After a cut to make a straight edge on one side, this left me with about a 1.5" off-cut on the other side. This was planned all along to be used as a "spine" for the rear cabinet. The rear of the cabinet is a single layer of 1-ply material with that same 10" dimension between the supports (side walls). I spent a little time playing with the Sagulator to model how the deflection of a shelf would change with varying lip sizes. Something in the 1.5" - 2" range adds quite a bit of stiffness without a lot of additional volume. I put a double 3/8" roundover on the end that receives the rear wave from the WO24P, and glued it into the centerline of each rear wall.

            Because there is only 6.75" of unsupported distance between the rear wall and the inner baffle, I made the explicit decision not to put any front-to-back bracing into the design. I would change this decision only a little to have some corner structure to aid in alignment for glue-up. The as-built cabinet is fairly stiff (knuckle wrap test) otherwise. There are two additional horizontal braces on the front baffle providing further stiffness to it focused on the top and bottom of the woofer (where there mechanical forces are greatest.

            Click image for larger version

Name:	IMG_9446.jpg
Views:	1
Size:	101.6 KB
ID:	865602

            After that, it was almost a pretty typical glue up. I used all butt joints, which did not have as much inherent alignment potential as I had hoped, and the shop's clamps were not as sturdy as I'd hoped. This created a number of panel gaps; a worryingly large number of panel gaps.

            Click image for larger version

Name:	IMG_9511.jpg
Views:	1
Size:	71.2 KB
ID:	865603

            The PR will be surface mounted on the rear of the cabinet down low. I'm hoping for a little extra boundary reinforcement for the low-end, plus it makes a conveniently large opening through which to mess with crossovers. The spine board provided support for the final pass with the Jasper Jig, but I did need to use a Japanese pull saw to cut all the way through.

            Click image for larger version

Name:	IMG_9538.jpg
Views:	1
Size:	64.1 KB
ID:	865604

            Here is a test fit of the drivers in their recesses. The woofer is a little proud, and the tweeter is a touch deep. Measuring plunge depth on my little Makita router is a challenge. I'll invest in a digital depth gauge before Saturday's work day where I can take a rabbeting bit to add some depth to the woofer recess. I'm off by maybe 1/8" (3mm).

            Click image for larger version

Name:	IMG_9552.jpg
Views:	1
Size:	81.9 KB
ID:	865605
            Last edited by Bear; 19 August 2020, 10:14 Wednesday.
            Welcome to Rivendell, Mr. Anderson.

            Comment

            • Bear
              Super Senior Member
              • Dec 2008
              • 1038

              #7
              Am I this big of an idiot?

              One of the problems of using the SDFWA shop is that you have to "pack it in, and pack it out". As a result, I did leave the in-progress pieces in the back of my SUV for the three weeks that I was working on this. San Diego weather is weird because you have almost all of the radiant heat from the sun of the local deserts, but you have a cool to cold sea breeze that makes the ambient temperature generally pleasant all year. It can fool you. Er, well, it can fool me. Despite solar tinting and parking in the shade, etc., I think a couple of the pieces that were most exposed did warp a bit between the table saw and glue-up. I wasn't willing to lose mass/material using the jointer, planer and surfacing sander (plus the risk of tear-out!), so I tried to using clamping pressure the fix the issues in glue-up. With Bessey clamps, this is more doable than it otherwise might seem. But I don't have the eight pack of Bessey's that I left behind in Houston. So I had to deal with the shop clamps, plus the couple of 54" Bessey's I had invested in back in March.

              Then I added two more because my approach/plan was reliant on being able to use that monster parallel clamping force. I was only moderately successful, as you can see in the top left corner here.

              Click image for larger version

Name:	IMG_9536.jpg
Views:	1
Size:	62.4 KB
ID:	865606

              Close up
              Click image for larger version

Name:	IMG_9537.jpg
Views:	1
Size:	55.1 KB
ID:	865607

              Aside from the acoustic (diffraction) benefits of a roundover, it also helps smooth the transition from one surface to another. This is a different corner after the 3/4" bit has done its work (I stepped into it -- I didn't just go straight to the 3/4!).
              Click image for larger version

Name:	IMG_9540.jpg
Views:	1
Size:	54.3 KB
ID:	865608
              Welcome to Rivendell, Mr. Anderson.

              Comment

              • bambadoo
                Junior Member
                • May 2020
                • 1

                #8
                Very interesting project. It is still very unclear for me whether that WG tweeter is available for purchase or not. Still no datasheet.

                Comment

                • Bear
                  Super Senior Member
                  • Dec 2008
                  • 1038

                  #9
                  Originally posted by bambadoo
                  Very interesting project. It is still very unclear for me whether that WG tweeter is available for purchase or not. Still no datasheet.


                  The datasheet is definitely lagging, but I have two in inventory, and Meniscus is offering the kit now. In other words, yes, it does seem to be in-stock at the usual places.
                  Welcome to Rivendell, Mr. Anderson.

                  Comment

                  • Bear
                    Super Senior Member
                    • Dec 2008
                    • 1038

                    #10
                    Sanding Ego

                    Yesterday was sanding day. I also put the subwoofer box up against my new 1" roundover to see if I could clean a few areas where I got some tear-out with the 3/4" bit. That was mostly a success. I did get some odd "points" on the corners where three different passes of the roundover bit came together. I was a little surprised at that, but my hypothesis is that they are caused by the intersecting panels not being 90 degrees to each other. I had to spend some careful moments kissing these nubbins up against the big, burly table belt sander. Plus a ton of sanding pads for my Makita 5" random orbital.


                    Corner detail (subwoofer box):

                    Click image for larger version

Name:	IMG_9570.jpg
Views:	1
Size:	56.8 KB
ID:	865612

                    Putting the Sand in Sandy Ego. The downdraft table works even better when you remember to turn it on.

                    Click image for larger version

Name:	IMG_9573.jpg
Views:	1
Size:	98.2 KB
ID:	865613

                    I have not used the carbonized bamboo until this set of builds. I am curious as to whether I just sanded away all of the carbonized color, and I am left with the bare bamboo. I'd really like a darker color than what I got with the natural bamboo color the last time, and something a bit darker than a typical hard maple.

                    Click image for larger version

Name:	IMG_9574.jpg
Views:	1
Size:	94.7 KB
ID:	865614

                    I now believe that Freud SandNet discs last 10x longer than traditional discs only once they hit a landfill. I sure chewed through a ton of them. This was ~20 discs in total, with the bulk being the 80 grit rough sand and then the 400 grit finish. Oddly, the 180 grit middle pass had the greatest longevity. I do have to comment that I really like the way the fine sanding makes the wood feel. It almost feels like a warm stone, rather than a wood. That tactile quality was one of the main factors that drove me to choose the material.

                    Click image for larger version

Name:	IMG_9578.jpg
Views:	1
Size:	88.3 KB
ID:	865615

                    Here is a close-up of my main shame on the build. I'll need to look into some form of filler to hide that gap.

                    Click image for larger version

Name:	IMG_9576.jpg
Views:	1
Size:	55.9 KB
ID:	865616
                    Welcome to Rivendell, Mr. Anderson.

                    Comment

                    • Bear
                      Super Senior Member
                      • Dec 2008
                      • 1038

                      #11
                      I don't have any additional progress to report on these just yet. I'm investigating various wood filler options for the bigger seams, and otherwise, I have been making progress on the cabinets for my future center channel and surrounds (yep, 5.1 in progress). Given that the Helios design has been more fully fleshed-out on the Meniscus website, I thought that it would be good to highlight a few details:
                      1. The official baffle width is now 11.5". That adds a little bit of volume for a negligible effect on diffraction.
                      2. The cabinet drawing specifies Eco Core insulation behind the woofer


                      I'm not terribly surprised at this last addition. Cabinet treatment may have just been an omission from the original build thread. Here's the link to what seems like the source:

                      Each panel is 48"x24"x2". SOLD AS 6 PANELS PER CASE. DOWNLOAD ECO CORE MSDS:Page 1 , Page 2 ECO-CORE Products use the revolutionary recycled paper material based insulation which is the green alternative to conventional fiberglass or foam building insulation products. Why we chose recycled paper insulation vs cotton insulation? The answer is simple. There is just a lot more paper waste being dumped every day than cotton waste. Millions of tons of paper trash hits the landfills everyday and this is our way to help in the clean-up efforts, plus paper based insulation performs better acoustically than cotton.


                      It claims to be largely recycle paper, which means that it is not fire rated (look to Roxul -- rock wool insulation -- or standard fiberglass for that). For a 2" thick panel, the key NRC ratings are:
                      • 200 Hz - 0.51
                      • 500 Hz - 1.18
                      • 1kHz - 1.11


                      To convert a NRC rating into a decibel attenuation number, the following formula is used:

                      NRC = 1 - 10 ^( -dB / 20)
                      or
                      dB = 20 * LOG10( 1 - NRC)

                      So, that 0.51 NRC rating would equal a bit over 6 dB of attenuation. But if one is astute with logarithms (or quick with a spreadsheet formula), one will quickly see that an NRC rating ought to be asymptotic to 1.0 (full absorption). However, lots of materials show greater NRC ratings than 1.0, which causes me to question the entire corpus. I would guess that this means that a material with an NRC rating over 1.0 has a quieter nearfield sound level than the ambient room, but this seems like it could be explained with a different formula. After a lot of additional time on The Google, I found this relatively informative technical bulletin from the folks at Owens Corning (a large manufacturer of fiberglass insulation):


                      Table 12 on page 19 has the TL,DR on most of this. It is a transmission loss, rather than an absorption, but higher is better. In terms of my Helios cabinets, I'm focused on the measurements at 500 Hz and 1kHz, since this corresponds most closely to the rear wave issues that my cabinet will experience. Net-net: higher NRC is better, but small differences probably aren't meaningful. Rockwool, with an NRC500Hz of 1.18 for a 3" batt and Owens-Corning 703, with an NRC500Hz of 1.14 for a 2" panel, probably aren't meaningfully different. When I look at the OC703 product, the NRC rating for a 4" thick layer is only a few hundredths higher, so there is definitely a point of rapidly diminishing returns.

                      I found a calculation in the OC PDF that would seemingly indicate that the relative difference in attenuation is calculable as 10* Log(Rating A / Rating B), but the applicability is dubious (e.g., a 1.0 vs a 0.5 rating would be -3dB, which is very different than what a NRC rating of 0.99 predicts...).

                      I did find a link which looks to be close to a full specification of the ASTM C243 protocol, and if it is, I'm not sure the website was supposed to make this public (ASTM charges for access to the standard):


                      One key item that jumped out to me on this is that the Sabin number is a decay rate (dB/s), rather than an instantaneous number, but when I tried to model the formula from page 2, I got hung up on the volume being inversely proportional to the absorption. It seems like I may need to chew through this a bit more to try to make sense of it all. Any tips/pointers are appreciated.
                      Welcome to Rivendell, Mr. Anderson.

                      Comment

                      • tf1216
                        Senior Member
                        • Apr 2006
                        • 161

                        #12
                        Hi Bear,
                        How is your project coming along?

                        Comment

                        • Bear
                          Super Senior Member
                          • Dec 2008
                          • 1038

                          #13
                          Originally posted by tf1216
                          Hi Bear,
                          How is your project coming along?
                          In the spirit of lessons-learned, I pooched installing a couple of the EZ Lock inserts on the bottom. I needed an M6 tap to try to correct the issue, which is work that is to be done. After that, I need to get the new crossovers built (I've been playing with that a bit). And then finishing and hookup.

                          I've been trying to get more time on my bicycle, but I do need to bite the bullet and go for finish line.
                          Welcome to Rivendell, Mr. Anderson.

                          Comment

                          • JonMarsh
                            Mad Max Moderator
                            • Aug 2000
                            • 15271

                            #14
                            Thanks for keeping us posted, Bear, and sharing all the messy details as the construction progresses- many prefer just to share the final product and not the tears and fears that can occur during the problem solving process, but those are very useful to new entrants to this endeavor so that they have a realistic notion of how issues can be successfully dealt with during the course of construction of a new project with new materials, tools, and techniques- adaptability for problem solving is always important.
                            the AudioWorx
                            Natalie P
                            M8ta
                            Modula Neo DCC
                            Modula MT XE
                            Modula Xtreme
                            Isiris
                            Wavecor Ardent

                            SMJ
                            Minerva Monitor
                            Calliope
                            Ardent D

                            In Development...
                            Isiris Mk II updates- in final test stage!
                            Obi-Wan
                            Saint-Saëns Symphonique/AKA SMJ-40
                            Modula PWB
                            Calliope CC Supreme
                            Natalie P Ultra
                            Natalie P Supreme
                            Janus BP1 Sub


                            Resistance is not futile, it is Volts divided by Amperes...
                            Just ask Mr. Ohm....

                            Comment

                            • Evil Twin
                              Super Senior Member
                              • Nov 2004
                              • 1531

                              #15
                              Originally posted by bambadoo
                              Very interesting project. It is still very unclear for me whether that WG tweeter is available for purchase or not. Still no datasheet.
                              they are shipping and available, but I have suspicions that the delay in the data sheet is due to the lack of desire to publish the most expected data for this kind of part, the frequency response versus measurement axis.

                              The pair I bought and measured last summer have a smooth overall response, but increasing fall off at high frequencies as you go off axis- a steady increase in the downslope of response. they do not come close to matching custom waveguides with the original RS28a tweeter fabricated a few years ago. I suspect the wide surround and the resulting gap between the throat and the dome edge may be a factor in this performance.
                              DFAL
                              Dark Force Acoustic Labs

                              A wholly owned subsidiary of Palpatine Heavy Industries

                              Comment

                              • Bear
                                Super Senior Member
                                • Dec 2008
                                • 1038

                                #16
                                Yeah. I'm already looking at an alternate future design using a pair of SW223BD03s plus a tweeter to be named later (e.g., T34A in a WG). I might cobble together a three way, but need to get through this build. I almost finished the finish on the subwoofer box as a practice piece, so the towers are next.
                                Welcome to Rivendell, Mr. Anderson.

                                Comment

                                • Bear
                                  Super Senior Member
                                  • Dec 2008
                                  • 1038

                                  #17
                                  EZ Lock? Not as EZ for me

                                  So, this will be a couple of catch-up posts since I spent a fair bit of time on other things the last several weeks. Let's start with getting some feet on these things. Attractive outriggers are ... Not Cheap. I have carried a set of Via Blue spikes for a long, long time, and since I couldn't find outriggers at a price I was willing to pay, these are being called into service.

                                  So, I grabbed some M6 EZ Lock inserts and the relevant drill bit. Yet again, I think I need to heed the advice given to me and slightly oversize the holes for the inserts. Of the eight that I did, four had problems, with two of them being severe. Also, being a novice, I got too much epoxy in the insert, causing issues (top right was the worst).

                                  Click image for larger version

Name:	IMG_9814.jpg
Views:	1
Size:	64.5 KB
ID:	865716

                                  However, an M6 tap and just a touch of effort was able to materially improve things. I'll need to go back and caulk several of the holes that went through the bottom of the cabinet before I close them up. Also, I'll need to adjust the feet to level the speaker, but at least the spikes are within a couple of millimeters of each other as a starting point.

                                  Click image for larger version

Name:	IMG_9815.jpg
Views:	1
Size:	57.0 KB
ID:	865717

                                  You can also see the excess epoxy that I had to sand prior to finishing them.
                                  Welcome to Rivendell, Mr. Anderson.

                                  Comment

                                  • Bear
                                    Super Senior Member
                                    • Dec 2008
                                    • 1038

                                    #18
                                    Subwoofer gets closer

                                    The dual subwoofer cabinet that is my lemons-into-lemonade test mule is getting really close to completion at this point. It was the first through the big roundover bit to see what that would do. It was the first cabinet to go through the finishing process (three coats of MinWax Wipe-On Poly), and it will be the first to get buttoned up.

                                    Click image for larger version

Name:	IMG_9813.jpg
Views:	1
Size:	140.7 KB
ID:	865718

                                    Because I didn't want to scavenge any more cabinet volume than my haphazard build approach had left me, I decided to mount the amp externally in a bracket I got from PE. I don't expect that the amp will be anything special, but these should just be low bass reinforcement for the Helios. It also helped my decision that the plate amp specifically said that it was not sealed and that a separate sub-chamber would need to be built. I'll just hide it on the back of the box.

                                    Mounting the amp bracket:
                                    Click image for larger version

Name:	IMG_9840.jpg
Views:	1
Size:	63.5 KB
ID:	865719

                                    Getting close
                                    Click image for larger version

Name:	IMG_9841.jpg
Views:	1
Size:	75.4 KB
ID:	865720

                                    PR223 used to drill screw holes. I'm yet again trying to use the socket head wood screws, but with a larger pilot hole (11/32) this time.
                                    Click image for larger version

Name:	IMG_9842.jpg
Views:	1
Size:	56.5 KB
ID:	865721
                                    Welcome to Rivendell, Mr. Anderson.

                                    Comment

                                    • Bear
                                      Super Senior Member
                                      • Dec 2008
                                      • 1038

                                      #19
                                      The Finish Line?

                                      Having gotten Not Terrible results with the subwoofer box, I started on the towers next. The goal was to get three coats of wipe-on poly for each cabinet, aiming for a satin (less reflective) finish since I care about video quality first and foremost (e.g., CalMan).

                                      The process was a little bit evolving. The process for cabinet #1 was:
                                      • Wipe down the cabinet with a tack cloth
                                      • Apply the poly on all six sides
                                      • Wipe off the excess with a staining pad
                                      • Dry for 2 - 24 hours
                                      • Lightly sand with 400 grit, and repeat


                                      I got a couple of runs that had to be sanded away, so for cabinet #2, I spread the poly then wiped. I still got a couple of runs from excess poly, but a lot fewer. I hadn't realized that I was putting that much onto the cabinet for it to run that way. Again, learning....

                                      Here we go:
                                      Click image for larger version

Name:	IMG_9837.jpg
Views:	1
Size:	135.8 KB
ID:	865722

                                      In-process:
                                      Click image for larger version

Name:	IMG_9838.jpg
Views:	1
Size:	133.8 KB
ID:	865723

                                      Comparison between the two before the second was finished.
                                      Click image for larger version

Name:	IMG_9843.jpg
Views:	1
Size:	90.1 KB
ID:	865724

                                      I ran a 0000 steel wool pad over the first cabinet, but that didn't seem to do much. That may be a result of my sanding the wood itself down to 400 grit before I ever started finishing. I've got some beeswax that may go on as a final buff before I load them up.
                                      Last edited by Bear; 12 October 2020, 09:37 Monday.
                                      Welcome to Rivendell, Mr. Anderson.

                                      Comment

                                      • Steve Manning
                                        Moderator
                                        • Dec 2006
                                        • 1885

                                        #20
                                        Originally posted by Bear
                                        So, this will be a couple of catch-up posts since I spent a fair bit of time on other things the last several weeks. Let's start with getting some feet on these things. Attractive outriggers are ... Not Cheap. I have carried a set of Via Blue spikes for a long, long time, and since I couldn't find outriggers at a price I was willing to pay, these are being called into service.

                                        So, I grabbed some M6 EZ Lock inserts and the relevant drill bit. Yet again, I think I need to heed the advice given to me and slightly oversize the holes for the inserts. Of the eight that I did, four had problems, with two of them being severe. Also, being a novice, I got too much epoxy in the insert, causing issues (top right was the worst).

                                        [ATTACH=CONFIG]30760[/ATTACH]

                                        However, an M6 tap and just a touch of effort was able to materially improve things. I'll need to go back and caulk several of the holes that went through the bottom of the cabinet before I close them up. Also, I'll need to adjust the feet to level the speaker, but at least the spikes are within a couple of millimeters of each other as a starting point.

                                        [ATTACH=CONFIG]30761[/ATTACH]

                                        You can also see the excess epoxy that I had to sand prior to finishing them.
                                        Looking good Bear. I use those ViaBlues a lot. As an FYI on the hole size for the inserts and bamboo, go 5% over size as well as chamfer the holes, works like a charm. McMaster Carr is a good source for crazy sized bits to do the 5% over. Also, I found these a while back. https://www.amazon.com/dp/B07SNSMW7D...v_ov_lig_dp_it. Jon is using them on the Ardent D test cabinets ..... very well built was his impression of them.
                                        Hold on to your butts - It's about to get Musical!


                                        WEBSITE: http://www.smjaudio.com/

                                        Comment

                                        • Bear
                                          Super Senior Member
                                          • Dec 2008
                                          • 1038

                                          #21
                                          Originally posted by Steve Manning
                                          Looking good Bear. I use those ViaBlues a lot. As an FYI on the hole size for the inserts and bamboo, go 5% over size as well as chamfer the holes, works like a charm. McMaster Carr is a good source for crazy sized bits to do the 5% over.
                                          Thanks, Steve. I wish that I'd found this before I bought the kit:


                                          Click image for larger version

Name:	e-zLokThreadedInserts.png
Views:	420
Size:	591.9 KB
ID:	932955

                                          The drill bit that EZ Lok includes in their installation kit is ridiculously sharp for a drill bit, but it looks like a 13/32 bit would do the trick, and I've already got one of those.

                                          Also, I found these a while back. https://www.amazon.com/dp/B07SNSMW7D/?coliid=I53MFNVRNENJY&colid=1VRILJ6X65H23&psc=1&re f_=lv_ov_lig_dp_it. Jon is using them on the Ardent D test cabinets ..... very well built was his impression of them.
                                          Solid tip, thanks! I'll look into those for my next tower. A center channel and surrounds are next on the agenda, and those shouldn't require feet, unless I'm doing something wrong.
                                          Last edited by theSven; 09 April 2023, 05:00 Sunday. Reason: Update image location
                                          Welcome to Rivendell, Mr. Anderson.

                                          Comment

                                          • Steve Manning
                                            Moderator
                                            • Dec 2006
                                            • 1885

                                            #22
                                            Originally posted by Bear
                                            Thanks, Steve. I wish that I'd found this before I bought the kit:


                                            The drill bit that EZ Lok includes in their installation kit is ridiculously sharp for a drill bit, but it looks like a 13/32 bit would do the trick, and I've already got one of those.


                                            Solid tip, thanks! I'll look into those for my next tower. A center channel and surrounds are next on the agenda, and those shouldn't require feet, unless I'm doing something wrong.
                                            Yeah, I don't know what they use for wood to obtain their numbers, but as you found out with bamboo it's too small. I've gotten in the habit if I try a new material, I do some testing up front before I screw up the real parts. You might waste an insert or two, but it's a lot less frustrating in the long run.
                                            Hold on to your butts - It's about to get Musical!


                                            WEBSITE: http://www.smjaudio.com/

                                            Comment

                                            • Bear
                                              Super Senior Member
                                              • Dec 2008
                                              • 1038

                                              #23
                                              Originally posted by Steve Manning
                                              Yeah, I don't know what they use for wood to obtain their numbers, but as you found out with bamboo it's too small. I've gotten in the habit if I try a new material, I do some testing up front before I screw up the real parts. You might waste an insert or two, but it's a lot less frustrating in the long run.
                                              The other thing that I found with the EZ Lok bit was that it really needed a stop collar. A standard tape flag just didn't work beyond the first hole. Yeah, I'm learning to increase my waste factor and practice, practice, practice.
                                              Welcome to Rivendell, Mr. Anderson.

                                              Comment

                                              • Bear
                                                Super Senior Member
                                                • Dec 2008
                                                • 1038

                                                #24
                                                No good deed goes unpunished...

                                                So, the plate amp has to go back, and PE won't have stock until the end of November. It was straight-up DOA - no 'magic smoke' ceremony at all. My summer of a new system may turn into a Christmas present. Maybe.

                                                The subwoofer box (~24L) is stuffed with 1lb (0.4kg) of wool, which should get close to the 1.2 - 1.4lb/cf that approximates the "heavily stuffed" setting in Unibox. The subs are a pair SW223BD03s that I got from Solen before PE took over distributing Wavecor in the U.S.

                                                Click image for larger version

Name:	IMG_9848.jpg
Views:	1
Size:	71.7 KB
ID:	865725

                                                I wish this was a finished look, but I've got six weeks to wait before the replacement amp shows up.
                                                Click image for larger version

Name:	IMG_9849.jpg
Views:	1
Size:	79.6 KB
ID:	865726

                                                I also installed 0.75" of Sonic Barrier into the towers.
                                                Click image for larger version

Name:	IMG_9850.jpg
Views:	1
Size:	51.0 KB
ID:	865727
                                                Last edited by Bear; 13 October 2020, 17:04 Tuesday.
                                                Welcome to Rivendell, Mr. Anderson.

                                                Comment

                                                • Bear
                                                  Super Senior Member
                                                  • Dec 2008
                                                  • 1038

                                                  #25
                                                  Cross with Crossovers

                                                  With the Sonic Barrier in place, it's time for the electrical work. I "upgraded" from the Clarity CSA caps to Jantzen Superior. I doubt that I'd ever hear the difference, but the higher spec is appreciated. Also note that I was able to find a 0.35mH inductor, as-specified, rather than substituting the 0.33mH foil inductor. However, since my DCR budget was about 0.3Ohms, it was still an expensive, Litz wire part.

                                                  Size comparison: Jantzen Superior vs Clarity CSA 3.3uF capacitors
                                                  Click image for larger version

Name:	IMG_9877.jpg
Views:	1
Size:	101.2 KB
ID:	865731

                                                  All told, I'm at $200/side with this set of crossovers, rather than $100/side with the first attempt. Realistically, if I'd have used the Eurobus terminals in round 1, then I'd have just re-used those. The terminal strips are cheap and they made hookup so much easier than in any of my prior builds. Highly recommended.

                                                  The tweeter board is on the left, and the Woofer board is on the right.

                                                  Click image for larger version

Name:	IMG_9884.jpg
Views:	1
Size:	148.7 KB
ID:	865732

                                                  The 14ga 1.8mH inductor on the tweeter board is probably overkill from a DCR perspective. The higher gage options were both cheaper and more compact. All of the inductors are held down with hot glue and nylon electrical "zip" ties. The Eurobus strips were held down with just hot glue. I drilled pilot holes at the corners for a 4mm socket head wood screw, but I only ended up using 2 per board.

                                                  Spot the wiring error. After a right shift (thanks for finding that Audyssey!), everything was good.

                                                  Click image for larger version

Name:	IMG_9948.jpg
Views:	1
Size:	59.5 KB
ID:	865735

                                                  Boards are installed on the side walls. Getting my impact driver into the cabinet was actually somewhat annoying for the far (front) screws.

                                                  Click image for larger version

Name:	IMG_9882.jpg
Views:	1
Size:	122.9 KB
ID:	865733

                                                  The Parts Express binding posts continue to annoy me with how short they are. I had bought longer, non-PE ones from Amazon (as recommended by Jon and Steve), but I didn't have big enough ring terminals to fit over them. Since I ended up having to use a bunch of ring terminals to make a T-junction (M512mm through bolt) anyway, then I could have used those instead. Note: invest in some 8mm ring terminals for next time.

                                                  Click image for larger version

Name:	IMG_9883.jpg
Views:	1
Size:	128.7 KB
ID:	865734

                                                  I did use a damp towel to clean out a fair bit of the residual saw dust. After that, I'll just say that if I were a chef, I'd call that "rustic" and charge you an extra $10 for the privilege.
                                                  Last edited by Bear; 26 October 2020, 08:53 Monday.
                                                  Welcome to Rivendell, Mr. Anderson.

                                                  Comment

                                                  • Bear
                                                    Super Senior Member
                                                    • Dec 2008
                                                    • 1038

                                                    #26
                                                    Putting things into overdrive(r)

                                                    Here are the obligatory photos for installing the drivers. The only trick is making sure that the mounting holes line-up with the pilot holes. It's a good idea to drive the first few screws no more than about halfway so that it is still possible to get everything aligned. As with putting a tire on a car, use a crisscross pattern.

                                                    The tweeter used M4 socket cap screws.

                                                    Click image for larger version

Name:	IMG_9870.jpg
Views:	1
Size:	66.4 KB
ID:	865738

                                                    The woofer and the passive radiator were both installed with M5 screws.

                                                    Click image for larger version

Name:	IMG_9871.jpg
Views:	1
Size:	69.0 KB
ID:	865737

                                                    Click image for larger version

Name:	IMG_9875.jpg
Views:	1
Size:	75.8 KB
ID:	865736

                                                    Using an appropriately-sized pilot hole (a touch large, actually), and none of the screws snapped on installation.
                                                    Last edited by Bear; 26 October 2020, 08:52 Monday.
                                                    Welcome to Rivendell, Mr. Anderson.

                                                    Comment

                                                    • Bear
                                                      Super Senior Member
                                                      • Dec 2008
                                                      • 1038

                                                      #27
                                                      The End?

                                                      So, the build journey is over. Bass is decent, maybe even a touch on the boomy end of things, given the proximity to the wall and the rear mount for the PR. I'll play with that over the coming weeks. Already, I've got a night-and-day difference in audio quality over the POS sound bar.

                                                      Click image for larger version

Name:	IMG_9954.jpg
Views:	1
Size:	108.0 KB
ID:	865739

                                                      Next up: a center channel and surrounds. Yol Bolsun (May there always be a road)!
                                                      Welcome to Rivendell, Mr. Anderson.

                                                      Comment

                                                      • Carl V
                                                        Senior Member
                                                        • Apr 2005
                                                        • 269

                                                        #28
                                                        Congrats, “long strange trip it’s been “ paraphrasing the dead!

                                                        Comment

                                                        • Bear
                                                          Super Senior Member
                                                          • Dec 2008
                                                          • 1038

                                                          #29
                                                          Originally posted by Carl V
                                                          Congrats, “long strange trip it’s been “ paraphrasing the dead!
                                                          Thanks! It's definitely been a trip. But "it's the journey, not the destination," right?
                                                          Welcome to Rivendell, Mr. Anderson.

                                                          Comment

                                                          • tf1216
                                                            Senior Member
                                                            • Apr 2006
                                                            • 161

                                                            #30
                                                            Have the tools to measure the performance of the Satori combination? I think a bunch of folks are curious if the waveguide implementation with the TW29BN matched Jeff's and Javad's version.

                                                            Comment

                                                            • JonMarsh
                                                              Mad Max Moderator
                                                              • Aug 2000
                                                              • 15271

                                                              #31
                                                              Originally posted by Bear
                                                              So, the build journey is over. Bass is decent, maybe even a touch on the boomy end of things, given the proximity to the wall and the rear mount for the PR. I'll play with that over the coming weeks. Already, I've got a night-and-day difference in audio quality over the POS sound bar.

                                                              [ATTACH=CONFIG]30786[/ATTACH]

                                                              Next up: a center channel and surrounds. Yol Bolsun (May there always be a road)!
                                                              d

                                                              Congratulations! I'm sure things feel pretty good at this point having a working build!
                                                              the AudioWorx
                                                              Natalie P
                                                              M8ta
                                                              Modula Neo DCC
                                                              Modula MT XE
                                                              Modula Xtreme
                                                              Isiris
                                                              Wavecor Ardent

                                                              SMJ
                                                              Minerva Monitor
                                                              Calliope
                                                              Ardent D

                                                              In Development...
                                                              Isiris Mk II updates- in final test stage!
                                                              Obi-Wan
                                                              Saint-Saëns Symphonique/AKA SMJ-40
                                                              Modula PWB
                                                              Calliope CC Supreme
                                                              Natalie P Ultra
                                                              Natalie P Supreme
                                                              Janus BP1 Sub


                                                              Resistance is not futile, it is Volts divided by Amperes...
                                                              Just ask Mr. Ohm....

                                                              Comment

                                                              • Bear
                                                                Super Senior Member
                                                                • Dec 2008
                                                                • 1038

                                                                #32
                                                                Originally posted by tf1216
                                                                Have the tools to measure the performance of the Satori combination? I think a bunch of folks are curious if the waveguide implementation with the TW29BN matched Jeff's and Javad's version.
                                                                Once upon a life, I invested in an Earthworks M30. However, I then had twins, and the full kit has been in a carrying case, unused, ever since. Given that my environment is not the most conducive to accurate measurement, I'm not sure that I'll improve anything beyond what's already been posted. At this price point, the Bliesma T34A basically dominates the Satori. At a cheaper price point, I'll be looking at SB26ADC in a waveguide in the near future.
                                                                Welcome to Rivendell, Mr. Anderson.

                                                                Comment

                                                                • tf1216
                                                                  Senior Member
                                                                  • Apr 2006
                                                                  • 161

                                                                  #33
                                                                  How are you feeling about your Helios mk2 at this point?

                                                                  Comment

                                                                  • Bear
                                                                    Super Senior Member
                                                                    • Dec 2008
                                                                    • 1038

                                                                    #34
                                                                    Originally posted by tf1216
                                                                    How are you feeling about your Helios mk2 at this point?
                                                                    They are probably still in the break-in phase. I'm only putting 2 - 4 hours a day into them, so the suspension may still have a little way to go to reach equilibrium. But....
                                                                    • The bottom-end is good. If there is a H/SWMBO around who dictates "no subwoofers", then the WO24P in 40L with a PR will give a pretty decent low-end. I've only played around with a little bit of Saint-Saens Symphony #3 at this point to verify how low. If there's a 16Hz organ tone in there, I can't feel it.
                                                                    • Treble is nice. Trisha Yearwood's "The Song Remembers When" has been my go-to for a while on this front. My previous system used SS 6600s across the front, and from a clarity standpoint, I'm definitely no worse off. However, there's a long list of qualifiers there. But, good gosh, that's a purty song, and they nailed it.
                                                                    • There's one "nick" on one front baffle, and I can see it from my couch. However, it's not distracting. The overall visual aesthetic is basically exactly as planned. The 1" roundover matches up really, really well with the bamboo. Even though it's a pretty basic monkey coffin, it doesn't seem like a monkey coffin compared to many speakers that have a sharply-defined baffle.
                                                                    • In terms of "do overs"... If I started the process with the SDFWA shop being open from day 1, I'd still go with the towers. I would increase the height to 40" yielding closer to a full 40L net after excluding bracing, crossovers and the Sonic Barrier. I'd probably try a little harder to replace the Sonic Barrier with Owens Corning OC-703 panels ($$). I'd also stick with the CSA caps. The 0.35mH Litz wire inductor is a keeper, though. Not only is it the specified value, but wire is just easier to work with compared to foil.
                                                                    • In terms of overall design decisions, I'll trust Jon's advice that the T34A is a good match for the Monacor WG-300, and I would spend $400 on a tweeter that way, rather than the beryllium Satori. That should give a slightly lower crossover point (closer to 1kHz), which would take away some of the excess distortion around 1kHz - 1.5kHz. At a MUCH lower price point, the SB26CDC in one of Augerpro's waveguides is probably 99% of the performance, though the issue with the SB26 tweeters is that they lack sensitivity (really only a 89dB/90dB driver). The Bliesma T25 may be the happy medium in terms of price/performance and suitability of purpose.
                                                                    Welcome to Rivendell, Mr. Anderson.

                                                                    Comment

                                                                    • tf1216
                                                                      Senior Member
                                                                      • Apr 2006
                                                                      • 161

                                                                      #35
                                                                      Thank you for the reply. You have the only Helios build I have encountered on the web. It's a design I am contemplating to build over the winter so your feedback is fun to hear.

                                                                      I'd love to use the Bliesma T25B with Augerpro's 6.5" waveguide instead of the Satori but I'm afraid I don't have the knowhow or time to produce the results Mr. Bagby did.
                                                                      From measurements I have seen online the WO24P has the lowest distortion from 200Hz to 1kHz of any other driver out there. It does appear the only area where the Helios could be improved is from 1 to 2kHz.

                                                                      If I can find a local hobbyist to me I'd be behind trying my hand at a passive crossover for a Bliesma swap Helios.

                                                                      Comment

                                                                      • Bear
                                                                        Super Senior Member
                                                                        • Dec 2008
                                                                        • 1038

                                                                        #36
                                                                        Originally posted by tf1216
                                                                        Thank you for the reply. You have the only Helios build I have encountered on the web. It's a design I am contemplating to build over the winter so your feedback is fun to hear.

                                                                        I'd love to use the Bliesma T25B with Augerpro's 6.5" waveguide instead of the Satori but I'm afraid I don't have the knowhow or time to produce the results Mr. Bagby did.
                                                                        From measurements I have seen online the WO24P has the lowest distortion from 200Hz to 1kHz of any other driver out there. It does appear the only area where the Helios could be improved is from 1 to 2kHz.

                                                                        If I can find a local hobbyist to me I'd be behind trying my hand at a passive crossover for a Bliesma swap Helios.
                                                                        Sounds good. For me, it was a timing thing. I wanted something NOW, which still turned into seven-ish months, including the false start (which will become a dual sub cabinet before year-end). I will say to be moderately cautious on WG choice. The Satori line generally has a fairly deep cone profile for any given size. See the tech note here on time alignment:


                                                                        The SB17 is shown as an 18mm offset from the SB29RDC, which is at-or-near the baffle plane (maybe a couple of millimeters off). The MW16, which is a slightly smaller driver, is 21mm from the "plain" TW29R, which does have a touch of waveguide loading itself (and a deeper recess vs the '29RDC, I beleive). Before we dive headlong into the cross-comparison, we would want to correct for the temperature differences indicated (speed of sound goes up with warmer temperatures), but the intuition is there: a smaller Satori driver has a deeper offset. When you scale this to the WO24P, which is basically closer to a 10" driver than an 8" driver, the cone depth is ... not small (nor is the driver!!). Net-net: You may want to look into an 8" WG, rather than the 6.5". For the bigger Bliesma with an off-the-shelf waveguide, there's less flexibility since the match between WG and driver does not have any options available beyond known configurations that "work".

                                                                        Do also note that a benefit of a WG-loaded tweeter is that you can often get away with a LOT fewer parts in the crossover. Plus, the Woofer section will be close to the as-designed topology, but when I say close, every single part value may need to be changed (and there may be an addition/subtraction or two). However, the existing design can act as a starting point/gut check for whether you're going in the right direction.

                                                                        If you want to play around some, I recommend going into the archives here for Zaph's original SB29RDNC/ZA14 design contest files. Grab a copy of Jeff's PCD spreadsheet, and plug the measurement files into the spreadsheet. You can then play with the winning designs and see how changing individual part values moves the various curves. You can even turn things from a TM into an MTM and see what changes. After that, grab some of the FRD/ZMA files from PE and start playing! (see next).
                                                                        Welcome to Rivendell, Mr. Anderson.

                                                                        Comment

                                                                        • Bear
                                                                          Super Senior Member
                                                                          • Dec 2008
                                                                          • 1038

                                                                          #37
                                                                          Here's a three-way using the RSS210HO crossed to the ZA14 and SB29RDCN. This was fun because it gave me insight about what a low frequency passive crossover requires (big caps and big coils!!), plus I ran into problems with impedance over several versions. I'd build this someday once I clear other, higher budget/time priorities.

                                                                          PCD 7 - ZA14 RS210HO 240 - 1883 v3.zip
                                                                          Welcome to Rivendell, Mr. Anderson.

                                                                          Comment

                                                                          • Evil Twin
                                                                            Super Senior Member
                                                                            • Nov 2004
                                                                            • 1531

                                                                            #38
                                                                            That looks like an interesting project... I have some of the RSS210, both versions, and have even pondered the possibility of an 8" two way line array using the HO version...

                                                                            But further driver tests need to be done first, before deciding on a final configuration.
                                                                            DFAL
                                                                            Dark Force Acoustic Labs

                                                                            A wholly owned subsidiary of Palpatine Heavy Industries

                                                                            Comment

                                                                            • Bear
                                                                              Super Senior Member
                                                                              • Dec 2008
                                                                              • 1038

                                                                              #39
                                                                              Originally posted by Evil Twin
                                                                              That looks like an interesting project... I have some of the RSS210, both versions, and have even pondered the possibility of an 8" two way line array using the HO version...

                                                                              But further driver tests need to be done first, before deciding on a final configuration.
                                                                              Thanks! It was a fun modeling exercise, but I'd probably go with the SB15NBAC once I've got some practice measuring drivers. This version used Zaph's files from the contest ~10 years ago and the RSS10 infinite baffle files from PE. Obviously the Z-axis offsets are fictional, but it does give me a starting point for budget estimation (e.g., I wouldn't expect the big caps to vary much). However, I've got an MT in progress first.
                                                                              Welcome to Rivendell, Mr. Anderson.

                                                                              Comment

                                                                              • Zvu
                                                                                Senior Member
                                                                                • Oct 2013
                                                                                • 434

                                                                                #40
                                                                                Hey B,

                                                                                I have just checked the crossover for Helios and found a few measurements of it. I am a bit worried about midwoofer's slope. Here is the pic:

                                                                                Click image for larger version

Name:	121212.png
Views:	429
Size:	332.9 KB
ID:	932954


                                                                                Rounded bit is break up that is only 15dB under tweeter level. No point of using a midwoofer with -50dB distortion if resonance is gonna tickle your ears just -15dB at 3kHz. Problem is that even 60 degrees off axis it still persists almost at the same level as 1kHz in raw measurement. It is very visible here and quite strong.

                                                                                The HD measurements at distance of 315 mm and voltage levels 4 - 16 Volt were carried out with High Pass Filter "on" (2nd order Butterworth type, 50 Hz cutoff, HPF2-50) The voice coil HD measurements were carried out with High Pass Filter "on" (2nd order Buttreworth type, 50 Hz cutoff, HPF2-50) Before taking the measurements the speaker had been very good broken-in


                                                                                Click image for larger version

Name:	12123.png
Views:	428
Size:	166.9 KB
ID:	932953


                                                                                I'm guessing that a tank filter (small capacitor and resistor in series conected across the midwoofer coil) would fix things significantly. If you have the time to disconnect the tweeter and measure it, i can suggest the tank values but you would probably have to tweak it a bit since i don't have the crossover schematic or raw measurements of woofer in that cabinet
                                                                                Last edited by theSven; 09 April 2023, 04:56 Sunday. Reason: Update image location
                                                                                Tesla; George Carlin;

                                                                                Comment

                                                                                • Bear
                                                                                  Super Senior Member
                                                                                  • Dec 2008
                                                                                  • 1038

                                                                                  #41
                                                                                  Originally posted by Zvu
                                                                                  Hey B,

                                                                                  I have just checked the crossover for Helios and found a few measurements of it. I am a bit worried about midwoofer's slope. Here is the pic:


                                                                                  Rounded bit is break up that is only 15dB under tweeter level. No point of using a midwoofer with -50dB distortion if resonance is gonna tickle your ears just -15dB at 3kHz. Problem is that even 60 degrees off axis it still persists almost at the same level as 1kHz in raw measurement. It is very visible here and quite strong.

                                                                                  The HD measurements at distance of 315 mm and voltage levels 4 - 16 Volt were carried out with High Pass Filter "on" (2nd order Butterworth type, 50 Hz cutoff, HPF2-50) The voice coil HD measurements were carried out with High Pass Filter "on" (2nd order Buttreworth type, 50 Hz cutoff, HPF2-50) Before taking the measurements the speaker had been very good broken-in


                                                                                  I'm guessing that a tank filter (small capacitor and resistor in series conected across the midwoofer coil) would fix things significantly. If you have the time to disconnect the tweeter and measure it, i can suggest the tank values but you would probably have to tweak it a bit since i don't have the crossover schematic or raw measurements of woofer in that cabinet.
                                                                                  Thanks for the heads-up. Getting comfortable with measurement is a next major step. I've got decent gear (sans turntable), so it's more of a technique and environment issue. Realistically, that will be a 2021 issue given work and the holidays.
                                                                                  Last edited by theSven; 09 April 2023, 04:57 Sunday. Reason: Update image location
                                                                                  Welcome to Rivendell, Mr. Anderson.

                                                                                  Comment

                                                                                  • Gregor
                                                                                    Junior Member
                                                                                    • Apr 2023
                                                                                    • 3

                                                                                    #42
                                                                                    Hi. I hope someone can help... Im searching for the original Helios crossover element values and scheme. I finally mannaged to get the drives, but cant find crossover documents anywhere. Thank you in advance!

                                                                                    Regards G

                                                                                    Comment

                                                                                    • technodanvan
                                                                                      Super Senior Member
                                                                                      • Nov 2009
                                                                                      • 1008

                                                                                      #43
                                                                                      Your best bet might be to reach out to Bear via PM, or maybe Javad at his Facebook group or Techtalk. I'm not sure that crossover was made publicly available.
                                                                                      - Danny

                                                                                      Comment

                                                                                      • Gregor
                                                                                        Junior Member
                                                                                        • Apr 2023
                                                                                        • 3

                                                                                        #44
                                                                                        Thank you Danny!

                                                                                        Comment

                                                                                        • technodanvan
                                                                                          Super Senior Member
                                                                                          • Nov 2009
                                                                                          • 1008

                                                                                          #45
                                                                                          No problem! If you can't reach Bear or Javad, you might reach out to Meniscus Audio. They might not give you the plans for free, but I bet they'd build the crossovers for you for a nominal fee. I've found their crossovers to be very well done, and always have them built for me since they barely charge anything extra for putting the kits together.
                                                                                          - Danny

                                                                                          Comment

                                                                                          Working...
                                                                                          Searching...Please wait.
                                                                                          An unexpected error was returned: 'Your submission could not be processed because you have logged in since the previous page was loaded.

                                                                                          Please push the back button and reload the previous window.'
                                                                                          An unexpected error was returned: 'Your submission could not be processed because the token has expired.

                                                                                          Please push the back button and reload the previous window.'
                                                                                          An internal error has occurred and the module cannot be displayed.
                                                                                          There are no results that meet this criteria.
                                                                                          Search Result for "|||"