Another Anthology Build :)

Collapse
X
 
  • Time
  • Show
Clear All
new posts
  • 707kevin
    Member
    • Oct 2010
    • 52

    Another Anthology Build :)

    After drooling for a few years, I finally ordered the parts for Jim Holtz and Curt Campbell's Anthology Speakers (Speaker Design Works)

    I'll keep these in the living room with the TV setup for a while. Due to their size they will probably replace my DCM TF-2000's in the spare room & come out to the living room for music and movie nights with friends.
    They'll be powered through a Carver TFM-35x with a Harmon Kardon AVR-3600 pre-outs.
    I currently have a 5 channel Zaph ZA5 setup: ZA5.3MTM Mains, ZA5.3c Center, and ZA5.2 surrounds, and a Dayton RSS315HF sealed in 2.25 sqft.

    The DCM TF-2000's are 60" high, 22" wide, and about 15" deep. The soundstage and imaging is amazing. They are very unique and incredibly rare speakers, but they are 1) too big for the living room, 2) 100% cloth covered (I have a cat), and 3) don't have the bass I would like for music without a sub. For these reasons, they stay in the spare room and don't get used as much as they should.

    Here's most of the parts - a few items on backorder from Madisound or SpeakerHardware.com
    Click image for larger version  Name:	IMG_20200429_173942 (1).jpg Views:	1 Size:	104.6 KB ID:	872518

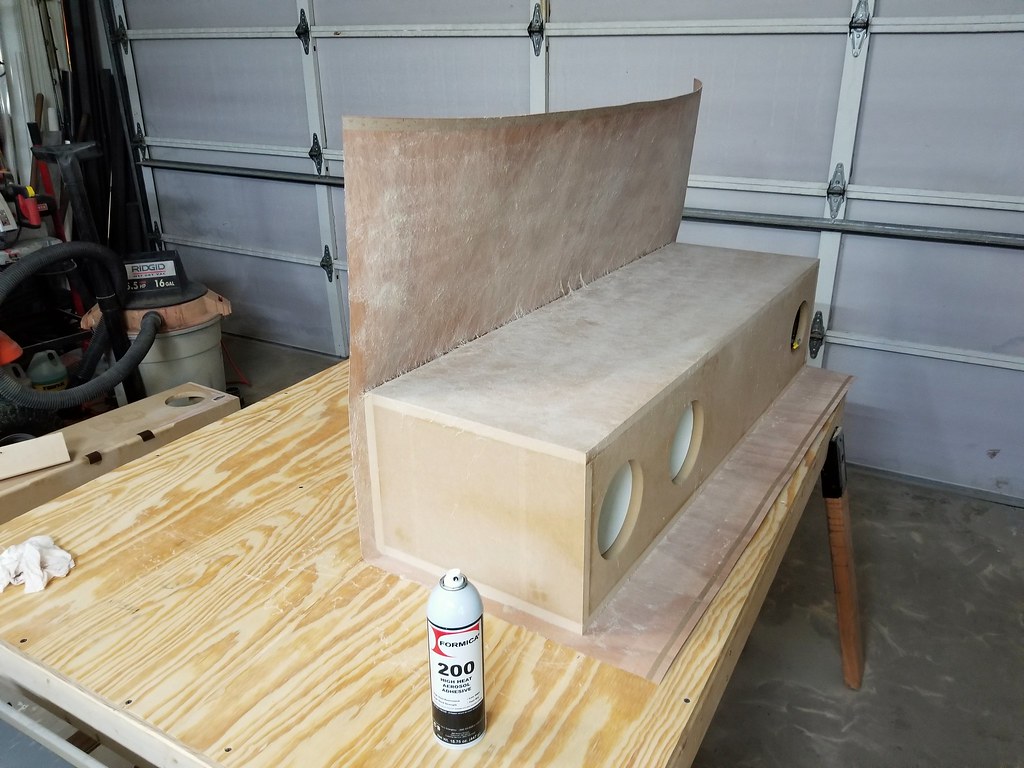
    I decided on a single crossover board. Making sure it will fit through the woofer hole, past the lower brace, onto the bottom of the cabinet, and still have room to install the port tube and flare.
    Click image for larger version  Name:	IMG_20200509_212443.jpg Views:	1 Size:	105.7 KB ID:	872515

    And a couple shots of the sheet goods.
    Click image for larger version  Name:	IMG_20200508_174036.jpg Views:	1 Size:	142.9 KB ID:	872516
    Click image for larger version  Name:	IMG_20200506_224339.jpg Views:	1 Size:	94.6 KB ID:	872517

    I'm leaving the front baffle about 1/8 too wide to flush trim later. I'm also leaving the sides slightly long for the same reason.
    Only 38 holes to cut out! It should be a piece of cake...that is, if piece of cake was the misery of cutting out 38 precise circles in MDF. Actually this might be the whole cake. It's going to be a chore!! Jasper Jig FTW.

    On my test cuts the Woofer and the tweeter are a virtually perfect press fit using the jasper jig and specs from the drawings. The mids had a little slop in them - like 1/32". Are there any genius ideas to use make an cut using the jasper jig at a 32nd for more precision? I don't have any other size router bits. I'd like to try to get the mids just set in just 'perfect' like the other drivers.

    My finish details are going to be round-over the sides, a 4x4 recess above the port for binding posts, and a veneer pattern inspired by these: https://www.htguide.com/forum/showth...aker-Kit-Build (still working out the actual pattern I want - but my wife and I both love the look.
    Last edited by theSven; 09 April 2023, 05:49 Sunday. Reason: Update htguide url
  • rick844
    Senior Member
    • Jun 2019
    • 232

    #2
    Awesome! You will love them. What are you asking with regards to the mids? Im not following your request.

    Comment

    • 707kevin
      Member
      • Oct 2010
      • 52

      #3
      Originally posted by rick844
      Awesome! You will love them. What are you asking with regards to the mids? I'm not following your request.
      Yeah, poorly worded question - I updated the post.

      The cutout for the mids did not fit as perfect as the cutout for the woofers and tweeters on my test run. It was just slightly loose, while the others were a perfect press in fit. It wasn't an entire 16th off - so I don't think I screwed it up on the Jasper jig. I was hoping for a easy way to just make the mid driver cutouts just a little tighter to the frame of the driver.

      Comment

      • rick844
        Senior Member
        • Jun 2019
        • 232

        #4
        Ah, gotcha. I used a caliper and measured the drivers myself and then adjusted the jig accordingly with just 1/16" or 1/32" offset. I dont recall exactly.

        Comment

        • rick844
          Senior Member
          • Jun 2019
          • 232

          #5
          I used a milescraft circle jig.

          Comment

          • 707kevin
            Member
            • Oct 2010
            • 52

            #6
            Slowly making progress.
            I cut out a 4x4 square where I'll put the binding posts. I'll glue in a panel with the posts so they aren't sticking out. I like the look better.

            Recess and hole for the ports are all done.

            Slow and dusty work! I rigged up a overhead hook for extension cords and vacuum hose which really helps with the router work.

            Click image for larger version

Name:	IMG_20200512_210530.jpg
Views:	1
Size:	88.5 KB
ID:	865452

            Comment

            • rick844
              Senior Member
              • Jun 2019
              • 232

              #7
              It is extremely dusty project. I learned to do all my cutting and routing outside after this project. MDF dust got in all of my tools, drawers, etc...

              Comment

              • 707kevin
                Member
                • Oct 2010
                • 52

                #8
                I hear that! I normally never cut in the garage if I can help it. With our rain and fog lately I can't do it outside.

                Did you use foam tape on your tweeter? I just realized they don't have a gasket and I'll need to compensate on my recess depth to make an airtight seal on the tweeter installation.

                Comment

                • rick844
                  Senior Member
                  • Jun 2019
                  • 232

                  #9
                  Originally posted by 707kevin
                  I hear that! I normally never cut in the garage if I can help it. With our rain and fog lately I can't do it outside.

                  Did you use foam tape on your tweeter? I just realized they don't have a gasket and I'll need to compensate on my recess depth to make an airtight seal on the tweeter installation.
                  I did not. The tweeters fit so very tightly, I don't think foam would have fit in there. LOL. The tape did come with the kit from Meniscus, which was used for the woofers. The mids came with foam already on them.

                  Comment

                  • rick844
                    Senior Member
                    • Jun 2019
                    • 232

                    #10
                    One thing I did differently was I cut a radius on the front baffle corners to allow me to wrap the veneer around to soften the front look. If you are considering this, and are fairly new to veneer, let me know. I can save you a lot of pain that I went through.

                    Comment

                    • 707kevin
                      Member
                      • Oct 2010
                      • 52

                      #11
                      Yeah, the tweeters do press in nice and snug. I have some very thin, soft foam tape I'll test out. It will squish down to paper thin. I like the idea of a more perfect seal.

                      I am considering a 3/4 radius on the front baffle sides (not top/bottom) , and this will be my first veneer job...any tips are appreciated!

                      Comment

                      • rick844
                        Senior Member
                        • Jun 2019
                        • 232

                        #12
                        Yes, that's exactly what I did. So, some tips.

                        1. Be picky with the veneer you choose. I found that the more sap vanes, the easier it was to wrap around the radii.
                        1.a. Also, try to get two sheets that look as close together as possible. Even though they may both come and look similar, check them in bright light. One of my towers is slightly darker than the other and had I have been more selective, i would have saved a bunch of pain.

                        2. Get this stuff. It is incredible, but it will not let go once you put the two pieces together.

                        Lay the cabinet down on a big flat surface with the veneer under it. Then, apply the contact spray to the cabinet and the veneer. Then roll the cabinet carefully while applying pressure to ensure the veneer rolls over the radius evenly. This is no joke very difficult to do, but the results are amazing.

                        I'll attach pics of the contact cement and how I rolled in another post.

                        Comment

                        • rick844
                          Senior Member
                          • Jun 2019
                          • 232

                          #13


                          Click image for larger version

Name:	glue-wrap-on.png
Views:	415
Size:	3.38 MB
ID:	932956
                          Last edited by theSven; 09 April 2023, 06:00 Sunday. Reason: Update image location

                          Comment

                          • rick844
                            Senior Member
                            • Jun 2019
                            • 232

                            #14
                            For whatever reason, this site is being stupid about editing posts. The link shows the contact cement and how I rolled the speaker over the veneer. Take your time and plan. Cause once it's on, it's on. You can get it off, but not without damaging the veneer.

                            Comment

                            • rick844
                              Senior Member
                              • Jun 2019
                              • 232

                              #15
                              Oh, yeah and also. I needed 2 4 x 8 sheets of veneer. No real way to use less. Place the towers so that the top piece can be cut separate and then applied later. I also didnt bother veneering the bottom. Nobody sees it.

                              Comment

                              • rick844
                                Senior Member
                                • Jun 2019
                                • 232

                                #16
                                Here is the thread I did when I built them. You might find some better photos and data here as well.

                                Last edited by theSven; 09 April 2023, 06:01 Sunday. Reason: Update htguide url

                                Comment

                                • 707kevin
                                  Member
                                  • Oct 2010
                                  • 52

                                  #17
                                  Thanks for the info, definitely helpful.

                                  Today I started on the outer baffle cutouts.
                                  I used 5/32, 7/32, and 1/4 inch drill bits to index my route depth for the driver recess. Also, once I set the depth for a driver, I cut all the recesses requiring that depth at one for consistency. Then went back and finished the cutouts.Click image for larger version

Name:	IMG_20200516_181020.jpg
Views:	1
Size:	88.6 KB
ID:	865454

                                  Comment

                                  • 707kevin
                                    Member
                                    • Oct 2010
                                    • 52

                                    #18
                                    Click image for larger version

Name:	IMG_20200516_180942.jpg
Views:	1
Size:	121.9 KB
ID:	865455

                                    Comment

                                    • 707kevin
                                      Member
                                      • Oct 2010
                                      • 52

                                      #19
                                      Click image for larger version

Name:	20200516_125646.jpg
Views:	1
Size:	70.1 KB
ID:	865456

                                      Still waiting on a tweeter and mid tunnel PVC.

                                      Comment

                                      • rick844
                                        Senior Member
                                        • Jun 2019
                                        • 232

                                        #20
                                        Looks good. I like the recessed terminals. Wish I had done that.

                                        Comment

                                        • 707kevin
                                          Member
                                          • Oct 2010
                                          • 52

                                          #21
                                          Just for fun here's some old pictures of those DCM's - I just can't justify them in our small living room.

                                          I think in these photos the TV was a 55", but looks like a 40" next to those speakers!
                                          Click image for larger version

Name:	20180211_131719.jpg
Views:	1
Size:	61.0 KB
ID:	865461

                                          And a naked shot too.
                                          Click image for larger version

Name:	20150707_220417.jpg
Views:	1
Size:	76.4 KB
ID:	865462

                                          Comment

                                          • rick844
                                            Senior Member
                                            • Jun 2019
                                            • 232

                                            #22
                                            Wow, those are HUGE.

                                            Comment

                                            • 707kevin
                                              Member
                                              • Oct 2010
                                              • 52

                                              #23
                                              lol, yes. I could not pass them up when I found them at a garage sale for $50
                                              I refinished them, refoamed a couple drivers, and gave them new cloth. They were slated to sell for $2000 in 1989 or so, but never made it into full production. The smaller TF-1000's are still out there all over the place with great reviews. These are more. and better. and more better.

                                              Comment

                                              • 707kevin
                                                Member
                                                • Oct 2010
                                                • 52

                                                #24
                                                Just some random progress photos. I like visual reference for a lot of this stuff. Deciding in what order to start glueing up the box took me longer than it should have.

                                                Like ALWAYS...if I had more clamps this would go faster...

                                                I decided to work with a side panel laying flat. My first round of glueing was the TOP panel, and the front inner baffle. Making sure these are 100% perfect square, as all other parts will be attached to these as I go.

                                                Then I glued in the front PVC support inside because there was no alignment needed - it either fits or it doesn't Somehow, the tweeter cutouts lines up absolutely perfect. I agonize over this crap. I feel like whatever step I'm about to take next will fail and I'll ruin the entire project. So far so good.

                                                Next was the PVC pipe, rear PVC support and uppermost brace. Use scraps of MDF to space the rear PVC support inboard enough to leave room for the rear baffle. I cut the side panels, top and bottom, and front outer baffle all about 1/16 oversize so I can come back and flush trim them later. Use the braces as a guide for the rear panel position.

                                                Then I clamped up the lower two braces, one at a time, because...clamps... That's where I'm at now on the box assembly. Tonight I'll glue up the rear panel and bottom panel. and have one box ready for internal foam and wiring!

                                                I will be gluing in flanged threaded inserts for the woofers later today, and preparing pilot holes for the mids and tweeters. I'm going to test out the CA glue method for the mids and tweeters.
                                                1. Drill pilot holes as deep as the screws.
                                                2. Insert a screw most of the way, but don't torque it down
                                                3. Add a few drops of THIN CA and let harden (it supposedly soaks into the MDF fibers up to 1/8 inch and makes it very hard)
                                                4. Mount driver and tighten down screw.

                                                Tips for Noobs like me:
                                                *** When you're about to glue up the PVC pipes into a tight fitting cutout, get the glue in and the pipe fitted FAST before the MDF swells from the glue.
                                                *** Test fit, dry fit, place all your clamps, make sure you have a plan before the glue goes on.
                                                *** Then test fit again.
                                                *** Leave the sides, top, bottom about 1/16 or even 1/8 in too long towards the back so when assembling the hang over a bit. Then after assembly, use a flush trim router and you will have a seriously perfect fit.
                                                *** Leave the front baffle 1/8" oversize at bottom, and one side

                                                TEST FIT
                                                Click image for larger version

Name:	IMG_20200523_113922.jpg
Views:	1
Size:	123.3 KB
ID:	865483

                                                TEST FIT
                                                Click image for larger version

Name:	IMG_20200523_114016.jpg
Views:	1
Size:	100.4 KB
ID:	865484

                                                Click image for larger version

Name:	IMG_20200606_222909.jpg
Views:	1
Size:	140.1 KB
ID:	865486
                                                Click image for larger version

Name:	IMG_20200606_215801.jpg
Views:	1
Size:	135.5 KB
ID:	865485

                                                Click image for larger version

Name:	IMG_20200608_074825.jpg
Views:	1
Size:	131.8 KB
ID:	865487

                                                Comment

                                                • 707kevin
                                                  Member
                                                  • Oct 2010
                                                  • 52

                                                  #25
                                                  Wow, my shop is a mess...

                                                  A few more. I know it's helpful for me to see every possible angle before I start something like this, so maybe it will help someone else to get an idea of how they want to tackle it.

                                                  Click image for larger version

Name:	IMG_20200608_074835.jpg
Views:	1
Size:	106.3 KB
ID:	865488
                                                  Click image for larger version

Name:	IMG_20200608_074840.jpg
Views:	1
Size:	99.5 KB
ID:	865489

                                                  Comment

                                                  • Mikerodrig27
                                                    Senior Member
                                                    • Feb 2015
                                                    • 160

                                                    #26
                                                    Looking good! It sounds like you're using Tnuts or barrel nuts. I have seen way more failures with those than the conventional wood screw. Nice thing about a wood screw is that if by chance you mess up the threads, you can glue a little piece of wood in there and put the screw back in.

                                                    Everything looks very accurate so far, great job!

                                                    Comment

                                                    • Jim Holtz
                                                      Ultra Senior Member
                                                      • Mar 2005
                                                      • 3223

                                                      #27
                                                      Excellent workmanship! :T

                                                      Jim

                                                      Comment

                                                      • 707kevin
                                                        Member
                                                        • Oct 2010
                                                        • 52

                                                        #28
                                                        Originally posted by Mikerodrig27
                                                        Looking good! It sounds like you're using Tnuts or barrel nuts. I have seen way more failures with those than the conventional wood screw. Nice thing about a wood screw is that if by chance you mess up the threads, you can glue a little piece of wood in there and put the screw back in.

                                                        Everything looks very accurate so far, great job!
                                                        Thanks!!

                                                        I'm using flanged threaded inserts. Very coarse blade like threads, and a flange so they don't pull through. After hardening the MDF with Thin CA glue I don't think they will go anywhere. They are inserted on the inside of the outer baffle only, sandwiched between the baffle layers. The hardened MDF will keep the threads from stripping out, and the sandwiching will prevent the inserts from backing out while unscrewing the drivers. My tests have been very positive on this so far.

                                                        These guys:
                                                        McMaster-Carr is the complete source for your plant with over 595,000 products. 98% of products ordered ship from stock and deliver same or next day.


                                                        What's REALLY messed up is that I'm doing it because I don't like the look of large philips head screws on the woofers, and this way I can use nice cap screws with allen/hex heads. :roll: I've settled with the mids and tweeters having philips heads because I realized I can't see them from the chair...


                                                        Click image for larger version

Name:	IMG_20200608_172851.jpg
Views:	1
Size:	144.1 KB
ID:	865490
                                                        Clamps? Clamps.

                                                        Click image for larger version

Name:	IMG_20200609_074605.jpg
Views:	1
Size:	125.4 KB
ID:	865491
                                                        So Close!

                                                        Comment

                                                        • 707kevin
                                                          Member
                                                          • Oct 2010
                                                          • 52

                                                          #29
                                                          Originally posted by Jim Holtz
                                                          Excellent workmanship! :T

                                                          Jim
                                                          I'm sure I'll say the same to you once I hear them

                                                          Comment

                                                          • 707kevin
                                                            Member
                                                            • Oct 2010
                                                            • 52

                                                            #30
                                                            Follow up to the CA glues Threaded inserts with flanges. I did a couple more tests today.

                                                            * Drill pilot hole to spec
                                                            * Thread the insert in about 3/4 of its final depth, then remove
                                                            * Apply thin CA to the entire length of hole
                                                            * Reinstall threaded insert and tighten to final flush depth (the flange stops)
                                                            * Wait a few minutes....

                                                            I was able to tighten down the screw enough to strip the head without the insert moving. On my next test, I didn't let the dead strip so I could test removal of the screw. Without CA glue (epoxy might work too? But the CA soaks in and bonds with the resin in the MDF), sometime the threaded insert will push back out when you go to unscrew the fastener. These did not budge, and I HOPE that being sandwiched between the baffle sheets, they wont be able to even if they try.

                                                            In fact it worked so well, I'm going to repair my RS315 sub with CA glue and some larger screws since the ones I used were too small on that anyways.
                                                            Last edited by 707kevin; 13 June 2020, 23:19 Saturday.

                                                            Comment

                                                            • Mikerodrig27
                                                              Senior Member
                                                              • Feb 2015
                                                              • 160

                                                              #31
                                                              Nice! Glad it worked so well. I have some Allen head screws with wood threads that i pulled off of some infinity speakers that I parted out. Haven't seen any since. I agree I like the look of allen heads better.

                                                              Comment

                                                              • 707kevin
                                                                Member
                                                                • Oct 2010
                                                                • 52

                                                                #32
                                                                Well, one down. One to go.
                                                                Check, check, and recheck that I have everything I need internally. The point of no return - glueing on the last side panel....
                                                                I almost had the glue down before I realized I didn't drill holes for the mids wiring in the tube.... yikes!


                                                                Click image for larger version

Name:	IMG_20200611_223759.jpg
Views:	1
Size:	115.4 KB
ID:	865493
                                                                I'm using slip on / spade terminals for now, since I'll have the drivers out again for veneer (eventually) After that I'll twist and solder everything.

                                                                Click image for larger version

Name:	IMG_20200611_223747.jpg
Views:	1
Size:	116.2 KB
ID:	865494

                                                                Click image for larger version

Name:	IMG_20200616_074718.jpg
Views:	1
Size:	89.5 KB
ID:	865495
                                                                Too close to the wall, I know! I had it out 18" or so while listening.


                                                                I played around with just this one speaker last night for a bit. I know how bad a single speaker can be on a stereo source, but I had to hear it.
                                                                I let them play for an hour or so while I was out, then played Diana Krall Live from Paris. That voice (one of her best recordings, I think) on those mids was outstandingly clear and detailed.
                                                                They seem to have enough bass that the sub won't be needed for music. Just the ONE speaker was rattling the room with a few test tracks, and I wasn't pushing it. The mid bass on some drum test tracks was phenomenal. Like, drum set-is-in-the-room amazing.

                                                                I think I'll be blown away with TWO of these broken in and ready to go in stereo.

                                                                Comment

                                                                • rick844
                                                                  Senior Member
                                                                  • Jun 2019
                                                                  • 232

                                                                  #33
                                                                  Yes, two will change your life. They will make you hate your center channel.

                                                                  Comment

                                                                  • rick844
                                                                    Senior Member
                                                                    • Jun 2019
                                                                    • 232

                                                                    #34
                                                                    Did you get the second one done?

                                                                    Comment

                                                                    • 707kevin
                                                                      Member
                                                                      • Oct 2010
                                                                      • 52

                                                                      #35
                                                                      Yes, FINALLY. Done as in assembled and able to listen. I've made the mistake of doing this in the past and I know it means they won't see a finish or veneer for at least a year...

                                                                      When I first pulling up the volume slowly with #2 (lefty) in the mix I was disappointed, something was wrong. I wasn't getting a wide image or more low end. The two speakers just didn't sound like a pair. I turned it up just a little more and noticed the mid drivers on the left speaker were dealing with a lot more excursion than the right... I knew the problem instantly. When you mark the crossover board IN - T M W... and read it upside down when wiring? I mixed up M and W. Swapped them around and wow what a difference.

                                                                      I haven't got a chance to really get into listening yet. A couple songs off Diana Krall Live in Paris highlights the clarity in vocals, little nuances in breathing that I never noticed before. The snare brushes used to sound like either static or white noise or constant rainfall or something to me. Now it's like you can hear the pattern of the snare brushes, and hear the drummer actually moving them. The detail have come alive. I played a few tracks from Porcupine Tree that really hit the drums and guitar. There was a few drum sections that had some craziness I never noticed bouncing the stick on the rim. Cool to hear things like that.

                                                                      Also they seem play stand up bass very nice. I didn't realize how much I was missing low notes with detail. A 5.5" MTM and a 12" sub leaves quite a gap in frequency response. At the same time, it's made me realize just how good my little ZAph ZA5 speakers are. The definitely do not sound bad next to the anthology's at all - just less detailed, less bass (ok, a lot less), and a little ragged around the highs as the volume comes up. I'm still really impressed by them for what they are.

                                                                      I'm going to have to pull out the DCMs and do some comparisons in the mids / highs & soundstage and imaging. Right now it's a toss-up, but I haven't really listened to the DCMs in 6-8 months at least. The Anthology's will destroy them in dynamics and overall impact and SPL.


                                                                      Pics are fun - No - I was not listening like this - the Anthology's had plenty of space all around. 65" TV for reference. Anyone that says 65" is big enough doesn't have big speakers I'm guessing!
                                                                      Hopefully soon I can have a few friends over that enjoy this sort of thing and really work them over.
                                                                      Click image for larger version

Name:	IMG_20200628_202548.jpg
Views:	1
Size:	77.1 KB
ID:	865517

                                                                      Comment

                                                                      • Jim Holtz
                                                                        Ultra Senior Member
                                                                        • Mar 2005
                                                                        • 3223

                                                                        #36
                                                                        Awesome feedback! I'm looking forward to hear results from your group listening session. :T

                                                                        This is after the fact but Rick is spot on about break in. I've found about 20 hours. It doesn't need to be blasting just normal volume.

                                                                        Jim
                                                                        Last edited by Jim Holtz; 29 June 2020, 16:43 Monday. Reason: Added thought

                                                                        Comment

                                                                        • rick844
                                                                          Senior Member
                                                                          • Jun 2019
                                                                          • 232

                                                                          #37
                                                                          They will break in a little too and you will see a little more mid and lower end bass response, or at least I did. When I first fired then up, they sounded great, but a little held back. Within only a few days of break in, they came alive. It's crazy how much I love these speakers. Hole theater is a must trial as well. The do everything right in my book. Often times I used to listen to music through all my speakers thinking it sounded better. Now, it sounds horrible if I turn on the other channels instead of just the towers and the sub. The imaging makes it sound as though the towers are directly in front of the tv, which obviously they are not.

                                                                          I want to build more speakers for atmos applications, but I just dont have the space for it. Also WAF is maxed out atm.

                                                                          Comment

                                                                          • Mikerodrig27
                                                                            Senior Member
                                                                            • Feb 2015
                                                                            • 160

                                                                            #38
                                                                            I agree with what Rick844 said. I have the RS225's and when I first fired my speakers up, they sounded a little anemic. Well that changed rather quickly. Take them for a good test drive. Great speakers. I am glad you are getting to finally listen to them.

                                                                            Comment

                                                                            • 707kevin
                                                                              Member
                                                                              • Oct 2010
                                                                              • 52

                                                                              #39
                                                                              It only took a day or three for the bass to develop. Now you can hear / feel just a lot more of the low end without turning it up as loud.

                                                                              If I had to come up with any complaints it would be that I'm having a little difficulty getting the speakers to disappear as much as I'd like. This was one of the DCM's "magic tricks" having these monster 60" x 22" monoliths in front of you, and you couldn't tell they were the source. It's probably my small rectangle of a room. 13ft x 22ft closed rectangle with the speakers on the long wall. Listening position is right against the center of back wall, which isn't great. I line up all the pillows on the back to try to soften the back wall. I've tried placing the speakers 7 to 10 ft apart which has affected the overall width and accuracy of the soundstage, but hasn't hidden the speakers. The rear of the speakers are 22" from the wall. Not toed in at all. I've settled on 8ft apart on center for now.

                                                                              I'm thinking of getting a few packs of acoustic foam and making temporary panels on cardboard that I can place for listening, then hide them in the closet when not needed.

                                                                              The spare bedroom is the same size room, but the furniture allows for placement on the short wall. I'll try them out in there just to see the difference in room orientation. I should be able to get 2 ft on either side, pull them out 2-3 feet, and still have 8-9 feet behind me.

                                                                              Comment

                                                                              • Mikerodrig27
                                                                                Senior Member
                                                                                • Feb 2015
                                                                                • 160

                                                                                #40
                                                                                Your idea of setting them up in the spare bedroom sounds like a good one. I think Jim recommended 3' of clear space around them but it sounds like an improvement regardless.

                                                                                I had a set of Forte 1's before I build my kit also by Jim and Curt. The Klipsch speakers would disappear in an impressive way. The new ones sort of do that but not completely. They sound bigger though and much clearer. They are still miles ahead of the old Fortes.

                                                                                I had a thought about putting sound diffusers behind the speakers to and some first reflection point absorption. Once I mow through a few other projects, I will try that.

                                                                                Comment

                                                                                • Jim Holtz
                                                                                  Ultra Senior Member
                                                                                  • Mar 2005
                                                                                  • 3223

                                                                                  #41
                                                                                  Originally posted by 707kevin
                                                                                  It only took a day or three for the bass to develop. Now you can hear / feel just a lot more of the low end without turning it up as loud.

                                                                                  If I had to come up with any complaints it would be that I'm having a little difficulty getting the speakers to disappear as much as I'd like. This was one of the DCM's "magic tricks" having these monster 60" x 22" monoliths in front of you, and you couldn't tell they were the source. It's probably my small rectangle of a room. 13ft x 22ft closed rectangle with the speakers on the long wall. Listening position is right against the center of back wall, which isn't great. I line up all the pillows on the back to try to soften the back wall. I've tried placing the speakers 7 to 10 ft apart which has affected the overall width and accuracy of the soundstage, but hasn't hidden the speakers. The rear of the speakers are 22" from the wall. Not toed in at all. I've settled on 8ft apart on center for now.

                                                                                  I'm thinking of getting a few packs of acoustic foam and making temporary panels on cardboard that I can place for listening, then hide them in the closet when not needed.

                                                                                  The spare bedroom is the same size room, but the furniture allows for placement on the short wall. I'll try them out in there just to see the difference in room orientation. I should be able to get 2 ft on either side, pull them out 2-3 feet, and still have 8-9 feet behind me.
                                                                                  The recommended positioning in a room that can accommodate it is 18" behind the speakers with at least that much from the sides to the side walls. More is better. So, the next suggestion is to take a look at the foam in the tunnels. 1" flat foam lining the tunnel with a 45 degree bevel on driver end and and at least 2" back from the end of the driver. The more you slide it back from the rear of the driver, the more sound stage you should get which means the speakers disappear more. Give it a try and see if it helps.

                                                                                  HTH

                                                                                  Jim

                                                                                  Comment

                                                                                  • rick844
                                                                                    Senior Member
                                                                                    • Jun 2019
                                                                                    • 232

                                                                                    #42
                                                                                    I must say, I have not experienced the same issue. To me, in stereo mode (no center channel playing) the sound seems like it is coming right from the center of the tv. I am not able to pull my towers away from the wall more then 12", and they simply sound perfect to me. Have you run any room correction software? What receiver are you using?

                                                                                    Comment

                                                                                    • 707kevin
                                                                                      Member
                                                                                      • Oct 2010
                                                                                      • 52

                                                                                      #43
                                                                                      Originally posted by Jim Holtz
                                                                                      The recommended positioning in a room that can accommodate it is 18" behind the speakers with at least that much from the sides to the side walls. More is better. So, the next suggestion is to take a look at the foam in the tunnels. 1" flat foam lining the tunnel with a 45 degree bevel on driver end and and at least 2" back from the end of the driver. The more you slide it back from the rear of the driver, the more sound stage you should get which means the speakers disappear more. Give it a try and see if it helps.

                                                                                      HTH

                                                                                      Jim
                                                                                      Thanks for taking the time to reply! Just to be clear - there is some goodness going on, I just can't get them to completely disappear.
                                                                                      I've got about 24" from back of enclosure to wall right now, and at least 5ft on the left, and the right at least 8 ft. The furniture in the photo, below the height of the top woofer. I think this should be good.

                                                                                      But... now that you mention it....I have my foam cut at 45, OK. But it is right up to the magnet as far as length goes. The 45 taper ends where the magnet starts. I should cut this so that it's 2" after the magnet? Please let me know if this is what you mean and I'll start cutting! I honestly just used department store camping pad open cell foam...
                                                                                      I also bought some of the Parts Express "Sonic Barrier" 1" foam that I haven't tried yet since I accidentally only ordered enough for one speaker. I had I read that someone really like the sound on that slightly more dense foam.

                                                                                      Comment

                                                                                      • Jim Holtz
                                                                                        Ultra Senior Member
                                                                                        • Mar 2005
                                                                                        • 3223

                                                                                        #44
                                                                                        Originally posted by 707kevin
                                                                                        Thanks for taking the time to reply! Just to be clear - there is some goodness going on, I just can't get them to completely disappear.
                                                                                        I've got about 24" from back of enclosure to wall right now, and at least 5ft on the left, and the right at least 8 ft. The furniture in the photo, below the height of the top woofer. I think this should be good.

                                                                                        But... now that you mention it....I have my foam cut at 45, OK. But it is right up to the magnet as far as length goes. The 45 taper ends where the magnet starts. I should cut this so that it's 2" after the magnet? Please let me know if this is what you mean and I'll start cutting! I honestly just used department store camping pad open cell foam...
                                                                                        I also bought some of the Parts Express "Sonic Barrier" 1" foam that I haven't tried yet since I accidentally only ordered enough for one speaker. I had I read that someone really like the sound on that slightly more dense foam.
                                                                                        The tunnel foam allows you to adjust it to your room since each one will vary. The 2" back from the rear magnet is a great place to start and honestly works great in my listening room with no treatment. That's also where Curt voiced them. Give it a try and see what happens. It's really easy to change if you don't like it. I think backing the foam of a bit will make them disappear for you.

                                                                                        Jim

                                                                                        Comment

                                                                                        • 707kevin
                                                                                          Member
                                                                                          • Oct 2010
                                                                                          • 52

                                                                                          #45
                                                                                          I think we're on to something!! Much better. I pulled the foam out exactly 2" . I'll play with more / less and then trim it off.
                                                                                          Going to need some time on this though, my allergies are killing my hearing right now - full head congestion

                                                                                          Comment

                                                                                          Working...
                                                                                          Searching...Please wait.
                                                                                          An unexpected error was returned: 'Your submission could not be processed because you have logged in since the previous page was loaded.

                                                                                          Please push the back button and reload the previous window.'
                                                                                          An unexpected error was returned: 'Your submission could not be processed because the token has expired.

                                                                                          Please push the back button and reload the previous window.'
                                                                                          An internal error has occurred and the module cannot be displayed.
                                                                                          There are no results that meet this criteria.
                                                                                          Search Result for "|||"