Building Workbenches

Collapse
X
 
  • Time
  • Show
Clear All
new posts
  • TEK
    Super Senior Member
    • Oct 2002
    • 1670

    #46
    From what I can remember to have seen, I think a one screw and nut kit is from USD 180,- and upwards.

    Does anyone have details about how to build the vice itself when using a wooden screw and nut?
    (not a foot vice, a regular face vice).
    I guess I'm searching for the wrong words or something - as I have a hard time finding good reference material.

    Edit:
    I found this description: https://cdn.shopify.com/s/files/1/08...99082082598254

    I'm a bit supriced as it suggest that the wood scruvs should be the only thing holding the vice. I also think that the way the nuts are fastened on seems week. Two metal scruves that probably will come loose and might not be strong enough to hold the extensive force that the the wood screw would apply to the nuts when beeing clamped tight...
    However, getting the nuts fasten in a better way should not be a problem. I'm wondering more about if it really is no need for any additional guides than the screws itself.
    Last edited by TEK; 15 May 2016, 15:09 Sunday.
    -TEK


    Many of the great achievements of the world were accomplished by tired and discouraged men who kept on working...

    Comment

    • Renron
      Senior Member
      • Jan 2008
      • 750

      #47
      Wow Tek,
      I'm impressed.
      Try looking on Matthias Wandel's youtube site. If anyone knows how to perfect those bits, it's him. A true Master!


      Ron
      Ardent TS

      Comment

      • Martyn
        Senior Member
        • Feb 2006
        • 380

        #48
        Gosh, I'm impressed by anyone who decides to cut his own lead-screws in wood!

        While I often start out with the intention of building things from scratch, in reality I'm too impatient and soon find myself looking for shortcuts. For my bench, I found a laminated maple bench top at Acklands Grainger to which I added a 2" x 6" apron. I used a Lee Valley vice and made my own maple jaw, and built a poplar frame to support it all. I then built a cabinet with lots of drawers that fits underneath. The result is very solid and has taken all the abuse I can throw at it. I'd post a photograph, but my ad-blocker won't let me grab the URL in Photo-bucket.
        Last edited by theSven; 11 August 2023, 17:57 Friday. Reason: Update text

        Comment

        • TEK
          Super Senior Member
          • Oct 2002
          • 1670

          #49
          Originally posted by Martyn
          Gosh, I'm impressed by anyone who decides to cut his own lead-screws in wood!

          While I often start out with the intention of building things from scratch, in reality I'm too impatient and soon find myself looking for shortcuts. For my bench, I found a laminated maple bench top at Acklands Grainger to which I added a 2" x 6" apron. I used a Lee Valley vice and made my own maple jaw, and built a poplar frame to support it all. I then built a cabinet with lots of drawers that fits underneath. The result is very solid and has taken all the abuse I can throw at it. I'd post a photograph, but my ad-blocker won't let me grab the URL in Photo-bucket.
          I think the short comment on this is:
          - Do you do it to because you need a workbench
          or
          - Do you do it because you want a project

          For med this is all about the project and the experienced gained while doing it. My learning experience from trying to lean about different type of workbenches, what different wood sorts might be used and advantages/disadvantages with each type , evaluation of different wood joint types, figuring out how to flattening the top, evaluating wood joints vs. scruves and so on.
          My selected approach is to try to build a massive workbench from scratch with all wood vices and all wood joints, everything made by me from scratch. But no, I will not go out into the wood and chop my own timber and make that into usable wood (ehhh, except maybe from for the vice screw ;-)

          I do completely and fully understand that not everyone will select the same path as me. Hey, I did not do it myself either. I started out by buying myself a bench (but that was a crappy one). And now I want to build a better one :-)

          Martyn: your build sound interesting. Please find a way to post those pictures - I would love to see them :-)
          What is you experience with having cabinet/drawers under the bench? I see some that has it, at the same time I also see some that advocate not to use it as they think it will be in the way when you want to clamp thing to the bench.
          Last edited by theSven; 11 August 2023, 17:58 Friday. Reason: Update quote
          -TEK


          Many of the great achievements of the world were accomplished by tired and discouraged men who kept on working...

          Comment

          • Martyn
            Senior Member
            • Feb 2006
            • 380

            #50
            Originally posted by TEK

            For med this is all about the project and the experienced gained while doing it.

            >
            >

            Martyn: your build sound interesting. Please find a way to post those pictures - I would love to see them :-)
            What is you experience with having cabinet/drawers under the bench?

            TEK, I entirely agree and hope you didn't construe my response as being critical - that wasn't my intention. I nearly took the same route myself, but laminating a big, heavy top and then planing it flat - and all those dovetailed drawers - I'd still be building it today! I was just tired of using an old interior door stretched across a pair of sawing horses as a bench and wanted something decent that would still give me a sense of pride and be something that would be worth passing on one day.

            I'll take a few photographs for you, even though it means cleaning off the piles of detritus that accumulates as soon as one's back is turned! Meanwhile, if anyone can suggest a simple way to include photographs that will work with an ad blocker, I'd much appreciate it.

            Comment

            • Martyn
              Senior Member
              • Feb 2006
              • 380

              #51
              OK, here are some photographs (I hope):

              If these work, I'll add some notes.
              Last edited by theSven; 03 May 2023, 21:22 Wednesday. Reason: Remove broken image links

              Comment

              • Martyn
                Senior Member
                • Feb 2006
                • 380

                #52
                Great! Here are a few details:

                The laminated maple top is 30" x 72" and is several inches thick (can't remember quite how thick). I edged it on three sides with 2" x 6" maple leaving the back open. I fitted a Lee Valley vice to the front left as is conventional, and I bored the right hand end in readiness for a second vice, but have never needed one. I bored the top with 3/4" holes to take bench dogs and did the same to the vice jaw so that I can use it for clamping. I used a solid carbide spiral up-cut router bit in a shop-made boring jig to ensure that my centres were accurate. I put a couple of holes in the front apron for good measure. In retrospect, I should have bored the complete matrix in the bench top (there's never a hole quite where you want one).

                The poplar frame is assembled using knock-down bench bolts similar to the ones stocked by Lee Valley. I probably fixed the frame to the bench top using lag screws in slotted holes, but I didn't remember to look underneath when I took the photographs. The end aprons are lag screwed too, because a glue joint on end-grain wouldn't survive the seasonal movement of the top. I fitted them to the front apron with hand-cut half-blind dovetails. I've only ever cut a few dovetails in my life, but I found these remarkably easy.

                It's very easy to get carried away when you build a bench. Even though this one is quite modest, it still weighs more than two people can manage. Hence the lag screws and knock-down bolts. When I eventually build my dream shop, I wanted to be sure that I could move my bench to its new location!

                The tool chest was irresistible. I'm short of wall space in my shop and have adopted a policy of building custom storage under most of my primary tools. Most retail cabinets have drawers that are far too deep, so I built a chest with ten shallow drawers and two deeper ones. They are very simply made with a drawer-lock router bit and MDF false fronts. I routed a dado along each side to accept hardwood runners glued to the carcass. The drawer fronts got a quick wipe of shellac to seal them. One day I might go back and make some fancy hardwood fronts, but I doubt it.

                As you can see from the second photograph, I left quite a gap between the top of the tool chest and the bottom of the front apron. This provides clearance for hold-downs and also lets me get in there with a shop vac once in a while to clean out the debris that falls through the dog holes. It also provides a handy surface for temporary storage or to stow things that are too long for the drawers. The final photograph shows a couple of shop-made bench stops that locate in the dog holes and provide a pair of orthogonal stops for clamping against. They won't take high clamping loads, but they come in handy sometimes as an extra pair of hands. They live out of the way but close at hand on top of the chest.

                I think that's about all; let me know if you have any questions.

                Perhaps this could become a "Show us your bench" thread?

                Comment

                • TEK
                  Super Senior Member
                  • Oct 2002
                  • 1670

                  #53
                  hope you didn't construe my response as being critical - that wasn't my intention.
                  Not at all!

                  Perhaps this could become a "Show us your bench thread"?
                  Yes please :-)

                  Martyn: thats a really nice bench!
                  I was a bit supriced to see that you do not have a end vice as I would expect that to be used a lot with the dog holes.
                  But as long as it's not missed there is no reason to add it :-)
                  Those orthogonal stops was a new idea. I have not seen that before. I might just steal that idea!
                  Your experience about the holes are interesting as I'm wondering about how many holes to make for my bench. The nice thing about holes is that you can always add more at a later time.

                  I have been reading up on some stuff by Cristhoper Swartz - and he is advocating against adding cabinet drawers under the bench (however, in his book he does have several designs that do have them - so he might have changed his mind along the way). I think his main reson is clamping - so if your experience is that it is no problem that's valuable input.
                  I will probably build mine with a shelf first and make it so that I can add drawers on top of the shelf of I figure out that I need it (my workspace is spares so I will probably need it).

                  Thanks a lot for sharing!
                  -TEK


                  Many of the great achievements of the world were accomplished by tired and discouraged men who kept on working...

                  Comment

                  • Martyn
                    Senior Member
                    • Feb 2006
                    • 380

                    #54
                    Originally posted by TEK
                    I think his main reson is clamping - so if your experience is that it is no problem that's valuable input.
                    Of course, conventional clamps don't reach very far under a bench top anyway, so you have to resort to other means. I have a couple of these: http://www.leevalley.com/en/wood/pag...49&cat=1,41637 and these: http://www.leevalley.com/en/wood/pag...37,41645,31129, which work well for me, so all I need is sufficient clearance below the bench top.

                    One thing that I might do differently if I were to make this bench again would be to make the front apron thicker. A 2" x 6" ends up around 1.5" or less by the time it's been cleaned up, which can make clamping along the front edge of the bench a little fiddly. Having a wider apron would improve this.

                    Comment

                    • Steve Manning
                      Moderator
                      • Dec 2006
                      • 1892

                      #55
                      Originally posted by Martyn
                      OK, here are some photographs (I hope):

                      If these work, I'll add some notes.
                      Very nice workbench :T
                      Last edited by theSven; 03 May 2023, 21:22 Wednesday. Reason: Remove broken image links
                      Hold on to your butts - It's about to get Musical!


                      WEBSITE: http://www.smjaudio.com/

                      Comment

                      • TEK
                        Super Senior Member
                        • Oct 2002
                        • 1670

                        #56
                        Hi
                        As you know I have this pile of wood now.


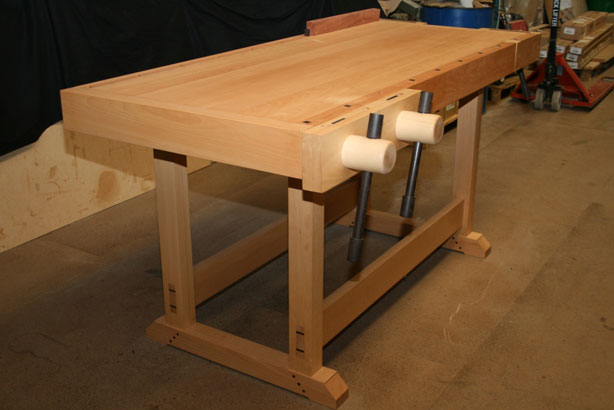
                        My plan is to build a split top roubo workbench.
                        I'm thinking about building each of the two parts of the top by two of the wide stocks above laid on top of each other.
                        That means that each side of the top will be two boards of 25cm/10" on top of each other glued together.
                        Do you think that will work or is there something I must consider about the wood? Will the top hold or am I in danger of the top splitting or something?
                        The top will be approx 10cm/4" thick
                        Last edited by theSven; 03 May 2023, 21:27 Wednesday. Reason: Update image location
                        -TEK


                        Many of the great achievements of the world were accomplished by tired and discouraged men who kept on working...

                        Comment

                        • Steve Manning
                          Moderator
                          • Dec 2006
                          • 1892

                          #57
                          Originally posted by TEK
                          Hi
                          As you know I have this pile of wood now.


                          My plan is to build a split top roubo workbench.
                          I'm thinking about building each of the two parts of the top by two of the wide stocks above laid on top of each other.
                          That means that each side of the top will be two boards of 25cm/10" on top of each other glued together.
                          Do you think that will work or is there something I must consider about the wood? Will the top hold or am I in danger of the top splitting or something?
                          The top will be approx 10cm/4" thick
                          I'd be a bit concerned with the boards cupping and splitting TEK. You might be OK with good bracing under the boards, though the top would need to be allowed to move around some to deal with seasonal changes. Typical approach, which I'm sure you already know, is laminate strips on edge together. Lots more work involved, but a lot more stable in the long run.
                          Last edited by theSven; 03 May 2023, 21:28 Wednesday. Reason: Update quote
                          Hold on to your butts - It's about to get Musical!


                          WEBSITE: http://www.smjaudio.com/

                          Comment

                          • Martyn
                            Senior Member
                            • Feb 2006
                            • 380

                            #58
                            Originally posted by Steve Manning
                            I'd be a bit concerned with the boards cupping and splitting...
                            I would be most concerned about cupping, although you can mitigate the risk somewhat. If your boards are edge-grain, then you should be alright (as well as very fortunate); if they're not, then you should ensure that you orientate the boards in each pair such that they will try to cup in opposite directions. Better still, have the boards re-sawn to about an inch or so thick, plane them, and then glue them back together flipping over alternate boards to neutralise any cupping (and splitting) tendency. This will give you four 1" layers instead of two 2". Even so, clamping won't be easy.

                            Best of all, rip each board into 4" wide edge-grain boards and glue them back together on edge (flipping as you go). All you'll be giving up is a continuous grain pattern on each half of your bench top, but you'll be gaining a tougher and much more stable one. Either way, you'll need a crane to lift the finished product!

                            Comment

                            • TEK
                              Super Senior Member
                              • Oct 2002
                              • 1670

                              #59
                              Thanks a lot for your inputs!
                              You confirmed what I was wondering about - I tought it was a bit strange that I did not find mutch documentation online of folks building the top the way I'm thinking about.

                              It seems like both of you are very clear that splitting up the boards and then glue them up on edge to create the top is the solution that will produce the safest and most long term result.

                              I will have to ponder this a bit and evaluate how to adress this and move forward. Most
                              Likely I will split the boards and glue them up again on edge.
                              -TEK


                              Many of the great achievements of the world were accomplished by tired and discouraged men who kept on working...

                              Comment

                              • TEK
                                Super Senior Member
                                • Oct 2002
                                • 1670

                                #60
                                The plan...
                                Click image for larger version

Name:	split-top-roubo-bench.jpg
Views:	1
Size:	61.3 KB
ID:	861874
                                -TEK


                                Many of the great achievements of the world were accomplished by tired and discouraged men who kept on working...

                                Comment

                                • Steve Manning
                                  Moderator
                                  • Dec 2006
                                  • 1892

                                  #61
                                  Originally posted by TEK
                                  The plan...
                                  [ATTACH=CONFIG]25871[/ATTACH]
                                  That should do nicely ....... your going to have with that build :T
                                  Hold on to your butts - It's about to get Musical!


                                  WEBSITE: http://www.smjaudio.com/

                                  Comment

                                  • TEK
                                    Super Senior Member
                                    • Oct 2002
                                    • 1670

                                    #62
                                    Thanks Steve!

                                    As I'm not going to start building anything before the saw arrives (mid june) I have had some time doing a lot of overthinking for this project.
                                    I have been very much forth and back regarding:
                                    - twin vice or leg vice for the face vice. I feel quite comfortable about going with a leg vice
                                    - twin vice or single vice for the tail vice - especially as I will use wooden screws that do is not connected.
                                    Still a bit back and forth on this. A single vise will be easier to use for most task. But the double vise will be very bice to have when needed. At the same time, if I plan for a double vice but install a single vice Incan expand later on if needed... Hmm
                                    - How to build the top. Use 2 boards glued on top of each other pr half or split and laminate a series of board.
                                    Quite clear recommendationd here to split and laminate. But then I miss the nice consistent "one log" view of the top
                                    Not decided jet...
                                    - trough joints to fasten the legs to the top.
                                    A bit unsure about this as I have not seen many split tops with this solution.
                                    Have added extra support between the top of the legs to let the two bench top parts have a solid frame to rest on, so that I will not risk that the center starts sagging.
                                    Split top and trough joints is bot something I have seen a lot of - might tgst indicate that I'm about to do something stupid?

                                    Some other comments:
                                    - joints for the runners will be draw-bored tenon
                                    - the endcaps will be wedged tenon joints
                                    - the screw(s) for the tail vice will be liftet up into the bench itself so that the screves won't have to be placed to low down
                                    joints
                                    - I think everything will be glued together
                                    - there will be a shelf below the bench (between the runners)
                                    -TEK


                                    Many of the great achievements of the world were accomplished by tired and discouraged men who kept on working...

                                    Comment

                                    • knowledgebass
                                      Senior Member
                                      • May 2013
                                      • 159

                                      #63
                                      Looks great Tek! 👍 👌
                                      Still planning to start my bench build this summer but we just had another kid so probably going to take me a year. My drawings aren't quite as sophisticated. I still prefer to draw it out by hand and draft up the dimensions in Excel.
                                      I also just had a 40+ year old ash cut down (had the emerald ash borer) and had it milled into some live edge planks at 2.5" rough thickness. So if I do finish a bench this summer I'll have some wood to work with. Although a live edge ash chop on a leg vise could be something nice.

                                      Comment

                                      • TEK
                                        Super Senior Member
                                        • Oct 2002
                                        • 1670

                                        #64
                                        Congrats on your new kid knowledgebase. Guess you have your hands quite filled up with that now :-)
                                        I have 3, youngest is soon 7 years old. They are adorable when small - but the really fun part starts when they grow up a bit
                                        Guess that ash can be made into some really nice stiff when you get going on that!

                                        Now, back to workbenches:
                                        I found this great picture thread:


                                        Learned a couple of things that I will incorporate into my own build.
                                        And I will build each half of the bench top from to planks instead of stripping them up and laminating them.
                                        If they twist a bit it should be fairly easy to straighten it up a couple of times, and then I hope they will be stable afterwards.
                                        I just think it will add some character to the bench to have a even, solid top to look at...
                                        -TEK


                                        Many of the great achievements of the world were accomplished by tired and discouraged men who kept on working...

                                        Comment

                                        • Steve Manning
                                          Moderator
                                          • Dec 2006
                                          • 1892

                                          #65
                                          TEK ..... here's a few links you ought to check out. http://benchcrafted.com/, go to the blog link and look through some of his stuff on bench building, this guys wood working skills are insane. This one might come handy when your ready to flatten you bench top, http://www.thewoodwhisperer.com/vide...with-a-router/, unless of course you want to do it by hand.
                                          Hold on to your butts - It's about to get Musical!


                                          WEBSITE: http://www.smjaudio.com/

                                          Comment

                                          • knowledgebass
                                            Senior Member
                                            • May 2013
                                            • 159

                                            #66
                                            Originally posted by TEK
                                            Congrats on your new kid knowledgebase. Guess you have your hands quite filled up with that now :-)
                                            I have 3, youngest is soon 7 years old. They are adorable when small - but the really fun part starts when they grow up a bit
                                            Thanks, number 3 for us too. Our oldest is 5 middle will be 2 soon. I'm probably overly optimistic for my available hobby time 😁

                                            Comment

                                            • oneplustwo
                                              Senior Member
                                              • Jan 2010
                                              • 666

                                              #67
                                              These are great! I'll be planning a bench for myself as well once the remodel is done. I also need a welding table though... has anyone seen tables that could do both well? Maybe something modular?
                                              Zaph SR-71
                                              Zaph ZDT 3.5
                                              Sunflower Redux
                                              12" Dayton HF sub
                                              CJD RS 150 MT
                                              Revelator bookshelf
                                              2x12 Guitar cab
                                              Corner loaded line array

                                              Comment

                                              • TEK
                                                Super Senior Member
                                                • Oct 2002
                                                • 1670

                                                #68
                                                What properties should a good welding table have?
                                                -TEK


                                                Many of the great achievements of the world were accomplished by tired and discouraged men who kept on working...

                                                Comment

                                                • oneplustwo
                                                  Senior Member
                                                  • Jan 2010
                                                  • 666

                                                  #69
                                                  I'm not sure if it will be possible to have the perfect table, especially for a dual use version for the home. But ideally, it should be very flat, have the ability to get grounded, allow for fixuring, and perhaps be thick enough to weld directly to without warping. Here's a couple off the shelf that is about the level I would shoot for given the space I have.


                                                  One idea would be to just build the woodworking table and then have a welding table "add on" that is hinged and can literally flip on top of the wooden table. It could also just hinge up and be supported kind of like a table saw outfeed table. There are pros and cons of both. But I tend to like the second option to reduce the risk of burning the wood table and also to allow for fixuring slots/holes that do not have to mate with the wooden table.
                                                  Last edited by theSven; 03 May 2023, 21:23 Wednesday. Reason: Remove broken image links
                                                  Zaph SR-71
                                                  Zaph ZDT 3.5
                                                  Sunflower Redux
                                                  12" Dayton HF sub
                                                  CJD RS 150 MT
                                                  Revelator bookshelf
                                                  2x12 Guitar cab
                                                  Corner loaded line array

                                                  Comment

                                                  • TEK
                                                    Super Senior Member
                                                    • Oct 2002
                                                    • 1670

                                                    #70
                                                    Hmm
                                                    Maybe you could have a split top roubo and a metal plate with a hole in the center (or two independent plates) that could go on top of that with something on the edges to cause it to sit tight. It should probably also be thick enough so that you do not burn the wood bench when welding.
                                                    The plate(s) could be stored on the wall ore something when not in use.
                                                    This would probably be one way given you mostly do woodworking.

                                                    However, if you have space it would probably be better to have a separate area in your shop for welding.
                                                    Inthink I would have looked at a wall mounted fold down table and place above/beside it for all the welding gear, tool and accessories. Maybe a standing shallow table where you could have the equipment underneath the table.
                                                    -TEK


                                                    Many of the great achievements of the world were accomplished by tired and discouraged men who kept on working...

                                                    Comment

                                                    • TEK
                                                      Super Senior Member
                                                      • Oct 2002
                                                      • 1670

                                                      #71
                                                      Got myself a new set of chiesels the other day (Stanley 750 aka "sweatheart").
                                                      These have wooden handels and it just don't feel right to bang away on them with steel hammer.

                                                      So I figured I would build myself a mallet - my first mallet ever :-)
                                                      Here is the result:
                                                      Click image for larger version

Name:	image.jpg
Views:	1
Size:	106.6 KB
ID:	861930
                                                      Click image for larger version

Name:	image.jpg
Views:	1
Size:	108.2 KB
ID:	861931
                                                      Click image for larger version

Name:	image.jpg
Views:	1
Size:	107.7 KB
ID:	861932

                                                      This was a "old scool" build, so no power tools was used.
                                                      The inner part of the head is made of beech. The sides as well as the handle is made of walnut.

                                                      The sides is glued on using epoxy.
                                                      It's threated with shellact (just one layer so far)

                                                      The beech was from the stuff I got earlier in this thread. The walnut (it's very hard/expensive to get walnut in norway) is leftovers from an old stair. So everything had to be cut to size, planed and prepared before use).

                                                      The handle is a bit on the thin side, except from that I'm quite happy with the result.
                                                      Time will show if it can handle the abuse I will give it!
                                                      -TEK


                                                      Many of the great achievements of the world were accomplished by tired and discouraged men who kept on working...

                                                      Comment

                                                      • Steve Manning
                                                        Moderator
                                                        • Dec 2006
                                                        • 1892

                                                        #72
                                                        Very cool TEK ..... I cheated and bought myself a brass mallet for my chisels. Liking the two tone.
                                                        Hold on to your butts - It's about to get Musical!


                                                        WEBSITE: http://www.smjaudio.com/

                                                        Comment

                                                        • TEK
                                                          Super Senior Member
                                                          • Oct 2002
                                                          • 1670

                                                          #73
                                                          Hi
                                                          Maybe I can get some help or input here?
                                                          I'm considering changing my design a bit and make the two tops independent of each other.
                                                          That means no end cap to connect them together.
                                                          Also it would mean going from a double tail vice to a single end vice only connected to one of the two tops. I see that with a single screw you must have some kind of stabilatots/guides to keep it straight.
                                                          I'm having problem finding good plans/builds for single screw wooden vices.
                                                          I have found this one: https://dblaney.wordpress.com/tag/wooden-vise-screws/
                                                          But not mutch else.
                                                          -TEK


                                                          Many of the great achievements of the world were accomplished by tired and discouraged men who kept on working...

                                                          Comment

                                                          • knowledgebass
                                                            Senior Member
                                                            • May 2013
                                                            • 159

                                                            #74
                                                            Originally posted by TEK
                                                            Hi
                                                            Maybe I can get some help or input here?
                                                            I'm considering changing my design a bit and make the two tops independent of each other.
                                                            That means no end cap to connect them together.
                                                            Also it would mean going from a double tail vice to a single end vice only connected to one of the two tops. I see that with a single screw you must have some kind of stabilatots/guides to keep it straight.
                                                            I'm having problem finding good plans/builds for single screw wooden vices.
                                                            I have found this one: https://dblaney.wordpress.com/tag/wooden-vise-screws/
                                                            But not mutch else.
                                                            TEK, I spent some time pondering making a wood screw as well, more importantly trying to piece the information together. I may revisit it in the future but for now I'm going to focus on getting the top done (Like how about I get it started ). I guess today I earn by username (although I guess then I would be knowledgebase)!

                                                            I have a few additional links you can glean some information from:
                                                            The Woodwrights Shop - Apparently there's an episode to go with this info as well, circa 2008. I haven't seen it yet. Also one of his books may have some info but I haven't read it. There may be a few books by this title but as far as I can tell this is the correct ISBN: Woodwright's Workbook - ISBN 0-8078-4157-9

                                                            Fine Woodworking - Article describing what appears to be the process above.

                                                            Random Forum Post - I found this interesting because the gentlemen appears to round his stock using a router jig where the router slides on a sled face and the stock is turned with a wrench. As I don't have a lathe to even create the round stock, this was a big hint for me.

                                                            Here's a couple details on Tail Vises From Lake Erie Tool Works (summary of customer projects here [PDF]
                                                            This one could suit a split top style:
                                                            Adding our August 2012 Workbench of the Month from Ryan B. of Jerrabomberra, New South Wales, Australia to our Lake Erie Toolworks Blog for ease of access and historical awareness. Ryan B. from New…


                                                            This one is beautiful:
                                                            We have a very unique workbench of the month for April 2015 which comes to us from David F. from Wichita, Kansas.  David built a 1/3 scale model workbench for a local historical museum in Wichita t…

                                                            Looks similar to the Jon Nyquist tail vise described in detail in Lon Schleining's book

                                                            Richard McGuire had a face vise using a single screw and his pinless linear bearing guide system. Can't find a photo of it since he's closed his bench shop now, but it was basically his leg vise turned on its side and probably would have fit well on one half of your split top.

                                                            Comment

                                                            • TEK
                                                              Super Senior Member
                                                              • Oct 2002
                                                              • 1670

                                                              #75
                                                              TEK, I spent some time pondering making a wood screw as well, more importantly trying to piece the information together
                                                              I went back and found the reference I was using when I built my screw and tap - and found it in post #12, from you :^x
                                                              However, I have traced it back to the source - and here is the whole series on making wooden tap and screw
                                                              :thanku: http://lumberjocks.com/CartersWhittl...og/series/4545
                                                              I have looked around a lot, and I have found many strange methods for solving this, but this is bot the one that seems to work the best and that seems to be most realistic to actually do with a predictable result.
                                                              However, you also posted this link: Random Forum Post
                                                              That's interesting as it seems like he have found a method to make the screw that will enable you to do it in several passes. That again will give you an option to get more even threads without tear outs.
                                                              Using the method in the first link you have to do a full depth router cut at the first pass - making it hard to both find the right depth as well as it's easy to get threads with tear outs. I might check out this method.
                                                              (I have got myself a lathe, so that part of the process is solved ;-))


                                                              Thanks a lot for the other links as well. There is a lot of great information in there.

                                                              For now there seems to be the following options for the tail vise (for me):
                                                              - #1: A regular face vice mounted at the end of the bench
                                                              The wooden screw in the center and a support guide on each side of the screw
                                                              This will cause the screw to be off center from the dog holes. All pressure will normally be on just one side and there is a risk that the vice will be bendt/scewed over time

                                                              Click image for larger version

Name:	facevise800600.webp
Views:	105
Size:	56.7 KB
ID:	935953


                                                              - #2: A regular face vice mounted at the end of the bench, but screw off center
                                                              Same as above, but this time the screw is moved to one of the side and there is only one support guide.
                                                              This has the advantage that you can have the screw directly behind the dog holes and will not get all pressure on one side of the screw - and thus there should be less risk of the vice to bendt/scewed over time
                                                              I have found some example of old pictures with benches like this - but very few
                                                              This will almost be the same as a small leg-vice mounted vertically

                                                              Image not available

                                                              - #3: A european style standard tail vise
                                                              As shown in the picture below. This is harder to build but will not give the problems with having all the pressure one one side.
                                                              A well-proven design that has been used a lot on old benches. If done right it should be possible to build one that does not sag.
                                                              I have seen some really old benches with no indication of sag what-so-ever

                                                              Click image for larger version

Name:	bench7-web.jpg
Views:	78
Size:	52.2 KB
ID:	935954


                                                              When I started looking around for this I was thinking that Forum would be the best option. However, as I find almost no reference to a vice like that - I'm afraid that is a hint telling me that's a bad idea.
                                                              So, then I'm back to Home or Blogs As I'm looking around, and at the same time is using my vice a bit more, Blogs comes back as a more and more likely solution...
                                                              Last edited by theSven; 03 May 2023, 21:24 Wednesday. Reason: Update image location
                                                              -TEK


                                                              Many of the great achievements of the world were accomplished by tired and discouraged men who kept on working...

                                                              Comment

                                                              • TEK
                                                                Super Senior Member
                                                                • Oct 2002
                                                                • 1670

                                                                #76
                                                                I will most likely go with this simplified design.
                                                                All endcaps are removed, making the top quite a bit easier to build. It's basic just two slobs.
                                                                Still keeping the dowtail/trough tenon between the base and the bench itself - those will be a challange to make for me...

                                                                Replacing the double tail-vice with a single vice as shown in the picture.
                                                                I will have a shelf below as will (will probably not be drawn)

                                                                Click image for larger version

Name:	workbench2.jpg
Views:	1
Size:	49.5 KB
ID:	861933

                                                                -TEK
                                                                -TEK


                                                                Many of the great achievements of the world were accomplished by tired and discouraged men who kept on working...

                                                                Comment

                                                                • knowledgebass
                                                                  Senior Member
                                                                  • May 2013
                                                                  • 159

                                                                  #77
                                                                  I've seen that. I think the Mr Carter's YouTube video(s) has been linked to before in the thread. May have been before the thread was broken out into its own topic.


                                                                  Originally posted by TEK


                                                                  When I started looking around for this I was thinking that #2 would be the best option. However, as I find almost no reference to a vice like that - I'm afraid that is a hint telling me that's a bad idea.
                                                                  So, then I'm back to #1 or #3. As I'm looking around, and at the same time is using my vice a bit more, #3 comes back as a more and more likely solution...
                                                                  #2 is what I was thinking roughly on the Richard McGuire (aka English Woodworker) website. I can't find the photo for anything though. He's closed his bench sales shop and some of the links on that site no longer work. Graham Haydon used a McGuire wood screw with his own sliding block for a nice looking vise in the style of #2.

                                                                  Comment

                                                                  • knowledgebass
                                                                    Senior Member
                                                                    • May 2013
                                                                    • 159

                                                                    #78
                                                                    Technically a bench, but really this is meant to be a stool so my kids can safely stand/work in the garage at a workbench giving them a length to walk on (e.g. for hand planing). The top is a 2x12 and I can stand on it without feeling flex. Even if my kids take no interest it's going to be plenty useful around the garage for reaching those high storage shelves.

                                                                    Click image for larger version

Name:	28600147356_53c7cb1019_z.jpg
Views:	77
Size:	111.8 KB
ID:	935955

                                                                    Click image for larger version

Name:	28632981715_1d31e0c914_z.jpg
Views:	78
Size:	117.9 KB
ID:	935956

                                                                    Workbench build is coming up next. ETA of two years, +/-10 years Ideally I'll finish it over the winter. Anyone have experience with cold cure epoxy? The bench will be to big to glue up in my basement.
                                                                    Last edited by theSven; 03 May 2023, 21:25 Wednesday. Reason: Update image location

                                                                    Comment

                                                                    • Srixon
                                                                      Member
                                                                      • Feb 2016
                                                                      • 40

                                                                      #79
                                                                      Nice joinery, Knowledgebass. :T

                                                                      Comment

                                                                      • knowledgebass
                                                                        Senior Member
                                                                        • May 2013
                                                                        • 159

                                                                        #80
                                                                        Originally posted by Srixon
                                                                        Nice joinery, Knowledgebass. :T
                                                                        Thanks. It was a learning experience all of it good practice for the my workbench build. The legs are cedar reclaimed from my deck, the top is pressure treated and the cross piece a piece of SPF that had recalled my garage in various jig form. The deck sourced cedar is so old some portions seemed devoid of any lignin. I wasn't sure it would hold together at times during mortising (I did have one massive chunk fly off early on) but the end result is more than strong enough.

                                                                        Comment

                                                                        • TEK
                                                                          Super Senior Member
                                                                          • Oct 2002
                                                                          • 1670

                                                                          #81
                                                                          That's cool. I should probably do some joint traning before I attak the real deal as well!
                                                                          -TEK


                                                                          Many of the great achievements of the world were accomplished by tired and discouraged men who kept on working...

                                                                          Comment

                                                                          • Srixon
                                                                            Member
                                                                            • Feb 2016
                                                                            • 40

                                                                            #82
                                                                            I can recommend this book.


                                                                            Lots of history on workbenches and plenty of innovative design ideas. Might be worth the $8 for the hardcover version.

                                                                            Comment

                                                                            • TEK
                                                                              Super Senior Member
                                                                              • Oct 2002
                                                                              • 1670

                                                                              #83
                                                                              Needed a bench for the hallway.
                                                                              Getting some practice on some very simple joinery, but kept it mostly quite plain...
                                                                              Good to get some of that beach to good use, even if it still is not on a workbench!


                                                                              Click image for larger versionName:	IMG_7250.jpgViews:	1Size:	97.6 KBID:	862886
                                                                              Last edited by theSven; 03 May 2023, 21:28 Wednesday. Reason: Update image location
                                                                              -TEK


                                                                              Many of the great achievements of the world were accomplished by tired and discouraged men who kept on working...

                                                                              Comment

                                                                              • Steve Manning
                                                                                Moderator
                                                                                • Dec 2006
                                                                                • 1892

                                                                                #84
                                                                                Very nice TEK .....any more pictures of the actual process?
                                                                                Hold on to your butts - It's about to get Musical!


                                                                                WEBSITE: http://www.smjaudio.com/

                                                                                Comment

                                                                                • dar47
                                                                                  Senior Member
                                                                                  • Nov 2008
                                                                                  • 876

                                                                                  #85
                                                                                  very nice! Wish I had access to all the beach, that wood would be perfect for defusers.

                                                                                  Comment

                                                                                  • TEK
                                                                                    Super Senior Member
                                                                                    • Oct 2002
                                                                                    • 1670

                                                                                    #86
                                                                                    Sorry Steve, did not document this one - not a single pic.
                                                                                    I started by straighten and flatting 4 planks making them all 4.5cm thick.
                                                                                    I then ripped them into 2cm strips. For two planks I stopped ripping when there were 7cm thickness left. Then ripped those in two - that is the wider ones on the side.
                                                                                    The two supports in the middel were finger joined half-by-half and tenoned into the side planks
                                                                                    Then cut it all to size and glued it up.
                                                                                    And of course - some sanding after ;-)

                                                                                    Finished it off with two layers of Liberon finish oil.
                                                                                    -TEK


                                                                                    Many of the great achievements of the world were accomplished by tired and discouraged men who kept on working...

                                                                                    Comment

                                                                                    • TEK
                                                                                      Super Senior Member
                                                                                      • Oct 2002
                                                                                      • 1670

                                                                                      #87
                                                                                      I'm wondering if anyone knows the dimension of the crisscross that benchcrafted is selling?

                                                                                      Click image for larger version

Name:	135178d.jpg
Views:	80
Size:	25.9 KB
ID:	935957
                                                                                      Last edited by theSven; 03 May 2023, 21:25 Wednesday. Reason: Update image location
                                                                                      -TEK


                                                                                      Many of the great achievements of the world were accomplished by tired and discouraged men who kept on working...

                                                                                      Comment

                                                                                      • Steve Manning
                                                                                        Moderator
                                                                                        • Dec 2006
                                                                                        • 1892

                                                                                        #88
                                                                                        Originally posted by TEK
                                                                                        I'm wondering if anyone knows the dimension of the crisscross that benchcrafted is selling?

                                                                                        Click image for larger version  Name:	135178d.jpg Views:	0 Size:	25.9 KB ID:	935957
                                                                                        Hey TEK, don't know if this will help or not, but they have drawings for installation n their website. https://www.benchcrafted.com/PDF%20F..._Ins_Jun15.pdf
                                                                                        Last edited by theSven; 03 May 2023, 21:26 Wednesday. Reason: Update image location
                                                                                        Hold on to your butts - It's about to get Musical!


                                                                                        WEBSITE: http://www.smjaudio.com/

                                                                                        Comment

                                                                                        • TEK
                                                                                          Super Senior Member
                                                                                          • Oct 2002
                                                                                          • 1670

                                                                                          #89
                                                                                          Thanks Steve. I did not find direct measurements, but I found this:
                                                                                          "The Crisscross occupies 19-1/2” of vertical space in your bench leg and chop"
                                                                                          I assume that means that the legs of the crisscross must be around 19", or 48cm.
                                                                                          -TEK


                                                                                          Many of the great achievements of the world were accomplished by tired and discouraged men who kept on working...

                                                                                          Comment

                                                                                          • Steve Manning
                                                                                            Moderator
                                                                                            • Dec 2006
                                                                                            • 1892

                                                                                            #90
                                                                                            Originally posted by TEK
                                                                                            Thanks Steve. I did not find direct measurements, but I found this:
                                                                                            "The Crisscross occupies 19-1/2” of vertical space in your bench leg and chop"
                                                                                            I assume that means that the legs of the crisscross must be around 19", or 48cm.
                                                                                            I was not sure if that would give you what you needed or not. By the way I have one of their tail vises, very nice build quality stuff.
                                                                                            Hold on to your butts - It's about to get Musical!


                                                                                            WEBSITE: http://www.smjaudio.com/

                                                                                            Comment

                                                                                            Working...
                                                                                            Searching...Please wait.
                                                                                            An unexpected error was returned: 'Your submission could not be processed because you have logged in since the previous page was loaded.

                                                                                            Please push the back button and reload the previous window.'
                                                                                            An unexpected error was returned: 'Your submission could not be processed because the token has expired.

                                                                                            Please push the back button and reload the previous window.'
                                                                                            An internal error has occurred and the module cannot be displayed.
                                                                                            There are no results that meet this criteria.
                                                                                            Search Result for "|||"