
-
-
Whew...
I hadn't been this nervous about doing a task in a while. Painting the baffles was either going to bring me joy or disappointment this holiday break. There was a small window of opportunity where the weather was just right so I was able to paint the baffles Sunday. The high was in the 70s and the humidity was in the 60% range...perfect. Today it's in the 40s. Now all I had to do was figure out how to use the sprayer.
I would like to first say thank you to Bill Schneider for his detailed build logs. I pretty much followed his technique for painting the baffles. I sealed with Zinnser's Seal Coat, then primed with Rustoleum sandable auto primer, a little spot putty and then 3 coats General Finishes lamp black milk paint. His work is what I could only aspire to achieve. I really didn't expect to get this good of results the first time but they turned out Great!
I practiced on some cardboard and a piece of MDF that I primed. They recommend that the fluid should exit the sprayer nozzle in a steady stream with the trigger pulled and no air attached, it indicates the right viscosity. Well the milk paint almost had the consistency of PVA glue. I diluted it 10% with distilled water but it only drizzled out of the nozzle. I don't know how optimal my setting were but I used the standard Fuji Groups aircap, set the fan pattern control to about 2/3 full and the fluid control knob to about 1.5 turns. It produced about a 6-8inch fan pattern at that same distance. I wasn't sure if it was atomizing optimally but the milk paint self leveled beautifully. No streaks, no runs...very nice. As always it has a lot to due with surface preparation. I need to let it cure a couple weeks before I can glue them to the enclosures. I need to apply some clamping pressure and don't want to damage the finish. Anyway...here's some pics.
Painting setup
Nice even sheen
Bases
No MDF seams...yet
Group photo
Comment
-
Looking mighty fine! :T
You're definitely getting the HT Guide Professional Builder's seal of approval for your outstanding workmanship on this project!
You did the right thing doing your research and finding someone with a solid build technique for the finishing- life's too short to reinvent the wheel over and over again! (Ahem... of course, some of us don't always practice what we preach, but I'm trying to do better...)the AudioWorx
Natalie P
M8ta
Modula Neo DCC
Modula MT XE
Modula Xtreme
Isiris
Wavecor Ardent
SMJ
Minerva Monitor
Calliope
Ardent D
In Development...
Isiris Mk II updates- in final test stage!
Obi-Wan
Saint-Saëns Symphonique/AKA SMJ-40
Modula PWB
Calliope CC Supreme
Natalie P Ultra
Natalie P Supreme
Janus BP1 Sub
Resistance is not futile, it is Volts divided by Amperes...
Just ask Mr. Ohm....Comment
-
Wow, those turned out great.What you screamin' for, every five minutes there's a bomb or something. I'm leavin' Bzzzzzzz!
5th Element, otherwise known as Matt.
Now with website. www.5een.co.uk Still under construction.Comment
-
I've had the opportunity to listen to the ER version today. These are among the best speakers I ever heard!
(these were the ones I heard: http://www.troelsgravesen.dk/jenzenER_Gerrit.htm )Comment
-
Thanks guys...I surprised myself. Thinking of projects, I would usually try to finds ways not to paint...now I think I'll be looking for ways to include it
Leeuwarden, I'm glad to hear the :T on the ER...I can't wait to listen to these.Comment
-
Very nice Scott those turned out great. Can't wait to see them attached to the rest of the cabinet. Like you I was amazed how much difference a real sprayer makes compared to a spray can. Keep up the good work. :TComment
-
Originally posted by Leeuwarden
Thats very encouraging! Also, thanks for the heads up on the break in. Question though, are you referring to the bass response or beyond that in regards to the break in period? How many hours and at what output level did you run them to break them in?Seek out and destroy early high gain room reflectionsComment
-
Jim, these are not my speakers, can't tell you anything about breaking in. These speakers are from someone who lives 1,5 hours drive from where I live. My experience with braking in new speakers is that it takes about 100 to 300 hours to settle. First 24 hours are usually the biggest change in sound.
These Jenzen speakers are so good I sreously consider building them myself although I just finished a pair of new speakers...Comment
-
OK. One more thing though. When you heard them, was the room that they were in treated? How large was it?Originally posted by LeeuwardenSeek out and destroy early high gain room reflectionsComment
-
Room was not treated. It was a L shaped room and the part the speakers were in was about 9 metres deep and 4 metres wide. Amp was a 50 Watt tube amp with KT88 tubes.Comment
-
I suppose in this light, it makes it even more encouraging that they sounded good in an untreated room and under powered a bit (50w amp, Troels recommends 100w minimum for these).Originally posted by Leeuwarden
Thanks for the info Seek out and destroy early high gain room reflections
Comment
-
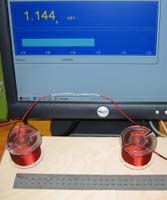
I plan on breaking in the woofers with a low frequency sine wave at about 1/2 xmax to get the T/S parameters to settle. This should accelerate some of the break-in. Honestly I think a lot of the break-in is just between our ears.
I've seen a 20% shift in the T/S parameters after 60hrs...I verified this on the Scan-Speak 22Ws I plan on using for my project shown here.
Comment
-
House was made from concrete and stone, it was a new house. My house was build around 1933, that could make a (big) difference... We did not play very loud, could explain why the tube amp did very wel...
Talking about amps, I'm trying to decide wether I will buy one of those http://www.aussieamplifiers.com/nxv300.htm and sell my UCD400AD'sComment
-
Seek out and destroy early high gain room reflectionsComment
-
50 watts is only under powered if the amplifier is forced into clipping. 100 watts is only 3dB louder than the 50 watt. In most situations a good 50 watt amplifier will drive speakers like these very loud, providing your room isn't gargantuan and you idea of loud is Concorde on the runway.What you screamin' for, every five minutes there's a bomb or something. I'm leavin' Bzzzzzzz!
5th Element, otherwise known as Matt.
Now with website. www.5een.co.uk Still under construction.Comment
-
Yes, as far as the T/S parameters go. It's much easier to break in the drivers out of the box because you only need a couple volts to drive the speaker at its resonance frequency to loosen the suspension. It's also much quieter
Comment
-
Another way of looking at that is say your running a mean average of 5 watts and a 12db spike / peak comes along. The 50watt amp will clip and the 100w wont.Originally posted by 5th element
And although the clip will likely be of sufficiently short duration to not hear it as distortion, what will happen is the spike will be compressed, effectively limiting your dynamic range.
So its not so much you need 100 watts to get loud enough. You may need it for dynamic headroom.
A speaker like this that has maybe a sensitivity of 88db at 1w at 1m will only be at 80db at 2.5m. Consequently, the loudest peak for a 100w amp at 2.5m would be 100db, and for a 50w amp 97db. A mono signal (both speakers driven) add 6db. That isnt that loud really.
Still another, but perhaps most relevant way to look at it, is that if you going to leave yourself 10db headroom, the 50w amp will only go to 87db, the 100w 90db (at a 2.5m distance with a 88db/m/w sensitivity)
I used this calculator to determine the sound level loss for a given distance http://www.sengpielaudio.com/calculator-distance.htmLast edited by jim1961; 30 December 2012, 12:00 Sunday.Seek out and destroy early high gain room reflectionsComment
-
So, T/S parameter gives you a measure of suspension rigidity?Originally posted by sdl2112Seek out and destroy early high gain room reflectionsComment
-
Yes, the T/S parameter Cms is the compliance of the driver's suspension, Vas is proportional to Cms...more info here http://en.wikipedia.org/wiki/Thiele/Small I'll call you.Comment
-
Forging ahead...
To apply a top coat or not was the question...the baffles looked great but it appeared they might mar and scuff easily so I elected to top coat the baffles. I used the General Finishes High Performance top coat. It went on nice. Now I think it is much more durable and now has a smooth finish with more depth. The milk paint alone was a little chalky.
I also lined the interior with Whispermat and F13 wool felt in the mid compartment...that takes some patience...and few beers :W
Cutting the Whispermat...it needs to be compressed and cut with a sharp utility knife to get clean cuts.
Applying the Polyseamseal adhesive.
Sides finished.
Pic taken right after top coat applied.
After 4 coats of top coat.
Comment
-
Looks great! Any regrets with the mini-mite? I might upgrade from rattle cans someday.
Comment
-
Looks like that sprayer was a good investment Scott, baffles are looking great. Looks like your getting pretty close to making some music, can't wait to see what it looks like all together.Comment
-
Looking great Scott! :T
I've got a Mini-Mite in my Amazon wish list that will be ordered as soon as my savings transfer clears! If you have any tips on your use experience with it (and copious spare time-). pls post them! I suspect I have a bit of a learning curve ahead, but Pete has offered some good tips and I have that book on spraying, so hopefully I'll be able to suss things out.
Must be getting close to making sound... this is certainly the exciting part!the AudioWorx
Natalie P
M8ta
Modula Neo DCC
Modula MT XE
Modula Xtreme
Isiris
Wavecor Ardent
SMJ
Minerva Monitor
Calliope
Ardent D
In Development...
Isiris Mk II updates- in final test stage!
Obi-Wan
Saint-Saëns Symphonique/AKA SMJ-40
Modula PWB
Calliope CC Supreme
Natalie P Ultra
Natalie P Supreme
Janus BP1 Sub
Resistance is not futile, it is Volts divided by Amperes...
Just ask Mr. Ohm....Comment
-
No regrets...it works very well. Set-up is easy and since I've been using water based products, clean-up is easy and virtually no nasty fumes!Originally posted by oneplustwoComment
-
Thanks Steve...yes it definitely was a good investment. I can't wait to see and hear the finished product too!Originally posted by Steve ManningComment
-
Nice work Scott
Seek out and destroy early high gain room reflectionsComment
-
I can't comment on other products but the Mini-Mite seems like the right product for me. It's a little loud...but then all my power tools are loud. As others have stated it's about like a standard shop vac...not like yours JonOriginally posted by JonMarsh I've even thought I could make a forced ventilated box lined with sound damping material to set on top of it if I really wanted it quieter...
As far as a learning curve...I was thinking like you but once you start spraying you get the hang of it real fast. That is actually the easy part. Through all my spraying so far I haven't really come close to a run. The hard part it finding a place to spray and having the temperature/humidity conditions right, not to mention all the different options of what finish to spray. Two websites to help with this are;
Jeff Jewitt's site:http://www.homesteadfinishingproducts.com/
Take a look at this video for spraying techniques...
I do recommend practicing on cardboard first and I even recommend finishing a piece of scrap prepared just how your real project is so you know exactly how it will apply. I did buy the #3 and #5 aircaps for different viscosity finishes. I used the standard #4 for the milk paint and the #3 (finer atomization) for the clear finish. I think you will definitely want at least the #3 for lacquer. That's about it :W
Yep...sound is not too far off. I have the crossovers to make, internal wiring and glue them up...Comment
-
Things are getting close...
The base crossover is constructed ready for final assembly. Still need to double check against the schematic. I think all I have left to purchase is some brass screws so I must be close :T I should have more updates soon...
Crossovers positioned in the bases.
Detail
Comment
-
Those look nice!Comment
-
Scott, arent there supposed to be (4) 22uf for each crossover? Or is it that there are (2) more below I cant see?
How do these bases attach to the speaker itself exactly?Seek out and destroy early high gain room reflectionsComment
-
Looking very good, Steve- progress is our most important product, after sawdust!
I'm getting into crossover building today, too, but just for initial testing and evaluation. I won't get this far...the AudioWorx
Natalie P
M8ta
Modula Neo DCC
Modula MT XE
Modula Xtreme
Isiris
Wavecor Ardent
SMJ
Minerva Monitor
Calliope
Ardent D
In Development...
Isiris Mk II updates- in final test stage!
Obi-Wan
Saint-Saëns Symphonique/AKA SMJ-40
Modula PWB
Calliope CC Supreme
Natalie P Ultra
Natalie P Supreme
Janus BP1 Sub
Resistance is not futile, it is Volts divided by Amperes...
Just ask Mr. Ohm....Comment
-
First pic shows them stacked for a total of 4. The bases will be attached with brass screws and I'll be adding rubber feet...you will see soonOriginally posted by jim1961 Oh...and the woofers are being exercized :W
Comment
-
Very nice on the xovers Scott, hope mine turn out half as well.Comment
-
Tip of the day...
Oh...and fyi...while I was arranging the crossover coils I initially placed the large air-core inductor closer (~2.5inches) to the smaller cored inductor...I was curious of the coupling. Ballpark numbers, with a 6Vac sine wave of 1-10khz applied to the air-core, I measured 0.5V in the cored inductor...not good I would think. I moved it to 4.5 inches and it measured ~35mv. I think that's a pretty easy check when deciding coil placement. Also I'm using either stainless steel or brass hardware. Actually I had to move the components after they were glued with E6000, not easy but at least I know it's possible for future reference.Comment
-
Thanks everyone...this is certainly the exciting part.
Seeing your work Steve...I'm sure your crossover will look beautiful :WComment
-
Originally posted by sdl2112
Coil placement advice from Troels:
And yes, the first pic show the stacked caps clearly ops:
Seek out and destroy early high gain room reflections
ops:
Seek out and destroy early high gain room reflectionsComment
-
Now for something completely different....
I was hoping to hear music tonight but that's not going to happen....Umm "slow work takes time..." right :E Going through the build process makes me appreciate all the efforts I see on these forums :T For every picture there is sooo much behind it. Today was full of details...tomorrow...we'll see.
Anyway...when I look at my photos you would think I work for a cat litter company The containers are very handy.... I had two cats, now one...the darker bengal passed away several years ago but he was a cool dude. Here's a few photos in lieu of speaker updates :B
Comment
-
Well, it was ALMOST a speaker update- at least one speaker cabinet was involved, and the cats are cute! Especially the darker one, may he rest in peace!the AudioWorx
Natalie P
M8ta
Modula Neo DCC
Modula MT XE
Modula Xtreme
Isiris
Wavecor Ardent
SMJ
Minerva Monitor
Calliope
Ardent D
In Development...
Isiris Mk II updates- in final test stage!
Obi-Wan
Saint-Saëns Symphonique/AKA SMJ-40
Modula PWB
Calliope CC Supreme
Natalie P Ultra
Natalie P Supreme
Janus BP1 Sub
Resistance is not futile, it is Volts divided by Amperes...
Just ask Mr. Ohm....Comment
-
You have glued the front / rear panels ????Originally posted by sdl2112
Or did you mean just hooking the drivers to the X over?
Hope you have a productive day
Seek out and destroy early high gain room reflectionsComment
-
They are glued and quite heavy 8O I had them out in the garage last night for assembly and they became a little heavy to dead lift...of coarse my dolly had two flat tires (won't hold air) so I was off to Home depot this morning for new wheels and padding. Now I'm good to go. Moving a little slow today, we'll see how far I get.
Comment
-
WOW! You are further along than I thought. You know, I could come down at any point to help if you need meOriginally posted by sdl2112
Seek out and destroy early high gain room reflectionsComment
-
Thanks but no need to come down...I'm real close as you will soon see :WOriginally posted by jim1961Comment
-
Speaker building marathon weekend...
My girlfriend had to travel to the Philippines so it was full go on the speaker build...unfortunately I didn't quite finish but I'm real close :W I'm pretty much done for the day...maybe one more trip to Home Depot for cable ties.
It's all coming together nicely and I couldn't be happier with the results...These are pretty big. I weighted one w/o the drivers and it's about 105lbs.
Early on in the planning stages I was curious how people would attach painted baffles to stained cabinets...external hardware...no problem but I'll be gluing. Do you paint first or mask off?? Hmmm...paint first for me...what I came up with was to rabbet the outer edge of the baffles. Mine is about 0.050" deep...why? Three things...it gives a uniform gap when mated; adding a gasket will seal the outer edge so when the glue is applied it will not squeeze out on the finish and last with the gasket it keeps the baffle from sliding due to the glue lubrication. I used 1/4" x 1/16" thick soft gasket from McMaster-Carr.
I think I mentioned I like pics so here's a bunch :E
Applying gasket to rear baffle
Rabbet edge before gasket
With gasket
Front baffle
Aligning rear baffle with Whispermat
Comment
-
Misc build pics...
Here's a few pics of how I did stuff...
Transfer punches are a must...I only recently realized what they are for :roll:
Twisting the internal hook-up wire...#16awg Teflon insulation, silver plated.
Delivery...
More wiring...
Comment


-
 hi i just wanted inputs on which one i should use between W26FX002 VS CA26RFX in troels jenzen build as i already have the T29CF002 and W18NX001 and just wanted to know if its worth the extra cost getting the W26 over the CA26 as iam looking at nearly 150$ difference between the 2 woofers in the United...
 -
 And yet another impressive design from Troels... and I wont even start on the exceptional woodworking skills!
http://www.troelsgravesen.dk/Illuminator-5.htm
Anyone considering building these? Would love to hear first listening impressions! The one thing Troels... -
 Just a FYI for any crossover builders out there.
I really liked the "soldering taglines" that Troels used to build his crossovers and I was thinking of using these on some of my projects. Troels said that they were from RS Components but I had a heck of a time finding them... -
 Thinking about building a pair of the Ekta Grande that Troels designed w/ all Scan Speak drivers. Has anyone built them and if so what is your impression of the sound? Love the cabinet design and I have always liked designs with Scan Speak drivers.
John your new Ardent design also looks wonderful... -
 Well after living with, and loving my Modula MTM's for a few years, the urge to build something new has become too strong. Sometimes I hate this hobby, too addictive
 . Anyway, looking to improve on the sound of the last project, https://www.htguide.com/forum/showthread.php?t=28398, and try a three-way...
Comment