Overnight Sensations with an Assistant

Collapse
This topic is closed.
X
X
 
  • Time
  • Show
Clear All
new posts
  • rdrowley
    Member
    • Sep 2010
    • 87

    Overnight Sensations with an Assistant

    I love DIY! There is a great amount of enjoyment and satisfaction I find when completing a project. What makes it even more satisfying is when that project is enjoyed by not only me, but by many others. After completing my first DIY project my wife was very impressed by how great it sounded. Movies just seemed to take on a whole new level of realism and music seemed to come alive. The problem was that this was only in the family/movie room. We have a TV in our bedroom that we use sparingly, usually when the kids are sick or she doesn't want to be in the basement to watch something. After one exceptionally non-fun sick kid episode where we ended up using that TV for an extended period of time my wife made the mistake of complaining about the audio that was coming from the tiny built in speakers in the TV. Admittedly they are probably about at good as the speakers you would find in a $12 clock radio. Absolutely no bass, tinny mid range and screeching high end. Looking back this is probably one of the main reasons we haven't used this TV much.

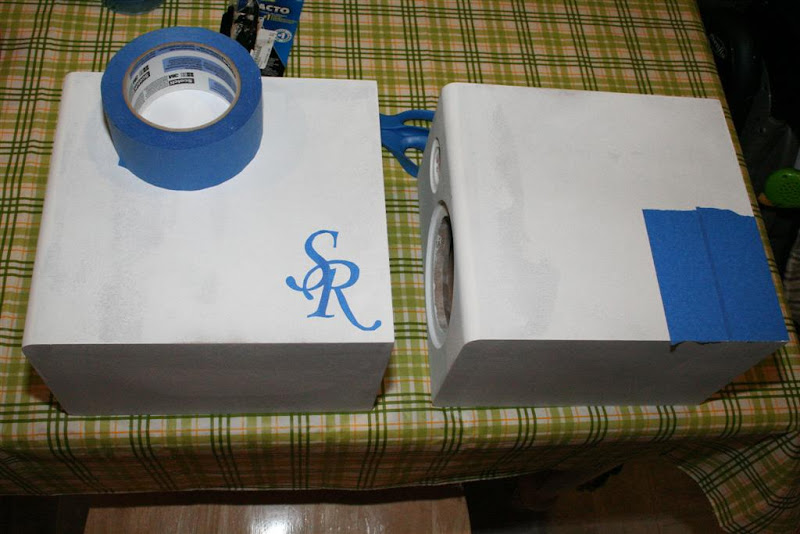
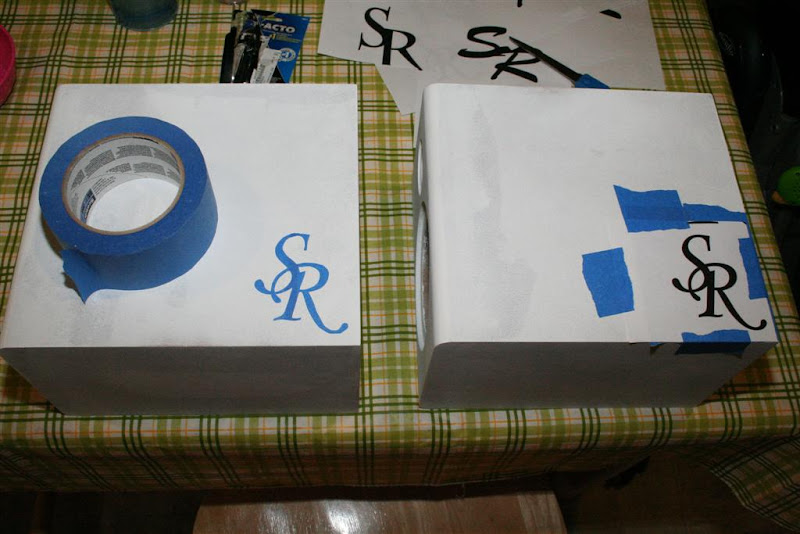
    We started talking about it and we decided to build some speakers for this TV. For this application we had some pretty tight space requirements. The speakers could only be about 10 inches tall at most. After looking around and reading through a lot of build threads I suggested to her that I build the Overnight Sensations for our application. She thought that was a great idea, but had some stipulations. The stipulations were she wanted to do it, or at least be very involved in doing it! Can you believe it! My wife wanted to help cut the wood, build the boxes, layout and build the crossovers, paint the boxes, everything! I was thrilled.

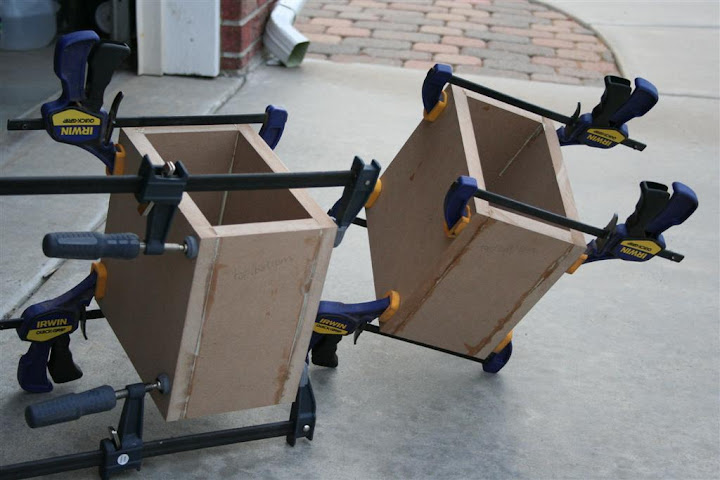
    We ordered components a couple of weeks ago and got a good start this past week. We have both of the crossovers built and tested and the boxes are cut and we have a good start putting them together. I'll post some pics soon. One slight issue is that the tweeters are backordered and not due to arrive until sometime in early June. We are hoping to have the speakers completed by then so we just have to plug them in and enjoy. The other more significant issue is I can't answer all my wife's questions. She and I are both engineers, but we are mechanical engineers, not electrical engineers. As we were laying out and soldering the crossover she wanted me to explain how EXACTLY a capacitor and inductor work together to create a high-pass or low-pass filter and EXACTLY how an L-pad circuit worked to attenuate the tweeter. As you can probably imagine I had no idea how to answer these questions. On the bright side, it is exceptionally fun to work in the shop with my wife and have her very interested in what we are doing. Who knows, I may create a DIY monster when this is all said and done, then I'd have to build even MORE speakers...

    I'll get some pics up soon.

    :B
    Last edited by rdrowley; 26 July 2011, 07:39 Tuesday.
    -Ryan
  • Bill Schneider
    Senior Member
    • Sep 2007
    • 158

    #2
    Oh, you lucky DAWG!

    I get only complaints from my SO when speaker building. She tolerated it for the first two builds, but since then, that's not the case.

    I have an art historian for a wife, so she likes unusual designs. Oddly enough, she LIKES the appearance of my Linkwitz Plutos, but complains about the others.

    Count your blessings, sir!
    My audio projects:
    https://www.afterness.com/audio

    Comment

    • john trials
      Senior Member
      • Mar 2009
      • 449

      #3
      If you really want to know EXACTLY how capacitors, inductors, and L-pads (voltage dividers) work, look for an intro to circuits book. I have yet to find a decent explanation online. My old college textbook (printed in 1983) from EE101, 'Electric Circuits' by Nilsson explains things VERY well. Newer versions are quite expensive, but if you can find an older used copy, nothing has changed since then in basic electronics. It may be too detailed an explanation, but you said you wanted to know EXACTLY how they work!

      Congratulations on finding the one woman in the world who would not only put up with your speaker building, but also want to help out/participate in a build.
      Statements: "They usually kill the desire to build anything else."

      Comment

      • NickS
        Junior Member
        • Sep 2008
        • 21

        #4
        These might help a little

        Learn the fundamentals of alternating current (AC) and its advantages over DC voltage.


        Hello from Portland, Oregon! Since 1999, we have been delicately crafting award-winning, audiophile quality speakers. As an early pioneer of direct to consumer online sales, we offer top notch customer service. We invite you to try our speakers with a 30 day in-home audition and hear the Aperion Advantage for yourself!
        Last edited by NickS; 23 May 2011, 21:29 Monday.

        Comment

        • rdrowley
          Member
          • Sep 2010
          • 87

          #5
          Thanks for the input on how the components of a crossover work. I think it will be helpful. I think I may even have an introductory electronics book hanging around here...somewhere.

          Here are the pics as promised:


          -Ryan

          Comment

          • JonP
            Senior Member
            • Apr 2006
            • 692

            #6
            Originally posted by rdrowley
            I love DIY! The other more significant issue is I can't answer all my wife's questions. She and I are both engineers, but we are mechanical engineers, not electrical engineers. As we were laying out and soldering the crossover she wanted me to explain how EXACTLY a capacitor and inductor work together to create a high-pass or low-pass filter and EXACTLY how an L-pad circuit worked to attenuate the tweeter. As you can probably imagine I had no idea how to answer these questions. On the bright side, it is exceptionally fun to work in the shop with my wife and have her very interested in what we are doing. Who knows, I may create a DIY monster when this is all said and done, then I'd have to build even MORE speakers...

            I'll get some pics up soon.

            :B
            Congrats on being a lucky guy! :B

            Who knows, you two might end up the first married speaker design team... :T

            If you want a book that will really cut to the chase, get "Speakerbuilding 201" by Ray Alden. A very good book, specifically on the subject, starts from the very beginnings of all the subjects and steps you thru.

            Comment

            • Undefinition
              Senior Member
              • Dec 2006
              • 577

              #7
              Overnight Sensations: speakers of familial harmony. :B

              I have to echo what everyone else said, that's really cool that she wanted to take part--not to mention to understand what was going on. My wife let me have a listening room... and that's usually the extent of her involvement in this hobby.
              EDIT: I have to revise that. This summer I'm working diligently on a real challenge of a project that she wants built to her specifications. I think she may be on to something, though, and the end result should be quite high on the WAF scale.
              Isn't it about time we started answering rhetorical questions?
              Paul Carmody's DIY Speaker Site

              Comment

              • rdrowley
                Member
                • Sep 2010
                • 87

                #8
                Thanks for the reading recommendations. It's great to know which of the many resources out there are worth reading/buying.

                My wife has been great through this. She basically wants to do everything, so I do it on one speaker to show here how, then she does it on the other. It's great.

                Here is the box showing the support for the removable back plate.


                Both the speakers showing how they will fit together with a slight gap built in for the paint.


                The baffles set up and ready to be routed with our home made "Jasper Jig".


                Half way there.


                Baffles routed.


                We would be further along but we were double checking everything before we routed so as not to have to cut new baffles. Most importantly though, she is happy with the results so far.
                -Ryan

                Comment

                • Davey
                  Senior Member
                  • Jan 2003
                  • 355

                  #9
                  Have your wife wear eye protection when soldering. (Very important.)

                  Good project.

                  Cheers,

                  Dave.

                  Comment

                  • rdrowley
                    Member
                    • Sep 2010
                    • 87

                    #10
                    Update: More Pics

                    Here are some updated pics in progress. We made a lot of progress over the weekend. We basically split the work. I would do a step on one of the boxes, then she would do the same on the next. The only thing we didn't split is the sanding. She kind of wanted to do most of the sanding and that is A-Ok with me! They look great so far, and my wife was super pleased with how they looked. Now we get to prime and paint! We'll see how far we get on that this week.


                    -Ryan

                    Comment

                    • rdrowley
                      Member
                      • Sep 2010
                      • 87

                      #11
                      Help with Personalization

                      We have been making slow but steady progress on this. However I did want to run something by some of the finishing experts here. As we were plugging along I had a friend suggest that we should personalize these in some way. I thought a good way to do that would be to add some kind of a logo in relief. I thought that I could cover a section of primed space with the logo made from painters tape, paint a couple of coats, then take off the tape and paint the last one or two coats creating a difference in heights of the paint. You can see the process below in the pictures, but the pictures are as far as I've gotten. Is this a good approach? Are there any pitfalls that I should be aware of?

                      Thanks in advance!


                      -Ryan

                      Comment

                      • BeerParty
                        Senior Member
                        • Oct 2008
                        • 475

                        #12
                        Originally posted by rdrowley
                        I thought that I could cover a section of primed space with the logo made from painters tape, paint a couple of coats, then take off the tape and paint the last one or two coats creating a difference in heights of the paint. You can see the process below in the pictures, but the pictures are as far as I've gotten. Is this a good approach? Are there any pitfalls that I should be aware of?
                        I would try it on some scrap before you tried it on the speakers. The process you describe might work, but I think the results would be so subtle that you would be the only people that would see it. My wife ordered some blankets for the family with their names sewn on in the same color as the blankets, and even that is hard to see.

                        A better approach would be to paint the entire cabinet a shade lighter than your final color, mask off the logo, and then repaint the cabinets with the final color. You could control how much the logo 'pops' by your color choice.
                        Chris

                        My Statement Monitors Build
                        My AviaTrix Build

                        Comment

                        • rdrowley
                          Member
                          • Sep 2010
                          • 87

                          #13
                          Originally posted by BeerParty
                          I would try it on some scrap before you tried it on the speakers. The process you describe might work, but I think the results would be so subtle that you would be the only people that would see it. My wife ordered some blankets for the family with their names sewn on in the same color as the blankets, and even that is hard to see.

                          A better approach would be to paint the entire cabinet a shade lighter than your final color, mask off the logo, and then repaint the cabinets with the final color. You could control how much the logo 'pops' by your color choice.
                          Thanks for the input Chris, I guess I should have been a little more specific in what we were going for. The whole point is to make it subtle. Something that can be seen when looked for, but not obvious to the casual observer. I'm looking for something that will make these speakers hers. I thought about putting a different color of paint for the logo, but I thought it would be too difficult to execute at the level I would want it and I thought it would be too much.
                          -Ryan

                          Comment

                          • BeerParty
                            Senior Member
                            • Oct 2008
                            • 475

                            #14
                            Originally posted by rdrowley
                            Thanks for the input Chris, I guess I should have been a little more specific in what we were going for. The whole point is to make it subtle. Something that can be seen when looked for, but not obvious to the casual observer. I'm looking for something that will make these speakers hers. I thought about putting a different color of paint for the logo, but I thought it would be too difficult to execute at the level I would want it and I thought it would be too much.
                            I see. Like I said, it might work. My concern is only that you might put the effort into it and end up with an invisible logo (not the worst mistake you could make).

                            BTW - I don't know about you, but I hate the sanding part of the build process. If I could get my wife to volunteer to sand for me, I would be in heaven! My hat is off to you and your lovely wife. :amen:
                            Chris

                            My Statement Monitors Build
                            My AviaTrix Build

                            Comment

                            • looneybomber
                              Senior Member
                              • May 2007
                              • 194

                              #15
                              What about doing what you're talking about, then lightly sanding the enclosure with say 2000grit when you're done. It would dull the finish everywhere but where the recessed initials are. They'd stay glossy.

                              Off topic. Where in KS are located?

                              Comment

                              • rdrowley
                                Member
                                • Sep 2010
                                • 87

                                #16
                                Thanks for the input on the logo. After the help provided and reading around I decided to go ahead and do what I had planned. Though I do like the idea of using a high grit sand paper inside the logo if it doesn't have the appeal I want when I'm done. Over the past few days we've been able to put on quite a few coats of paint. My wife did a couple and I did a couple. After she got the hang of it she did a great job, but she had a hard time with the respirator. She didn't like the suffocating sensation it gives you until you are used to it. Plus, down here in Derby, KS it's been quite hot and the paint jumper with the respirator make for a sweaty uncomfortable painting experience. I think we had 4 coats before I took the tape logo off. Before I pulled it off I carefully cut around it with an x-acto knife. That was a very good idea as I think the paint would have pulled up had I not done that. Anyway, enough rambling, here are the pics.

                                Here are the backs in their custom made paint holding device.


                                And the actual boxes with the tape logo removed.


                                After I took these pictures I put another coat of paint on. I have to say that the logo looks really spectacular. There is some really goo relief and it is subtle yet easy to see at the moment. I think with one more coat of paint we'll be done with the painting. I'll post some more pics at that point. After that we're going to let it dry for a few days then start the buffing and polishing till they are smooth and glossy. Hopefully with a mirror finish, I guess we'll see.

                                I'm dying to try these out and see how they sound, hopefully on Saturday!
                                -Ryan

                                Comment

                                • rdrowley
                                  Member
                                  • Sep 2010
                                  • 87

                                  #17
                                  Originally posted by looneybomber
                                  What about doing what you're talking about, then lightly sanding the enclosure with say 2000grit when you're done. It would dull the finish everywhere but where the recessed initials are. They'd stay glossy.

                                  Off topic. Where in KS are located?
                                  I like that idea, but possibly in reverse. Sanding the logo, but after I painted I don't think I'll have to. I guess I'll see when we start buffing.

                                  I'm in Derby, down by Wichita.
                                  -Ryan

                                  Comment

                                  • rdrowley
                                    Member
                                    • Sep 2010
                                    • 87

                                    #18
                                    All the painting is done!

                                    We finally got all the painting done. It was either 6 or 7 coats...I don't remember which. This photo is of the logo in relief after the final coat had dried. I'm pretty excited to polish it, but I've got to wait for the supplies to arrive and for the paint to fully dry. This picture also accurately shows the color, the previous pictures didn't as the program I used to shrink them down messed with the red color quite a bit.

                                    -Ryan

                                    Comment

                                    • rdrowley
                                      Member
                                      • Sep 2010
                                      • 87

                                      #19
                                      Whew! Finally done! After a couple of weeks off due to a vacation we were able to get back on this project and get it done. For those of you that have never done a glossy painted finish, I have two things to say. First, you should try it, if for no other reason than to learn. Secondly, prepare to spend a TON of time on it.

                                      Having never done a glossy finish before I learned a lot about how to do it. I learned that every little imperfection in your woodworking gets amplified many times when you get to the painting. I also would have put on several more coats of primer before I got started on the paint. That would have helped with some of the minor imperfections I had to deal with in the paint.

                                      I'll post some pics soon, and possibly described what I did to finish them, but for now I wanted to post impressions. After we got the speakers and cross overs installed we tested them last night. My first impressions, without proper break in time, is they sound much bigger than they are. Much bigger. The highs are good and match the woofer well. I've heard better tweeters, but definitely not for the paltry price of $7. With that in mind they sound spectacular. I look forward to breaking these in properly and listening to the results.

                                      Thanks Paul for such a fun and friendly design! My wife and I have really enjoyed doing this together, and look forward to enjoying them!
                                      -Ryan

                                      Comment

                                      • rdrowley
                                        Member
                                        • Sep 2010
                                        • 87

                                        #20
                                        Completed Pictures

                                        Here are the promised pics after we were done. This is after many coats of paint, wet sanding with 600 grit then 2000 grit then buffing with cutting compound and finally with high gloss polishing compound.


                                        Here with a nice reflection. If you look close you can see the logo we made on the bottom right hand corner. I think the logo turned out better than I could have expected.


                                        I had someone say they couldn't see the logo very well, so here is a close up that allows you to see it better.


                                        Here they are in their designated location.


                                        And, of course, the obligatory enjoyment shot...with everyone enjoying
                                        Last edited by rdrowley; 26 July 2011, 07:41 Tuesday. Reason: Added a better logo picture
                                        -Ryan

                                        Comment

                                        • john trials
                                          Senior Member
                                          • Mar 2009
                                          • 449

                                          #21
                                          Those OS look great! They also look really deep. I don't think I've ever seen a side view of OS before.
                                          Statements: "They usually kill the desire to build anything else."

                                          Comment

                                          • rdrowley
                                            Member
                                            • Sep 2010
                                            • 87

                                            #22
                                            Originally posted by john trials
                                            Those OS look great! They also look really deep. I don't think I've ever seen a side view of OS before.
                                            Thanks John, They are very deep compared to other speakers of a similar baffle area. I built them out of 3/4 MDF so they are quite heavy too.

                                            I have been listening to them quite heavily recently and I have to agree with what Paul said about his. These speakers are perfect to listen to after the kids go to bed. You get a great breadth of sound at a high quality even at low volumes. Watching movies is a complete joy. Listening to music is incredible as well. However, they don't just sound great at low volumes. When the kids are awake you can crank it up pretty good and retain the incredible sound. These are absolutely great speakers for the size and for the price. This is what DIY is all about!
                                            -Ryan

                                            Comment

                                            • doors666
                                              Junior Member
                                              • Aug 2011
                                              • 1

                                              #23
                                              Hi,

                                              Great build, awesome looking speakers. I am also in the process of making of overnight sensations. Could you please tell me the size of the all holes in the baffle and the depth for the woofer and tweeter. I seem to always mess it up and have it either too loose or too tight.

                                              thanx in advance

                                              Comment

                                              • rdrowley
                                                Member
                                                • Sep 2010
                                                • 87

                                                #24
                                                Originally posted by doors666
                                                Hi,

                                                Great build, awesome looking speakers. I am also in the process of making of overnight sensations. Could you please tell me the size of the all holes in the baffle and the depth for the woofer and tweeter. I seem to always mess it up and have it either too loose or too tight.

                                                thanx in advance
                                                I used forstner bits to make the holes for the tweeter. I cut the counter sink first using a 1 7/8 diameter bit and cut it about 3/32 deep. Then I cut the through hole with a 1 1/4 diameter bit. Cut at this diameter the tweeter will not fit in the hole, which is what I wanted. When it came time to install the tweeter I wrapped a round piece of 3/4 diameter wood with sand paper and sanded till the tweeter could be press fit into the hole. This was perfect to seal the hole and worked well since the tweeter has no fasteners.

                                                For the woofer I don't remember exactly what size I cut the holes but this is probably close enough. I think I cut the countersink at 4 3/4 diameter at about .18 inches deep. Then the through hole was very close to 3 3/4 diameter. These diameters depend greatly on how you are going to finish the speakers. If you are going to veneer then I would suggest getting a jasper jig and cutting it exactly to the manufacturers specifications. If you are going to paint you have several options. You can cut the holes exactly to size and then tape off the holes when you paint, or you can make the holes about 1/16th big all the way around and carefully paint the holes too. The second option is more risky and may require some last minute sanding of the paint to get the drivers to fit, but IMO it can also look nicer depending on how you do it.

                                                I hope that helps.
                                                -Ryan

                                                Comment

                                                Working...
                                                Searching...Please wait.
                                                An unexpected error was returned: 'Your submission could not be processed because you have logged in since the previous page was loaded.

                                                Please push the back button and reload the previous window.'
                                                An unexpected error was returned: 'Your submission could not be processed because the token has expired.

                                                Please push the back button and reload the previous window.'
                                                An internal error has occurred and the module cannot be displayed.
                                                There are no results that meet this criteria.
                                                Search Result for "|||"