Piano Gloss Black

Collapse
This topic is closed.
X
X
 
  • Time
  • Show
Clear All
new posts
  • mpotoka
    Senior Member
    • Sep 2007
    • 203

    Piano Gloss Black

    Well I read this thread (again) from diyaudio.com

    Paint Finishing Technique I've had a few emails about the finish technique I used on the Percieves so I've decided to try and capture the finishing process again and also add some useful commentary on what I do throughout. The last time I tried this it was on a silver basecoat and you could...


    and it got me motivated to try it (again).

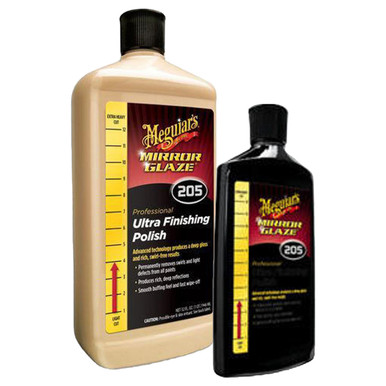
    A little background. I used to paint for a commercial painting company, but only walls/woodwork/exteriors. I have used an airless sprayer, but never an HVLP for automotive type applications. I bought my hvlp sprayer a few months ago, and used it to paint some flat black on a sub I built. That is about the extent of my HVLP spraying experience. I also attempted to go through this process once before when I built my Modula MTs. I never achieved the gloss black, for a couple main reasons. What I thought was the main issue was that I didn't have the right rubbing compound. I bought what I could find at my local store, and started having a go at it. Well it worked to some degree--but never got glossy. I finally gave up and called it good enough for now (I still had to do the cutouts on the baffles, and knew I would mark them up and would do final finishing later) What I realized last night while I was reading is that I made a more critical mistake. I didn't read all the instructions (typical male) and just looked at his picture. Said, huh, looks like gloss black paint, wet sand it down, rubbing compound, fine cutting polish, voila! What I neglected to pick up on was that he had about 10 coats of clear laquer (or similar) over the black paint. That was my AHA! moment for the day, because I just put about 8 coats of paint on and tried to polish that. Hence this addiitional attempt.

    Part of the problem I had before is that the products he mentions using are from the UK. I want to find some products that are generally available in the US. I will be doing my first attempts on a test piece of MDF, until I have a method/products that provide a finish I desire. I don't plan on creating my own method--basically following what was done in the above referenced thread. I will try to give a step by step description and photos of what I did.

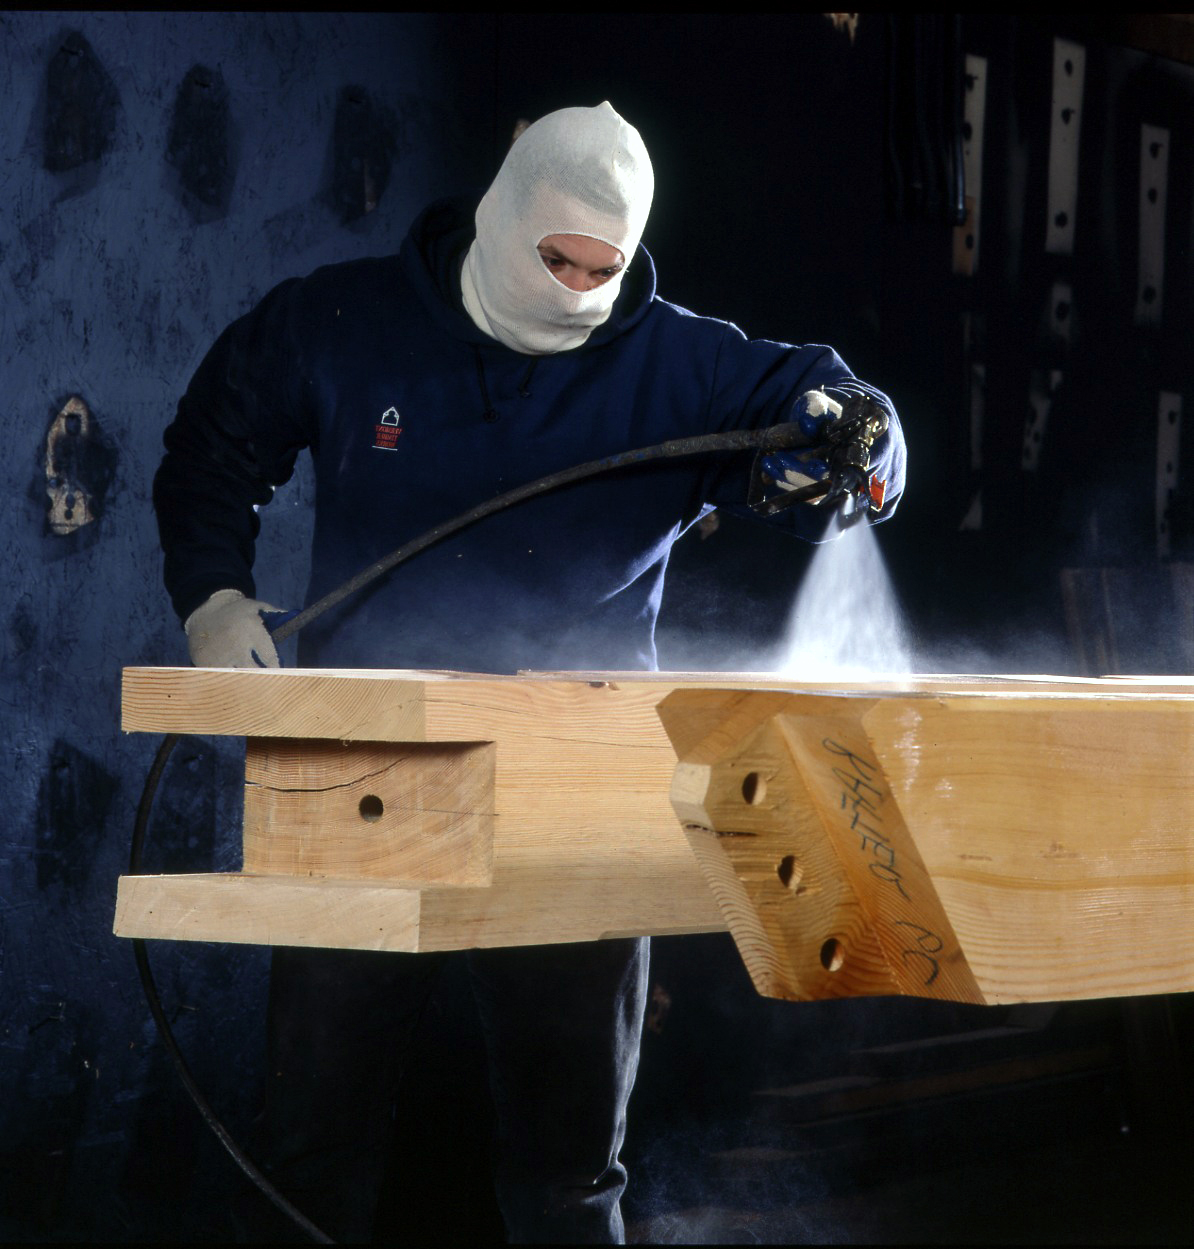
    My first test is going to be attempted with all water based products. I have no idea if they will work, but if they do, I will love the fact that I am not having to use thinner to clean the gun out.

    The tools I am using right now for this:

    Compress: Porter Cable Pancake Compressor CFFN250N
    HVLP Sprayer: Coleman Powermate 010-0013CT
    Filter/Regulator: Puma AP2121FR (between the compressor and gun)

    Click image for larger version

Name:	primergun.webp
Views:	44
Size:	68.7 KB
ID:	945834

    The pressure on the compressor is set to 95-100 (typical nail-gun range) and the regulator hooked up by the sprayer is set to output 30 psi.

    I am spraying on a small piece of MDF, and right now am using this product:


    Glidden Gripper Grey Primer--available at Home Depot.

    I didn't sand the MDF or anything before painting. It is just a cutoff from my last speaker project.

    Click image for larger version

Name:	booth.webp
Views:	28
Size:	38.3 KB
ID:	945835

    So far I sprayed 4 coats of primer (thinned) about 20 minutes apart. The can says wait an hour, but since it is going on so thin, I disregarded this.

    I lightly dry sanded the primer after 4 coats. I could still see the lines in the primer (sort of like wood grain--I'll call it MDF grain). I have sprayed 2 more coats and it looks like the MDF grain is pretty much gone. Orange peel texture doesn't look too bad--that seems more related to the variables on the gun than anything else (proper thinning, air pressure, material content).

    Pic of the grey primer--I actually didn't get rid of the mdf graining as much as I hoped. If you look closely, you can see the horizontal lines.

    Click image for larger version

Name:	greyprimed.webp
Views:	25
Size:	56.8 KB
ID:	945836

    I am going to spray another coat, and head to dinner. After dinner I will sand the primer, and start putting on a few color coats.

    Anyone feel free to chime in here with suggestions/experiences/criticisms. I am hoping for this to be a resource for others to use. I will probably also post a link to this thread on AVS.
    Last edited by theSven; 23 July 2023, 08:57 Sunday. Reason: Update image location
  • Hdale85
    Moderator Emeritus
    • Jan 2006
    • 16073

    #2
    I'm going to be attempting something similar but not gloss black it will be over a stained wood. But I want the piano gloss finish and will be using an HVLP sprayer.

    Comment

    • PMazz
      Senior Member
      • May 2001
      • 861

      #3
      I'm surprised a pancake compressor can keep up with a sprayer.

      Lacquer is typically used for the speed of building a finish. Many coats can be applied in a short span of time.

      I shoot flat black first and then clear. Sanding and prep time is best spent before the first coat of anything goes on, of course. Use a sanding sealer between the black and topcoat if the surface isn't flat as it will bridge minor inconsistencies. Lay on enough material to ensure not sanding thru. I always finish with a buffer and polishing compound.

      Good luck! Gloss black can be a pain (time consuming).

      Pete
      Birth of a Media Center

      Comment

      • mpotoka
        Senior Member
        • Sep 2007
        • 203

        #4
        Originally posted by Dougie085
        I'm going to be attempting something similar but not gloss black it will be over a stained wood. But I want the piano gloss finish and will be using an HVLP sprayer.

        I'd love to see some pictures when you get going. I was just speculating with my wife before I started this what it would look like over top of stained wood.

        Comment

        • mpotoka
          Senior Member
          • Sep 2007
          • 203

          #5
          Originally posted by PMazz
          I'm surprised a pancake compressor can keep up with a sprayer.

          Lacquer is typically used for the speed of building a finish. Many coats can be applied in a short span of time.

          I shoot flat black first and then clear. Sanding and prep time is best spent before the first coat of anything goes on, of course. Use a sanding sealer between the black and topcoat if the surface isn't flat as it will bridge minor inconsistencies. Lay on enough material to ensure not sanding thru. I always finish with a buffer and polishing compound.

          Good luck! Gloss black can be a pain (time consuming).

          Pete
          Your post made me start looking a little closer at my product choice. I read that polyeurethane starts getting more prone to cracking after 3 coats. Also that water based products are just paint without pigment. I thought what I had dried about as fast as lacquer, but I was comparing it to brushing lacquers not spraying lacquers. I think I am going to not attempt the Poly and go straight to lacquer instead.

          I have a ton of flat black paint around--you say that would work fine?

          If you could specify products (paint & lacquer) that would be great!

          Comment

          • littlesaint
            Senior Member
            • Jul 2007
            • 823

            #6
            I used an HVLP to stain my deck. It works very well provided the material isn't too thick. One suggestion about gloss finishes on speakers. If you're using them in a home theater, particularly front projection, the reflected light can impact picture quality.
            Santino

            The only true wisdom is in knowing you know nothing.

            Comment

            • mpotoka
              Senior Member
              • Sep 2007
              • 203

              #7
              Originally posted by littlesaint
              I used an HVLP to stain my deck. It works very well provided the material isn't too thick. One suggestion about gloss finishes on speakers. If you're using them in a home theater, particularly front projection, the reflected light can impact picture quality.
              Good point. My future relocation (summer) to Chicago is going to require me to give up my home theater Whatever speakers I build from here out are going to have to be living room friendly.

              I wet sanded the MDF this morning--sure enough my lack of sanding the primer showed up. Almost all the black went away (the 4 coats I did last night) the only black left was in the MDF Grain. Oh well, I put another coat on, was a little too thin, so did another wet sand just now and put an additional coat on. I'm going to call it good enough, however I think using flat black would certainly dry out a little smoother. Maybe its poor spraying on my part. According to Shinobiwan, a bit of orange peel on the black doesn't seem to be a big concern.

              I read about some people using crystalac, which greatly appeals to me, besides the fact I can't go pick it up at the store. For now I stopped at home depot and picked up 2 cans of Minwax Spray on Lacquer. In a couple hours I will start putting my coats of lacquer on. Even if they are rattlecans, from my understanding it will probably just require more sanding. Thats what palm sanders are for.

              The black paint I put on was made by Valspar. It is Premium Decorator Enamel Gloss Black 28860. Here is a picture of my latest coat. You can see that after I wet sanded, the water ran around the edges and soaked into the mdf pretty bad. For this test piece it isn't a big deal, but I will make sure and seal everything before I go about doing anything on a speaker.

              I will try to take all the rest of these pictures from the same spot--held at an angle looking outside my back (south facing) door so we can get some natural daylight on the test piece.

              Click image for larger version

Name:	black.webp
Views:	29
Size:	62.6 KB
ID:	945837

              I am actually kind of glad there are some imperfections on my test piece, so that I can get an idea of what will and what won't show up as I go along in the process.
              Last edited by theSven; 23 July 2023, 08:59 Sunday. Reason: Update image location

              Comment

              • bluewizard
                Senior Member
                • Mar 2008
                • 104

                #8
                Just a thought on water based primer. From what I read, that generally not preferred. Since MDF is just finely powdered wood particles, it sucks up water like a sponge and that can tend to raise the surface and make it rough.

                It sounds like your primer layers went on smooth enough, so it apparently wasn't a problem for you.

                steve/bluewizard

                Comment

                • JonP
                  Senior Member
                  • Apr 2006
                  • 692

                  #9
                  Yeah, sealing MDF would be important... Zinnser's Seal Coat (basically dewaxed amber Shellac) is good, being thin and alcohol based it really soaks into the MDF. Makes it harder, so it sands very well, and I'd guess that for a Piano finish more than anything, getting a totally flat and smooth surface is important.

                  Looks like your primer coats sealed it well.

                  You'll have to lay on enough, and sand it down thru the orange peel, till it's all flat.

                  Another thing, look into Micro Mesh products... it's a kind of super sandpaper.. cloth backed, resiliant glue holding the grains. Lasts forever, sands VERY well, never clogs. Rockler used to have a demo pack, you can buy sheets from them, or a bigger sampler kit direct thru Micro Mesh. I got the Rockler kit, had sizes from 400 equivalent, to glass smooth. Really good stuff, probably will take (a lot of) the pain out of doing that finish...

                  Comment

                  • JohnA
                    Super Senior Member
                    • Apr 2005
                    • 2179

                    #10
                    Originally posted by mpotoka
                    Your post made me start looking a little closer at my product choice. I read that polyeurethane starts getting more prone to cracking after 3 coats. Also that water based products are just paint without pigment. I thought what I had dried about as fast as lacquer, but I was comparing it to brushing lacquers not spraying lacquers. I think I am going to not attempt the Poly and go straight to lacquer instead.

                    I have a ton of flat black paint around--you say that would work fine?

                    If you could specify products (paint & lacquer) that would be great!
                    Watch out when applying any solvent based lacquer (the type that requires actual lacquer thinner to thin and clean) over any other type of paint!

                    Because solvent based lacquer will pretty much act like a paint remover, and cause the other type of paint underneath it to soften and bubble up. And it will for sure destroy the types of paints used for house painting, even polyurethanes. About the only types of paint you can apply laquer over, is fully cured epoxy and baked on automotive enamels. As for polyurethanes, if it's a two part automotive poly and seasoned/cured. you can use lacquer over them also. Those are almost the same as epoxies in how they chemically cure and harden. Also, stay away from the automotive two part polys unless you have the proper kind of fresh air supplied full mask respirators to use with them, the normal type of respirators with the filter cans on the ends are not good enough to filter whats needed and are not safe to use with them.

                    Comment

                    • chasw98
                      Super Senior Member
                      • Jan 2006
                      • 1360

                      #11
                      Here is how my effort at gloss black came out.

                      Click image for larger version

Name:	DSCN4042.webp
Views:	27
Size:	35.9 KB
ID:	945838

                      And this was done using all water based products.

                      Chuck
                      Last edited by theSven; 23 July 2023, 08:59 Sunday. Reason: Update image location

                      Comment

                      • PMazz
                        Senior Member
                        • May 2001
                        • 861

                        #12
                        It's a good idea to stay with the same line of finishes. Nothing worse than a crackled peeling finish after hours of work. I use industrial finishes so I can't recommend specific products, but Sherwin Williams in our area sells lacquers. They should be able to set you up with something.

                        Pete
                        Birth of a Media Center

                        Comment

                        • mpotoka
                          Senior Member
                          • Sep 2007
                          • 203

                          #13
                          Chuck--you use crystalac correct?

                          My other thought was to use the Bulls Eye Shellac from Home Depot. My rattle can lacquer doesn't seem to have done anything negative to my black paint--I am guessing it is kind of an idiot-proof lacquer (or they wouldn't sell it at home depot in a spray can). We will see over the next couple of days.

                          Click image for larger version

Name:	lacquer.webp
Views:	25
Size:	71.4 KB
ID:	945839

                          I was going to buy the shellac and spray it, but from what I read it sounds like Shellac isn't as hard, and would scratch easy? Anyone have experience with this product?

                          I am interested in the micromesh stuff. I already ordered some of this:


                          I should wait for a few weeks for the lacquer to fully cure, but I will probably just wait until my sandpaper shows up (late next week) since it is just a test piece.

                          I came across this list the other day, but I wasn't exactly sure what levels to purchase.


                          I ordered some MEGUIAR’S MIRROR GLAZE MEDIUM-CUT CLEANER #1 and then some MEGUIAR’S BODY SHOP PROFESSIONAL SWIRL FREE POLISH LIGHT CUT New porsche I also picked up 6 microfiber detailing cloths.

                          I purchased them all from autogeek.net--can anyone tell me if I can find similar/better products cheaper? Or if I should have gotten different levels of cut action?

                          See why Meguiar’s has been a trusted car care company for more than 120 years by shopping an authorized selection of products to treat any motorized vehicle.

                          Meguiars M205 Ultra Finishing Polish - Rich, swirl-free results on all paints! If you use Meguiars #105 Ultra-Cut Compound, youll love Meguiars Mirror Glaze #205 Ultra Finishing Polish. This polish was designed to follow #105 and all other ...

                          Cobra All Purpose Microfiber Towel - The Cobra All Purpose Microfiber Towel is nonabrasive and safe on any surface. This value-priced towel is handy for polishing, buffing, cleaning and all the other tasks for which you depend on quality microfiber towels.


                          I did pick up some microfiber cloths for cheaper at a store in town, but I don't know about quality comparison, and I already had the order in.
                          Last edited by theSven; 23 July 2023, 09:01 Sunday. Reason: Update image location

                          Comment

                          • mpotoka
                            Senior Member
                            • Sep 2007
                            • 203

                            #14
                            Oh and by the way--don't stick a commercial grade exhaust fan in a window where you are spraying, then try to run the dryer at the same time. We tripped the pressure switch on the furnace, and when my wife came home and said it was cold, I looked at it was 49. I couldn't get the furnace to run again until this morning I finally figured out how to reset the switch.

                            Comment

                            • JonP
                              Senior Member
                              • Apr 2006
                              • 692

                              #15
                              I did a all Shellac finish on my Modula MT's. It is fairly easy to damage, so if you are thinking wear and tear, other finishes are probably better. Easy to spray, coats dry fast.. and are thin, so you need a lot of them... Beautiful if you want a glossy clear fiinish.

                              A note on your wet sanding... it may be obvious, or you have been doing it already, but if not... using a hard flat block is the way to go for flattening out surface imperfections. I used a piece of Baltic Birch ply.. and had to keep sanding it flat as the water would warp it. Should have sealed it better...

                              Comment

                              • mpotoka
                                Senior Member
                                • Sep 2007
                                • 203

                                #16
                                Originally posted by JonP
                                I did a all Shellac finish on my Modula MT's. It is fairly easy to damage, so if you are thinking wear and tear, other finishes are probably better. Easy to spray, coats dry fast.. and are thin, so you need a lot of them... Beautiful if you want a glossy clear fiinish.

                                A note on your wet sanding... it may be obvious, or you have been doing it already, but if not... using a hard flat block is the way to go for flattening out surface imperfections. I used a piece of Baltic Birch ply.. and had to keep sanding it flat as the water would warp it. Should have sealed it better...

                                I did buy a 3m Rubber block for wet sanding. ALthough, I will be using my not-so-hard Porter Cable Palm sander when I get to the bigger speakers. Not ideal, but less work from what I gather.

                                Comment

                                • Hdale85
                                  Moderator Emeritus
                                  • Jan 2006
                                  • 16073

                                  #17
                                  I would say if your going for a piano gloss finish you need to use some high quality products. For me I plan on using a very nice poly with several layers to be quite thick. I would say you want to use a decent quality clear/poly. I'm not sure about your rattle can lacquer but I hope it turns out well. After that I'll have to order some very nice quality rubbing compounds and what not. With something like this I'm pretty sure your results will only turn out as good as your materials. Sort of the same as you get what you paid for cheap products = sub par performance.

                                  Comment

                                  • BobEllis
                                    Super Senior Member
                                    • Dec 2005
                                    • 1609

                                    #18
                                    I've used waterborne www.Pianolac.com with great results. Others have recommended a similar product, Crystalac, available from several online retailers. The black pianolac really is just as black as laquer, and doesn't need a clearcoat.

                                    While not as fast drying as laquer, you can spray a thicker coat. Three coats of Pianolac in a day gives a thicker layer of finish than you'd be able to get with a conventional laquer in a day.

                                    The real key to a successful piano black finish is surface prepartion. Don't count on the finish to fill your mistakes. Take your time working through the grits when rubbing out. Clean up the work area thoroughly between grits so that you don't get a coarser grit scratching up your 600 grit surface.

                                    Comment

                                    • mpotoka
                                      Senior Member
                                      • Sep 2007
                                      • 203

                                      #19
                                      Originally posted by Dougie085
                                      I would say if your going for a piano gloss finish you need to use some high quality products. For me I plan on using a very nice poly with several layers to be quite thick. I would say you want to use a decent quality clear/poly. I'm not sure about your rattle can lacquer but I hope it turns out well. After that I'll have to order some very nice quality rubbing compounds and what not. With something like this I'm pretty sure your results will only turn out as good as your materials. Sort of the same as you get what you paid for cheap products = sub par performance.

                                      I was going to use poly, but I read this:


                                      and another site I can't find right now. The wikipedia suggests that the layers don't meld together well. I read somewhere else that poly is good at 2-3 coats, but when you start increasing to 4-5 coats, it actually becomes more brittle/prone to cracking. Perhaps someone who knows better can chime in here.

                                      Here is the other site:


                                      Read under Vapor Exchange..

                                      Comment

                                      • mpotoka
                                        Senior Member
                                        • Sep 2007
                                        • 203

                                        #20
                                        Originally posted by BobEllis
                                        I've used waterborne www.Pianolac.com with great results. Others have recommended a similar product, Crystalac, available from several online retailers. The black pianolac really is just as black as laquer, and doesn't need a clearcoat.

                                        While not as fast drying as laquer, you can spray a thicker coat. Three coats of Pianolac in a day gives a thicker layer of finish than you'd be able to get with a conventional laquer in a day.

                                        The real key to a successful piano black finish is surface prepartion. Don't count on the finish to fill your mistakes. Take your time working through the grits when rubbing out. Clean up the work area thoroughly between grits so that you don't get a coarser grit scratching up your 600 grit surface.
                                        Thanks for the product suggestion.

                                        Could you please clarify for me what you mean by "working through the grits when rubbing out"

                                        Comment

                                        • BobEllis
                                          Super Senior Member
                                          • Dec 2005
                                          • 1609

                                          #21
                                          After spraying you'll start at 320 grit, going until the orange peel is removed (you might be able to get away with leaving a little tiny bit of orange peel at 320 but you need to get it all with 400).

                                          Clean, then go to 400 until all the 320 grit scratches are gone. Clean, sand with 600 grit, etc. Typically it will take about the same amount of time at 600 as you spent at 400, and so on to remove the coarser grit's scratches. That's what I meant by working up through the grits. If you go straight to a fine grit (high number) it will take longer and there is more chance that you'll end up with some orange peel left.

                                          You'll want to go to at least 1200 grit before going to rubbing compund and then polish. I go to 1500 or 2000, spending less time polishng. Use a power polisher once you stop sanding as PMazz suggests unless you want to get a REALLY good workout.

                                          Comment

                                          • Hdale85
                                            Moderator Emeritus
                                            • Jan 2006
                                            • 16073

                                            #22
                                            Bob do you use a power sander?

                                            Comment

                                            • mpotoka
                                              Senior Member
                                              • Sep 2007
                                              • 203

                                              #23
                                              Well I have some 600 grit, but will probably try to go straight with 2000 and the power sander. At least that is the plan on the test piece.

                                              Comment

                                              • BobEllis
                                                Super Senior Member
                                                • Dec 2005
                                                • 1609

                                                #24
                                                I haven't used a power sander - I've had enough trouble sanding through the finish by hand. ops:

                                                I might try power sanding on a big project, but so far I've only done piano black on fairly small cabinets.

                                                Comment

                                                • Hdale85
                                                  Moderator Emeritus
                                                  • Jan 2006
                                                  • 16073

                                                  #25
                                                  Well my cabinets are going to be curved and roughly 48" tall... I would prefer not to do by hand

                                                  Comment

                                                  • mpotoka
                                                    Senior Member
                                                    • Sep 2007
                                                    • 203

                                                    #26
                                                    Well my 2000g sandpaper showed up in the mail today. It didn't cut the mustard, so I had to drop down to 600g first to get the shiny spots gone. Then I used the 2000g to get rid as much of the scratches as I felt like (just a test piece)

                                                    600g piece.

                                                    Click image for larger version  Name:	600g.webp Views:	1 Size:	16.3 KB ID:	945846

                                                    After 2000g sandpaper

                                                    Click image for larger version  Name:	2000g.webp Views:	1 Size:	9.6 KB ID:	945847

                                                    Now I didn't take any more pictures durning the stages of rubbing compound. I struggled a little, went back to the high cut stuff. This is about the best I could get. (and yes we have a dusty house)

                                                    On the Floor:

                                                    Click image for larger version  Name:	floor.webp Views:	1 Size:	43.4 KB ID:	945848

                                                    Leaning agaist the music stand on our clavinova:

                                                    Click image for larger version  Name:	piano.webp Views:	1 Size:	41.5 KB ID:	945849

                                                    A closer shot at the piano key reflection, to try and show a little more detail.

                                                    Click image for larger version  Name:	pianob.webp Views:	1 Size:	44.9 KB ID:	945850

                                                    And a picture next to the speaker I plan on putting the finish on (and I finalized the crossover last night waiting for sandpaper )

                                                    Click image for larger version  Name:	b3nr.webp Views:	1 Size:	30.8 KB ID:	945851
                                                    Last edited by theSven; 23 July 2023, 09:09 Sunday. Reason: Update image location

                                                    Comment

                                                    • mpotoka
                                                      Senior Member
                                                      • Sep 2007
                                                      • 203

                                                      #27
                                                      Now I still have a number of very fine scratches. I don't know if I need a less-cutting polish, or a softer rag. What final polish have others used?

                                                      Comment

                                                      • Hdale85
                                                        Moderator Emeritus
                                                        • Jan 2006
                                                        • 16073

                                                        #28
                                                        Wow.... that looks remarkably good considering you used a spray on clear coat. Did you do like the one guy said? Use a small amount of polish and rub it in until it drys to a powder and then add more? If so then I would say a finer polish or maybe it is your rage. What are you using for a rag? One of the guides I read said you would have to change rage pretty often to keep from getting build up that damages your surface.

                                                        Comment

                                                        • mpotoka
                                                          Senior Member
                                                          • Sep 2007
                                                          • 203

                                                          #29
                                                          Originally posted by Dougie085
                                                          Wow.... that looks remarkably good considering you used a spray on clear coat. Did you do like the one guy said? Use a small amount of polish and rub it in until it drys to a powder and then add more? If so then I would say a finer polish or maybe it is your rage. What are you using for a rag? One of the guides I read said you would have to change rage pretty often to keep from getting build up that damages your surface.

                                                          I did try to do like the guy said--although the polish never really seemed to turn into a powder. I did start to notice that it could dry out in the rag, even if the stuff on the piece of MDF appeared to be wet yet.

                                                          I got the best results by rubbing it on, medium pressure. Then letting it dry for a minute or two, then buffing it out with another clean cloth. Every time I put more polish on, I used a new section of clean rag. I am using some Microfiber Detailing Cloths made by Cobra. The Autogeek website says they are good for polishing and buffing, so it don't *think* that is the problem. My guess is to go up to a number 2 or even 1 level of cut. That is why I am wondering what other people have used.

                                                          I was pretty impressed with how hard this spray-on lacquer was. I was really suprised that the not-so-stellar black paint job I did doesn't show at all--I would be totally thrilled if only those slight scratches were gone. Tomorrow I will try to take a picture in the sunlight to get them to show.

                                                          Comment

                                                          • Hdale85
                                                            Moderator Emeritus
                                                            • Jan 2006
                                                            • 16073

                                                            #30
                                                            Yeah might want to try that or maybe use a smaller amount of solution on the rag and see if that works? Maybe your using to much for it to dry.

                                                            Comment

                                                            • tyler
                                                              Senior Member
                                                              • Feb 2007
                                                              • 101

                                                              #31
                                                              Originally posted by BobEllis
                                                              I've used waterborne www.Pianolac.com with great results. Others have recommended a similar product, Crystalac, available from several online retailers. The black pianolac really is just as black as laquer, and doesn't need a clearcoat.

                                                              While not as fast drying as laquer, you can spray a thicker coat. Three coats of Pianolac in a day gives a thicker layer of finish than you'd be able to get with a conventional laquer in a day.

                                                              The real key to a successful piano black finish is surface prepartion. Don't count on the finish to fill your mistakes. Take your time working through the grits when rubbing out. Clean up the work area thoroughly between grits so that you don't get a coarser grit scratching up your 600 grit surface.
                                                              Thanks for the great tip!:B

                                                              Comment

                                                              • mpotoka
                                                                Senior Member
                                                                • Sep 2007
                                                                • 203

                                                                #32
                                                                Well I took a picture today out the back door, same spot as all the painted pictures were taken. Considering the lackluster approach, and the haste in which I completed this test piece, I am more than encouraged. I was suprised by how little work it took to get something that looks this good. A bit more preperation next time and I think things will turn out fantastic. Too bad about 4" of snow fell in the last 30 hours though....

                                                                Click image for larger version

Name:	glossblack.webp
Views:	23
Size:	98.0 KB
ID:	945852
                                                                Last edited by theSven; 23 July 2023, 09:06 Sunday. Reason: Update image location

                                                                Comment

                                                                • JonP
                                                                  Senior Member
                                                                  • Apr 2006
                                                                  • 692

                                                                  #33
                                                                  Originally posted by mpotoka
                                                                  I did try to do like the guy said--although the polish never really seemed to turn into a powder. I did start to notice that it could dry out in the rag, even if the stuff on the piece of MDF appeared to be wet yet.

                                                                  I got the best results by rubbing it on, medium pressure. Then letting it dry for a minute or two, then buffing it out with another clean cloth. Every time I put more polish on, I used a new section of clean rag. I am using some Microfiber Detailing Cloths made by Cobra. The Autogeek website says they are good for polishing and buffing, so it don't *think* that is the problem. My guess is to go up to a number 2 or even 1 level of cut. That is why I am wondering what other people have used.
                                                                  Depending on the polish... I used a Meguire's one a woodworking buddy said was popular... it may need a certain amount of work for the abrasive to break down. That one touts a "reducing abrasive" or something similar. It's supposed to crumble to finer and finer effective grits as you buff. You might not be applying enough pressure, or pressure for long enough. Experiment with that... I didn't see it turn to powder, unless I left some sitting. It just seemed to dissappear into the shop towels I was using.

                                                                  Something that might help with the scratches, would be going religiously up thru the grits.. i.e. don't skip a grade. Idea being, each "size" of scratch pattern would be elilminated by the next grade. Jumping several may leave some deep earlier ones that never quite get ground out. Each finer grit will tend to grind out a thinner and thinner layer of the surface.

                                                                  Did you ever get the Micro Mesh sanding sheets? I seemed to get as good or better surface going up thru to 12000 (probably equiv of 2400 regular grit rating) as I did going up to 2000 and then buffing with the compound.

                                                                  Hope that helps...

                                                                  Comment

                                                                  • mpotoka
                                                                    Senior Member
                                                                    • Sep 2007
                                                                    • 203

                                                                    #34
                                                                    I have not gotten any micro-mesh stuff yet. I will seriously look into that when I am going to attempt the finish on a whole speaker. I am pretty confident the scratches are a result of my current level of polish. I can work for awhile in a left-right direction, and all the scratches going up-down go away, and leaving me only a few left to right scratches. Then i can switch to going up-down, and get rid of all the left-right scratches with more pressure, but I create new up-down scratches I cannot get rid of. I finally worked back and forth and lighter and lighter pressure till I got rid of almost all of them.

                                                                    I am pretty happy with what I have achieved--I am quite confident that when I start doing a whole speaker--spending more time on the priming/sanding will leave me with a great finish. I am pretty sure I will still end up with these light scratches unless I try a different product.

                                                                    It snowed about 6" here this weekend, so it will be a month or so before I dare go and spray in the garage. I will update this thread when I actually attempt this on a speaker (42" tall floor stander, lots of surface area, and large roundovers)

                                                                    Comment

                                                                    • Dennis H
                                                                      Ultra Senior Member
                                                                      • Aug 2002
                                                                      • 3798

                                                                      #35
                                                                      One thing I notice is all the finish is sanded off the edges of your test piece. Be careful when you do a real speaker, the same thing can easily happen at the corners.

                                                                      Comment

                                                                      • Hdale85
                                                                        Moderator Emeritus
                                                                        • Jan 2006
                                                                        • 16073

                                                                        #36
                                                                        Make sure you get an even amount of paint on the edges as you do the rest of the piece as well when you do the actual speakers.

                                                                        Comment

                                                                        • mpotoka
                                                                          Senior Member
                                                                          • Sep 2007
                                                                          • 203

                                                                          #37
                                                                          Originally posted by Dennis H
                                                                          One thing I notice is all the finish is sanded off the edges of your test piece. Be careful when you do a real speaker, the same thing can easily happen at the corners.
                                                                          Yeah that was due to the wet sanding I did on the primer--it soaked around to the end grain of the MDF and raised it all up. I won't be doing any wet sanding on the real box until its all primed/sealed

                                                                          Comment

                                                                          • jquin
                                                                            Senior Member
                                                                            • Dec 2006
                                                                            • 138

                                                                            #38
                                                                            Hi All
                                                                            Has anyone had any experience with two pack acid catalyst paints like Mirotone to do the Piano black thing?

                                                                            I have considered Automotive paints but don't want to experiment with primers that don't work with MDF and clear coats that don't work with acrylics.

                                                                            It seems to me that dedicated furniture paints might be more durable in the long run? Yes?

                                                                            Comment

                                                                            • mpotoka
                                                                              Senior Member
                                                                              • Sep 2007
                                                                              • 203

                                                                              #39
                                                                              I am not sure about any different paint products. From what I have read--and if I understand correctly after buffing to the point of a high-gloss finish--a wax or similar product is needed to actually protect the surface. I haven't read that much about it or have a lot of experience working with finishes--hopefully someone else can chime in.

                                                                              Mike

                                                                              Comment

                                                                              • dpc rep
                                                                                Member
                                                                                • Feb 2008
                                                                                • 58

                                                                                #40
                                                                                I have noticed a few things throughout the thread and would like to point out a few things to consider.

                                                                                Working up through the grits is imperative to prevent you from killing yourself when you finally get around to buffing the finish, unless it is a relatively soft finish like shellac, lacquer, or the up and coming and increasingly popular (due to reduced VOC emmisions in the atmosphere) waterbourne finishes, but even these require some sort of middle ground. For the ultimate in appearance and durability, a 2-component polyurethane will give the best results, but it is also the most expensive to use and also requires a much larger investment in equipment and a higher degree of skill.

                                                                                Also, if you are using using a wet-dry paper to wet sand, a little known but important tip is to let the paper soak in your bucket of water for at least 20 - 30 minutes before you start sanding. The reason for this is that it softens the back of the paper and allows the different sizes of the grits on the paper (all sandpaper actually has a wide range of grits on it to achieve an "average" grit that is printed on it) to actually embedd themselves into the paper somewhat and even out the cut. This will help to eliminate some of the heavier scratches that you might see unexplainedly even though you are using a fine finishing paper. All of the sandpaper manufacturers actually recommend soaking the wet paper, but it is not common knowledge if you are outside of the refinishing industry.

                                                                                The micro-mesh paper mentioned earlier is a great product and usually contains several pieces of fabric backed paper for each grit 1500, 1800, 2400, 2800, 3200, 4000, 6000, 8000, 10000, and 12000. This product was originally designed to polish scratched out of aircraft windows. The idea with this product is to actually work up through the grits successively and progressively sand out the scratch profile of the previous grit, until the scratches are so small (12000 grit) that you are unable to see them. You are actually using the sandpaper to polish the finish, believe it or not! The only downside to this product is its cost and speed of use. It is easy to use but as you can imagine, it is very time consuming and I couldnt even imagine trying to use it on a larger enclosure.

                                                                                If you are going to use a waterbased primer to fill the grain and imperfections in your cabinet, then it is a very good idea to use a solvent based sanding sealer, or a shellac that is reduced down, first to seal the wood fibers in, especially on the end grain. If not sealed up, the waterbased primer can easily swell the wood fibers and cause some real problems.

                                                                                The smoother you can get your substrate and color before you clear it, the easier your final sanding and polishing will be. You can actually get a pretty good finish with the spray cans from HD or Lowes, but it is just going to take a little longer to get there since they dont build millage very quickly. The upside is that lacquer buffs and polishes very easily.

                                                                                There are a lot of products out there that can make the whole process easier, if you are willing to spend the money and have access to them. If you can find yourself an automotive paint supply store, they will most likely have everything you need to finish your cabinets there and could make some other suggestions for you as well, depending on what tools you have available to you.

                                                                                Sorry for the short novel, and not trying to sound like a know-it-all, but I have already screwed up more than enough in the earlier part of my career and have had to figure out things the hard way.

                                                                                I am now a manufacturers rep for a large company so there isnt much that I havent either sprayed or had to figure out yet and if I can help your project go any easier or faster, let me know.

                                                                                Comment

                                                                                • Xander
                                                                                  Senior Member
                                                                                  • Dec 2007
                                                                                  • 132

                                                                                  #41
                                                                                  Originally posted by dpc rep
                                                                                  Sorry for the short novel, and not trying to sound like a know-it-all, but I have already screwed up more than enough in the earlier part of my career and have had to figure out things the hard way.
                                                                                  Certainly no apology needed. I for one appreciate your advice. The best way to learn is from other peoples' experience. Or mistakes :W

                                                                                  I'm now considering a very small gloss black enclosure for some experiment speakers I'm going to make...

                                                                                  Comment

                                                                                  Working...
                                                                                  Searching...Please wait.
                                                                                  An unexpected error was returned: 'Your submission could not be processed because you have logged in since the previous page was loaded.

                                                                                  Please push the back button and reload the previous window.'
                                                                                  An unexpected error was returned: 'Your submission could not be processed because the token has expired.

                                                                                  Please push the back button and reload the previous window.'
                                                                                  An internal error has occurred and the module cannot be displayed.
                                                                                  There are no results that meet this criteria.
                                                                                  Search Result for "|||"