My new translam Project

Collapse
This topic is closed.
X
X
 
  • Time
  • Show
Clear All
new posts
  • gmed
    Senior Member
    • Dec 2006
    • 207

    #91
    I am almost finished with the second speaker. The second speaker was a little more difficult to finish and easier at the same time. My first version of the second speaker got messed up due to router bit mess-up, and there was no way to salvage the speaker, so I had to start another one, and since I had spent many days on just 6 layers of plywood in the intense summer heat, I just couldn't do it anymore and was ready to give up. this is when I spoke to a friend of a friend who has a $100K CNC router table who cut it all for me for a price, but it was all worth it. I finished gluing all the pieces in 4 days, vs 6 months part time!!!

    Images not available

    Straightening the edges of the inset for the front baffle

    Images not available

    For those of you who wonder how I did the rear flat area for the port, here is how. First I nailed couple of boards from either side so that the speaker can face up straight, with baffle looking up.

    Images not available

    Then, on my router table, nailed couple of stops on either side, measured to a specific distance in-order to make my flat space a specific length.

    Images not available

    then pass the speaker on the router table using the bit that you see in the pic which is a 1" radius circular bit.

    And you get

    Image not available

    You still have to do some sanding, but it gets the job done.
    Basically, this is what I was trying to achieve.
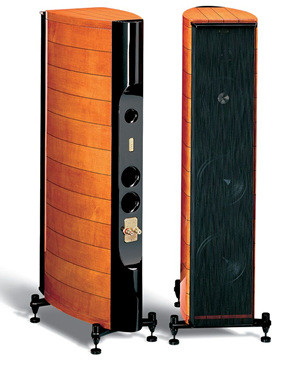
    Click image for larger version

Name:	sfAmati.jpg
Views:	12
Size:	32.5 KB
ID:	950054

    Just few more weeks and I should be ready for the NoCal DIY meet.
    Last edited by theSven; 03 December 2023, 16:25 Sunday. Reason: Remove broken image links

    Comment

    • ThomasW
      Moderator Emeritus
      • Aug 2000
      • 10933

      #92
      If you want to compress the pictures to something reasonable like 50-70K the embedded images can return. Placing 14 pictures in one post, all of which were 500K or larger is inconsiderate of those not having high-speed connections..

      IB subwoofer FAQ page


      "Complicated equipment and light reflectors and various other items of hardware are enough, to my mind, to prevent the birdie from coming out." ...... Henri Cartier-Bresson

      Comment

      • Fred333
        Member
        • Oct 2007
        • 45

        #93
        Very nice looking project. I really like the layer look.
        Always looking for a Scranton Web Design company.

        Comment

        • gmed
          Senior Member
          • Dec 2006
          • 207

          #94
          So almost finished, now working on the finish. It is amazing how the grains just pop out at you. The pictures dont do the wood justice, I mean its only simple BB plywood, the finish is coming out great.

          Images not available

          I'm using wipe on Poly. Very easy to work with.

          Images not available
          Last edited by theSven; 03 December 2023, 16:26 Sunday. Reason: Remove broken image links

          Comment

          • yousuredo2
            Senior Member
            • Jun 2006
            • 206

            #95
            Nice work...
            leaving them naked in all there glory, very interesting...
            My System
            ~ BenQ w5000 DLP 1080p Projector
            ~ Sony Bravia SXRD KDS-60A3000
            ~ Onkyo tx sr805
            ~ Sony PS.3
            ~ Xbox 360
            ~ Natalie P's Main L/R
            ~ Polk Csi A6 -Center
            ~ Polk RTi6 Rears
            ~ Behringer ep2500
            ~ Behringer Fbq 2496

            Comment

            • jkrutke
              Senior Member
              • Dec 2005
              • 590

              #96
              Looking great. Natural with wipe-on poly is the prefered finish for laminated plywood. On my own plywood project, I'm experimenting with dark red and dark blue on some scrap pieces.
              Zaph|Audio

              Comment

              • Hdale85
                Moderator Emeritus
                • Jan 2006
                • 16073

                #97
                Where did you find those spikes? They very expebsive?

                Comment

                • cjd
                  Ultra Senior Member
                  • Dec 2004
                  • 5570

                  #98
                  FWIW, the binding post plates Parts Express sells work perfectly with the Supra posts. Very nice plates, too.

                  Project looks superb!

                  C
                  diVine Sound - my DIY speaker designs at diVine Audio

                  Comment

                  • gmed
                    Senior Member
                    • Dec 2006
                    • 207

                    #99
                    Thanks for the nice words. The spikes I found online. $100 for a set of 2x4. The binding post plate Im making them myself from aluminum, due to the small space available.

                    Comment

                    • gmed
                      Senior Member
                      • Dec 2006
                      • 207

                      So finally done with the finish for the first speaker, spikes in place, up next is the aluminum port and binding post plate, then the crossover. As you can see I was able to find a reverse round over bit, so the woofer hole has a round over from the inside. Nice, ha?

                      Images not available
                      Last edited by theSven; 03 December 2023, 16:26 Sunday. Reason: Remove broken image links

                      Comment

                      • gmed
                        Senior Member
                        • Dec 2006
                        • 207

                        1-2 days away from listening to my speakers.

                        Images not available
                        Last edited by theSven; 03 December 2023, 16:27 Sunday. Reason: Remove broken image links

                        Comment

                        • cjd
                          Ultra Senior Member
                          • Dec 2004
                          • 5570

                          Nice stuff!
                          diVine Sound - my DIY speaker designs at diVine Audio

                          Comment

                          • gmed
                            Senior Member
                            • Dec 2006
                            • 207

                            Finally the first one is done, and it sounds amazing. No measurements since I don't have the means, but I can tell you, Im gonna have a lot of fun with them.

                            Does any one know how and how long I need to burn them in?

                            Is it necessary?

                            Images not available
                            Last edited by theSven; 03 December 2023, 16:27 Sunday. Reason: Remove broken image links

                            Comment

                            • Gir
                              Senior Member
                              • Dec 2006
                              • 309

                              Wow, those look absolutely amazing! Great work!
                              -Tyler


                              Under deadline pressure for the next week. If you want something, it can wait. Unless it's blind screaming paroxysmally hedonistic...

                              Comment

                              • mike93lx
                                Member
                                • Dec 2007
                                • 33

                                gmed, how are they sounding? I am planning to start my own translam project soon as well and will definitely incorporate some of your ideas. fantastic job!

                                how deep and wide are yours? my design right now is at 9" wide by 11.5" deep for a 2way bookshelf.

                                thanks!

                                Comment

                                • gmed
                                  Senior Member
                                  • Dec 2006
                                  • 207

                                  Thanks, They are sounding excellent. Though I havent spent much time with them since I am now working on the Stands. They sound very crisp and warm. Very impressive deep bass considering Im using 7" woofers in this enclosure. I was expecting a very tight bass due to the enclosure being very rigid, but Im a ctually pretty happy with the sound. They havent broken in yet, in fact havent even begun yet, but Im sure as I use them they will sound better. Mine measure roughly 14 by 17.5, if im not mistaking.

                                  If you have any questions, do not hesitate to ask.

                                  Comment

                                  • mike93lx
                                    Member
                                    • Dec 2007
                                    • 33

                                    wow, that is a sizable bookshelf speaker. Now I'm wondering if I should make mine larger.

                                    How many flush bits did you run through on the first cabinet? were you able to do it all with one?

                                    Comment

                                    • gmed
                                      Senior Member
                                      • Dec 2006
                                      • 207

                                      For the first speaker, I used may i believe about 5 or 6. Thank goodness for Rockler and their deals, or else they really would cost a lot. You could use less but they get blunt and do not cut as well.

                                      Comment

                                      • SQconstable
                                        Senior Member
                                        • Mar 2005
                                        • 141

                                        So did you basically make one perfect one, and then flush-bit route all the others from that "template"? I think I've found exactly the type of enclosure style I want to build for the SR71 kit! You are my hero, man.

                                        Comment

                                        • gmed
                                          Senior Member
                                          • Dec 2006
                                          • 207

                                          Yes, I had someone cut me a template with CNC router based on the drawing I did on Corel Draw, then i used a flush bit to cut the rest. i glued the subsequent rectangular piece of BB plywood onto the previous, nailed it using a brad gun, then cut using a router table. You can see what Im talking about on the first page of the thread.

                                          Image not available
                                          Last edited by theSven; 03 December 2023, 16:28 Sunday. Reason: Remove broken image link

                                          Comment

                                          Working...
                                          Searching...Please wait.
                                          An unexpected error was returned: 'Your submission could not be processed because you have logged in since the previous page was loaded.

                                          Please push the back button and reload the previous window.'
                                          An unexpected error was returned: 'Your submission could not be processed because the token has expired.

                                          Please push the back button and reload the previous window.'
                                          An internal error has occurred and the module cannot be displayed.
                                          There are no results that meet this criteria.
                                          Search Result for "|||"