Customizing The Dayton Aluminum Binding Post Back Plate

Collapse
This topic is closed.
X
X
 
  • Time
  • Show
Clear All
new posts
  • 64NOMIS
    Member
    • Apr 2009
    • 58

    Customizing The Dayton Aluminum Binding Post Back Plate

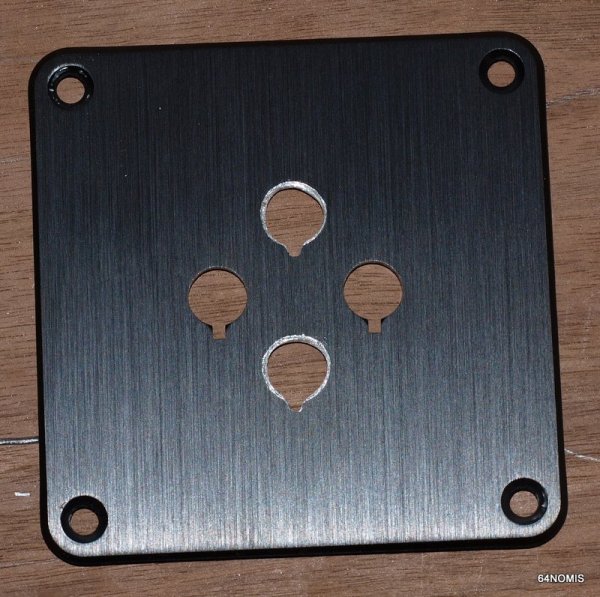
    I have been customizing the Dayton binding post back plate from partsexpress.

    I needed a small rear plate with four holes for four connectors. The crossover is in the unit base and for no good reason I am running two ground lines up (well, I guess the cable is paired...). So I bought the Parts Express Dayton 2 hole unit and their nice banana plugs. They are square and the holes are aligned to the center, so I was able to lay one on top of the other horizontally opposed as a template, draw my circles for the holes, secure them to a board, clamp, and then bore out the holes on my drill press getting a perfect match to the .43 inch hole.

    Problem - how do I create a clean notch within the hole to match the notch in the banana plug which secures the plug as it being screwed in and over time & vibration? No good idea has come to me. Suggestions?
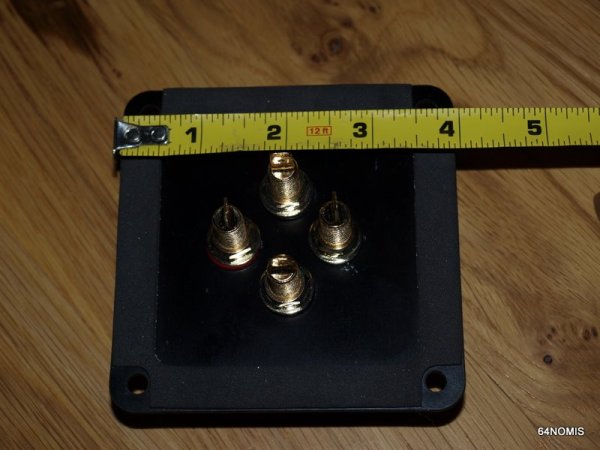
    Parts in scene:
    Dayton SCP-6 Speaker Cable Pair w/Bananas 6
    Dayton BPP-G Premium Binding Post Pair Gold
    Dayton SBPP-BK Binding Post Plate Black Anodized

    (This post orignally from my thread on Console 2.0: http://www.htguide.com/forum/showthread.php4?t=33461)


    Want More | Visit www.omnixedia.com | Compendium of the Diachron Omnix
    The Complete Vision | http:links.amd.com/eyecndys | Introduction to Central Computing & Multi Display Environments
  • Dennis H
    Ultra Senior Member
    • Aug 2002
    • 3798

    #2
    Jigsaw?

    Comment

    • BigguyZ
      Senior Member
      • Jan 2009
      • 153

      #3
      Pick up a needle file from the hadware store or local WWing store?

      Comment

      • wkhanna
        Grumpy Old Super Moderator Emeritus
        • Jan 2006
        • 5673

        #4
        Off the top of my head, I would say start with a hack saw blade, assuming one with fit thru the hole, then, finish with a needle file.

        Otherwise, file the notch off of the plug?
        _


        Bill

        Practicing Curmudgeon & Audio Snob
        ....just an "ON" switch, Please!

        FinleyAudio

        Comment

        • 64NOMIS
          Member
          • Apr 2009
          • 58

          #5
          Needle File - new term in my vocabulary. Looks like the right thing.

          I'll stop at harbor freight on my way home.

          I wanted to keep the notch in the post - seems to have a purpose in life.
          Want More | Visit www.omnixedia.com | Compendium of the Diachron Omnix
          The Complete Vision | http:links.amd.com/eyecndys | Introduction to Central Computing & Multi Display Environments

          Comment

          • cjd
            Ultra Senior Member
            • Dec 2004
            • 5570

            #6
            I would drill a small hole at each end of the notch (one may be "inside" the large hole, you want them as close together as you can), THEN drill the large hole. Clean up the notch with the needle files. Course, you can't do that now, just next time.

            Use beeswax on the drill bits, and less pressure.

            C
            diVine Sound - my DIY speaker designs at diVine Audio

            Comment

            • David_D
              Senior Member
              • Feb 2008
              • 197

              #7
              +1 On the Jig saw blade.
              Seems like it could be the perfect width, but easy to open up if not.
              If you go this route, run the saw on the back side so you don't scratch up that nice black anodize.
              PS: You need to sharpen your drill bits dude.
              Cheers
              -David
              -David

              As we try and consider
              We receive all we venture to give

              Comment

              • 64NOMIS
                Member
                • Apr 2009
                • 58

                #8
                Originally posted by David_D
                +1 On the Jig saw blade.
                Seems like it could be the perfect width, but easy to open up if not.
                If you go this route, run the saw on the back side so you don't scratch up that nice black anodize.
                PS: You need to sharpen your drill bits dude.
                Cheers
                -David
                Yeah, and what's funny is I have used that bit on aluminum before, tortured it really, on soft, thick 1/4" inch plates. Nothing a file can't clean up but good for others to take note. Use a nice sharp bit, beeswax and less pressure.

                I have been debating using the drill press for the notch - the problem is that the notch is so small that the bit is thin. I think I can simply file it out. Working on it now..

                Good that most of my work is with wood, a medium I seem to be on better terms with...
                Want More | Visit www.omnixedia.com | Compendium of the Diachron Omnix
                The Complete Vision | http:links.amd.com/eyecndys | Introduction to Central Computing & Multi Display Environments

                Comment

                • chasw98
                  Super Senior Member
                  • Jan 2006
                  • 1360

                  #9
                  Go and buy an end mill of the proper diameter that the notch is supposed to be. Load it up in your Bridgeport Mill and clamp the plate to the working surface. Using your Mitutoyo digital reader, mill out the length of the notch to the nearest thousandth.

                  If you don't have a Bridgeport mill or a Mitutoyo display, then try mounting your router base in a piece of wood maybe 3/4" thick and 12" x 12". Clamp a straight edge to the wood the appropriate distance from the notch. Using the proper diameter router bit, you should be able to notch the soft aluminum very easily and very accurately with minimal fuss or muss. Just be sure the wood you mount your router base and router to is securely mounted so that it can't move. Now you have a cheap accurate router table with minimal cost.

                  I have mounted my router to my radial arm saw base and it works very well. I use a piece of 2 inch aluminum angle iron as a 'fence' to route wood and metal all the time. Just be very careful, wear goggles, hearing protection, and be aware of the location of the high speed router bit at all times! Don't do this if you do not feel comfortable with high speed spinning cutting objects.

                  Comment

                  • 64NOMIS
                    Member
                    • Apr 2009
                    • 58

                    #10
                    Thanks for the help.

                    I am going to disappoint all but the minimalists. Response from chasw98 still has me crying.

                    What I appreciate is that there are many solutions, and given my current state of work, child, flu induced exhaustion, I went strait for the least glamorous one. The result is functional.

                    Here's the modified binding post.


                    As suggested by Bigguyz, I used a small file and it went quick. File was triangular but very fine, brand new, and I just worked each edge of a triangular inital groove to make it nearly square. Rolled up some sand paper cleaned up the holes. Post now presses in tightly for a firm fit.

                    Next task, complete HF/MF faces.


                    Last edited by 64NOMIS; 15 May 2009, 00:28 Friday.
                    Want More | Visit www.omnixedia.com | Compendium of the Diachron Omnix
                    The Complete Vision | http:links.amd.com/eyecndys | Introduction to Central Computing & Multi Display Environments

                    Comment

                    • BigguyZ
                      Senior Member
                      • Jan 2009
                      • 153

                      #11
                      Looks good!

                      Comment

                      • David_D
                        Senior Member
                        • Feb 2008
                        • 197

                        #12
                        Nice Job!
                        -David

                        As we try and consider
                        We receive all we venture to give

                        Comment

                        • 64NOMIS
                          Member
                          • Apr 2009
                          • 58

                          #13
                          Better tool, better job.

                          Harbor Freight had 10 needle files for $2.

                          A rectangular file is great, you vary the pressure to make the opening wider or longer. And as long as you approach each direction in near proportion, or don't get too agresive with either the height or the width, you are able to file your way into a perfect fit. Only a few minutes of work per slot and there it is!

                          Want More | Visit www.omnixedia.com | Compendium of the Diachron Omnix
                          The Complete Vision | http:links.amd.com/eyecndys | Introduction to Central Computing & Multi Display Environments

                          Comment

                          Working...
                          Searching...Please wait.
                          An unexpected error was returned: 'Your submission could not be processed because you have logged in since the previous page was loaded.

                          Please push the back button and reload the previous window.'
                          An unexpected error was returned: 'Your submission could not be processed because the token has expired.

                          Please push the back button and reload the previous window.'
                          An internal error has occurred and the module cannot be displayed.
                          There are no results that meet this criteria.
                          Search Result for "|||"