Strategies for subwoofer box assembly?

Collapse
This topic is closed.
X
X
 
  • Time
  • Show
Clear All
new posts
  • cameronthorne
    Member
    • Sep 2006
    • 35

    Strategies for subwoofer box assembly?

    This is my first major woodworking project, so I need some help, and thought this would be the best place to ask. I'm getting ready to assemble my subwoofer end table, and I wondered what the best strategy is for getting it all glued up square and straight? Should I use screws to provide my clamping pressure, and then remove them when finished? The screw holes will later be covered by trim panels, so this is definitely an option, except for the top plate. How should I attached the top plate? Is a simple bead of PVA glue acceptable around the top rim of the rest of the box, or does it need dowel pins or some other joining method? What order should I glue the pieces? Braces? How many at a time? Should all the internal joints/seams be caulked after glued for extra strength/sealing? With what - liquid nails? Silicon?

    The box is a down-firing design made from 18mm baltic birch ply, has a decent amount of internal bracing, and the bottom baffle is 2 layer thick; plate amp on the back side.

    Here's a picture from a dry-fit last night (sans bracing and trim panels):


    Thanks for helping the n00b!

    -- Cameron

    Edit: I've got 2 36" Irwin clamps, 6 12" Irwin clamps (almost useless in this application, and 1 band clamp.. I think I may need more clamps for this piece, but how far can I get with only these? What else should I get?
  • ThomasW
    Moderator Emeritus
    • Aug 2000
    • 10934

    #2
    Biscuits and PVA glue.

    There's no such thing as too many clamps.

    IB subwoofer FAQ page


    "Complicated equipment and light reflectors and various other items of hardware are enough, to my mind, to prevent the birdie from coming out." ...... Henri Cartier-Bresson

    Comment

    • wmilas
      Member
      • Dec 2006
      • 45

      #3
      Out of curiosity, anyone every try pocket holes on 3/4 carcass? Dunno if mdf is strong enough but baltic birch should be. Wonder what the downside would be.

      The upside is you really only need the clamps to align the glued ends while the screws are inserted. Afterwards if done correctly clamps help I suppose but aren't as critical as biscuits, since most of the clamping pressure is coming from the screws anyways.

      I've used pockets on hardwood and hardwood plys (Cabinets ... never tried it on speaker carcasses though.

      Comment

      • cameronthorne
        Member
        • Sep 2006
        • 35

        #4
        The friend who helped me with most of the cutting is going to lend me his biscuit joiner. I'll give it a whirl this weekend and see how it goes. I thought it sounded complicated until he explained it to me; it sounds like it will be much easier than dowel pins for this application.

        I can't wait until Friday night! I've got some boxes to build!

        Comment

        • ---k---
          Ultra Senior Member
          • Nov 2005
          • 5202

          #5
          I put some pocket holes in some of the braces for my speakers, but didn't end up using them. For the most part, it was too narrow to get the drill in where I needed and butt joints work just fine. Also, I was somewhat limited to where the pocket screws could go, because I planned on doing a round over edge and didn't want the bit to hit the screws.

          Someone else posted some pictures a while ago where they used a lot of pocket screws for their box and loved it. I think they'll work great if it is possible to use them. But really, butt joints and clamps also work. So, 6 of one, 1/2 dozen of another.
          - Ryan

          CJD Ochocinco! ND140/BC25SC06 MTM & TM
          CJD Khanspires - A Dayton RS28/RS150/RS225 WMTMW
          CJD Khancenter - A Dayton RS28/RS150/RS180 WTMW Center

          Comment

          • wmilas
            Member
            • Dec 2006
            • 45

            #6
            oh.. never thought about the tight spaces. Every place I've used em has been pretty wide open.

            Like you said biscuits work just fine

            Comment

            • yousuredo2
              Senior Member
              • Jun 2006
              • 206

              #7
              I would also enclose the area that the amp is going to be. most amps aren't air tight
              My System
              ~ BenQ w5000 DLP 1080p Projector
              ~ Sony Bravia SXRD KDS-60A3000
              ~ Onkyo tx sr805
              ~ Sony PS.3
              ~ Xbox 360
              ~ Natalie P's Main L/R
              ~ Polk Csi A6 -Center
              ~ Polk RTi6 Rears
              ~ Behringer ep2500
              ~ Behringer Fbq 2496

              Comment

              • cameronthorne
                Member
                • Sep 2006
                • 35

                #8
                Originally posted by yousuredo2
                I would also enclose the area that the amp is going to be. most amps aren't air tight
                Hmm. That's a good idea, but it is too late for this incarnation. Hopefully I can get it to seal well. It does have a healthy strip of closed-cell foam around the perimeter - similar to what I am sealing the drivers with. Hopefully that will suffice.

                I am finishing some small (20L) boxes over the next few days, and then I get to the big end table...

                This biscuits have been working out well. I still think I will caulk all the internal seams with liquid nails or some other construction adhesive just for extra sealing.

                -- Cameron

                Comment

                • PoorboyMike
                  Senior Member
                  • Oct 2005
                  • 637

                  #9
                  Originally posted by cameronthorne
                  Hmm. That's a good idea, but it is too late for this incarnation. Hopefully I can get it to seal well. It does have a healthy strip of closed-cell foam around the perimeter - similar to what I am sealing the drivers with. Hopefully that will suffice.

                  -- Cameron
                  The outside of the amp isn't the problem, it's all of knobs and plug ins where the leaks occur.

                  Comment

                  • cameronthorne
                    Member
                    • Sep 2006
                    • 35

                    #10
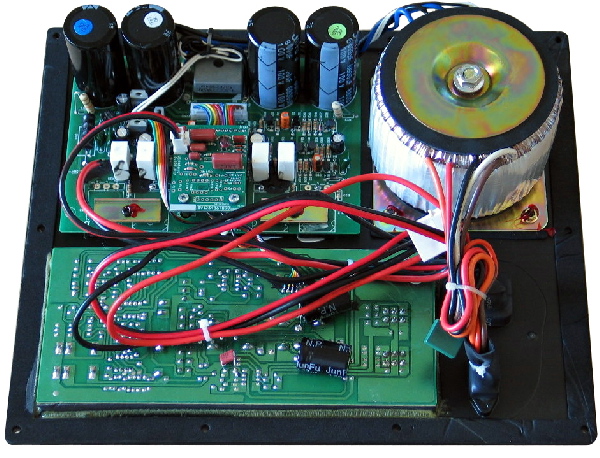
                    Ah so! I'll check it over again, but this one at least appears to be well sealed on that front. The controls are off the lower PCB on the Rythmik A370 in this photo:


                    -- Cameron

                    Comment

                    Working...
                    Searching...Please wait.
                    An unexpected error was returned: 'Your submission could not be processed because you have logged in since the previous page was loaded.

                    Please push the back button and reload the previous window.'
                    An unexpected error was returned: 'Your submission could not be processed because the token has expired.

                    Please push the back button and reload the previous window.'
                    An internal error has occurred and the module cannot be displayed.
                    There are no results that meet this criteria.
                    Search Result for "|||"