Building In-Khan-Neatos for the living room

Collapse
This topic is closed.
X
X
 
  • Time
  • Show
Clear All
new posts
  • TEK
    Super Senior Member
    • Oct 2002
    • 1670

    Building In-Khan-Neatos for the living room

    Hi

    To get a more decent sound for the TV in the living room we have decided that we want a pair of real speakers.
    After some research I have found that the In-Khan-Neatos is looking like a good option.
    The speakers will be placed on each side of the TV, quite close to the TV. The height of the front grill will be exactly the same as the height of the TV, so that the speakers should look like they are a part of the TV.

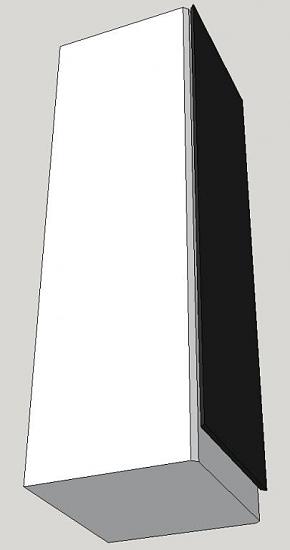
    To make this look resonable good I'm thinking about a design like this:

    Click image for larger versionName:	in-khan-neatos.jpgViews:	1Size:	24.7 KBID:	871425

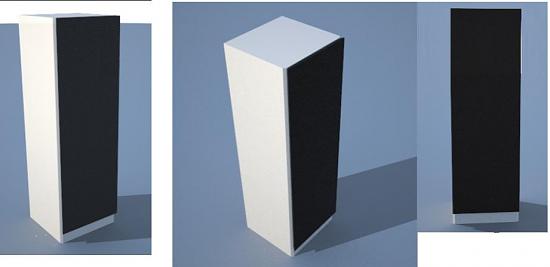
    After looking at the TV-set, checking some other threads and done some calculation I think that 27" * 8 1/2" * 8" (h/w/d) is good dimensions for the box (outside).
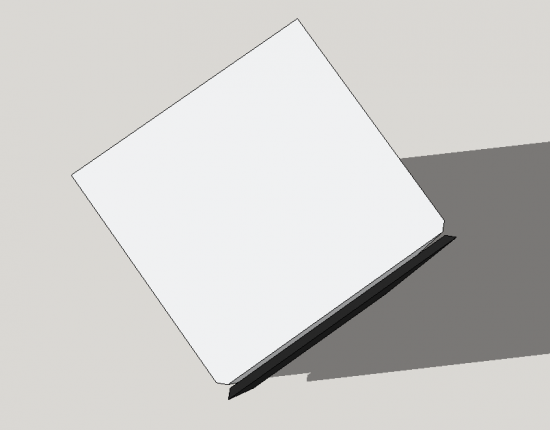
    The baffel is a bit smaller than the original drawings, but as the crossover that I'm planning to use is in-wall, and these will be close to the TV - I can't see that it should do much difference.
    I plan to make the box out of 1/2" MDF, meaning that the internal volume of the box will be approximate 22-23 liters.

    Click image for larger versionName:	in-khan-draft-top.pngViews:	1Size:	14.7 KBID:	871426

    Click image for larger versionName:	in-khan-draft-below.jpgViews:	1Size:	15.6 KBID:	871427

    I will start to put together the shopping chart for parts quite soon I think.

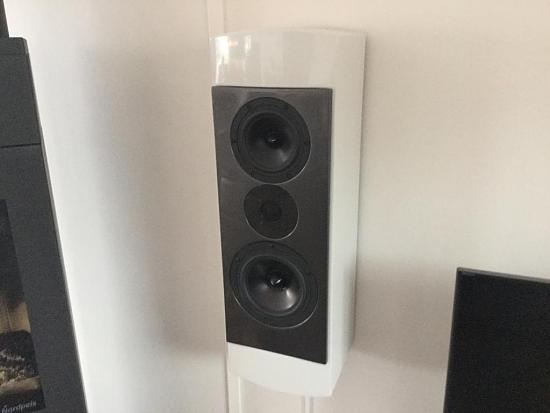
    This was is the result:

    Click image for larger versionName:	image.jpgViews:	1Size:	50.8 KBID:	872022
    Last edited by theSven; 02 August 2023, 20:24 Wednesday. Reason: Update image size
    -TEK


    Many of the great achievements of the world were accomplished by tired and discouraged men who kept on working...
  • TEK
    Super Senior Member
    • Oct 2002
    • 1670

    #2
    Hi

    I wonder if I could get some help with the crossover parts.
    This is the crossover for the In-Khan-Neatos:
    Click image for larger version

Name:	in-khan-neatos crossover.png
Views:	1
Size:	90.9 KB
ID:	859698

    And this is the original BOM:
    Click image for larger version

Name:	in-khan-bom-052509.jpg
Views:	3
Size:	89.4 KB
ID:	859697

    CJD/---k----: You might like to know that the crossover is missing from http://www.divine-audio.com/in-khan-neatos/ (just a icon is showing).

    As you can see from the boom there are parts from Parts-Express and from Madisound.
    As I will have to order these parts abroad there will be custom and fees to get them into the country.

    If I'm to replace the parts from Madisound with parts from Parts-Express or hifisound.de.
    Is there anything in perticular I have to be aware of? I mean, what should I look for when replacing the parts?
    (this will be my first crossover build - so sorry for the novice question)
    -TEK


    Many of the great achievements of the world were accomplished by tired and discouraged men who kept on working...

    Comment

    • ---k---
      Ultra Senior Member
      • Nov 2005
      • 5202

      #3
      I bought parts at both due to cost and maybe some availability. Let me see what I can come up with.

      2.5 ohm resistor, tweeter: Mills 2.5 Ohm 12W Non-Inductive Resistor

      (CJD would probably prefer this one)

      .9mhl inductor Jantzen Audio 0.90mH 18 AWG Air Core Inductor Crossover


      .3 mhl Jantzen Audio 0.30mH 20 AWG Air Core Inductor Crossover Coil


      (I selected 1 18 ga and 1 20 ga inductor. The DCR is pretty darn close on both to the original. I think the two average to darn near perfect the specified.)

      6 ohm resistor: http://www.parts-express.com/mills-6...esistor--005-6

      10 ohm resistor: http://www.parts-express.com/dayton-...sistor--004-10

      the 33+47 woofer caps with 1 80uf cap: http://www.parts-express.com/80uf-10...citor--027-358
      or more expensive upgrade:
      http://www.parts-express.com/dayton-...citor--027-441 + http://www.parts-express.com/dayton-...citor--027-448


      There are lots of options. Basically, I looked for Mills resistors to swap in for the Eagle where they were in line with the driver. Where they were parrallel, to save a few bucks, I swapped in the generic Dayton resistor.
      For Inductors, you want the same value and the same DCR.
      Caps, same same. The upgrade is to the basic Dayton poly cap. You can get fancier if you want, but do the tweeter and mid first.

      It should be possible to get the crossover parts from an EU supplier and just order the drivers from here. That may or may not cost less.

      Hope that helps. I did it quickly, so double check my results to make sure I got all the links correct.
      - Ryan

      CJD Ochocinco! ND140/BC25SC06 MTM & TM
      CJD Khanspires - A Dayton RS28/RS150/RS225 WMTMW
      CJD Khancenter - A Dayton RS28/RS150/RS180 WTMW Center

      Comment

      • cjd
        Ultra Senior Member
        • Dec 2004
        • 5568

        #4
        Crossover image fixed (though of course you can always find it at the end via the gallery....)

        I think the general approach is "source parts from wherever makes the most sense - be it price or availability - as long as they're within tolerance." In this design, my only real paranoia is ensuring the mid padding has adequate power handling. Does it run hot? I don't know. I think the only thing we damaged was the receiver, letting live speaker wires bump HVAC duct (steel...) and that just required a reset (thank goodness for a functioning protection circuit!)

        C
        diVine Sound - my DIY speaker designs at diVine Audio

        Comment

        • TEK
          Super Senior Member
          • Oct 2002
          • 1670

          #5
          Originally posted by ---k---
          I bought parts at both due to cost and maybe some availability. Let me see what I can come up with.

          2.5 ohm resistor, tweeter: Mills 2.5 Ohm 12W Non-Inductive Resistor

          (CJD would probably prefer this one)

          .9mhl inductor Jantzen Audio 0.90mH 18 AWG Air Core Inductor Crossover


          .3 mhl Jantzen Audio 0.30mH 20 AWG Air Core Inductor Crossover Coil


          (I selected 1 18 ga and 1 20 ga inductor. The DCR is pretty darn close on both to the original. I think the two average to darn near perfect the specified.)

          6 ohm resistor: http://www.parts-express.com/mills-6...esistor--005-6

          10 ohm resistor: http://www.parts-express.com/dayton-...sistor--004-10

          the 33+47 woofer caps with 1 80uf cap: http://www.parts-express.com/80uf-10...citor--027-358
          or more expensive upgrade:
          http://www.parts-express.com/dayton-...citor--027-441 + http://www.parts-express.com/dayton-...citor--027-448


          There are lots of options. Basically, I looked for Mills resistors to swap in for the Eagle where they were in line with the driver. Where they were parrallel, to save a few bucks, I swapped in the generic Dayton resistor.
          For Inductors, you want the same value and the same DCR.
          Caps, same same. The upgrade is to the basic Dayton poly cap. You can get fancier if you want, but do the tweeter and mid first.

          It should be possible to get the crossover parts from an EU supplier and just order the drivers from here. That may or may not cost less.

          Hope that helps. I did it quickly, so double check my results to make sure I got all the links correct.
          Thanks a lot cjd!
          A little follow up question. From what I can see you have replaced parts form parts-express with other parts from parts-express on the list of items.
          I assume that you ment to replace the with other items.

          After searching a bit on parts-express, based on the input you gave me - I think that the following should be possible to use to replace those last two madison parts:


          Does these look OK?
          -TEK


          Many of the great achievements of the world were accomplished by tired and discouraged men who kept on working...

          Comment

          • ---k---
            Ultra Senior Member
            • Nov 2005
            • 5202

            #6
            My bad. My highlighting confused me for a second. The .7 mh inductor is a darn near perfect replacement. The 2.7 for the 2.75 is close enough.
            - Ryan

            CJD Ochocinco! ND140/BC25SC06 MTM & TM
            CJD Khanspires - A Dayton RS28/RS150/RS225 WMTMW
            CJD Khancenter - A Dayton RS28/RS150/RS180 WTMW Center

            Comment

            • TEK
              Super Senior Member
              • Oct 2002
              • 1670

              #7
              Thanks Ryan

              This is the resulting BOM. It should contain all parts needed for the element and crossover design for 2 in-khans.
              (in addition it contains a catalogue and an binding post set for the in-khans and another speaker set)
              Click image for larger version

Name:	in-khan-neatos boom-tek.png
Views:	1
Size:	65.8 KB
ID:	859704

              I will see if I can add items for the Wavecor Ardent as well before the order is placed.
              -TEK


              Many of the great achievements of the world were accomplished by tired and discouraged men who kept on working...

              Comment

              • ---k---
                Ultra Senior Member
                • Nov 2005
                • 5202

                #8
                Okay. My brain is dead currently due to sleep deprivation caused by a sick infant. I'm not sure I'm the best to check it, but I'll try at some point in the near future.
                - Ryan

                CJD Ochocinco! ND140/BC25SC06 MTM & TM
                CJD Khanspires - A Dayton RS28/RS150/RS225 WMTMW
                CJD Khancenter - A Dayton RS28/RS150/RS180 WTMW Center

                Comment

                • TEK
                  Super Senior Member
                  • Oct 2002
                  • 1670

                  #9
                  Thanks, but I'm not expecting that. This is based on the existing bom and the input in the previous post.
                  I think I have it pretty clear, and doing a double check against the original BOM and the previous input is something I can do myself.
                  In a build where I had figured out the part myself that would have been very welcome - but as this is just getting the part already defined I think you better get some sleep instead of using time double checking my work :-)

                  Added it here for my and others future reference if someone would like to build this and not have to order from several sources.
                  (will find out when building it if I missed on something ;-)
                  -TEK


                  Many of the great achievements of the world were accomplished by tired and discouraged men who kept on working...

                  Comment

                  • TEK
                    Super Senior Member
                    • Oct 2002
                    • 1670

                    #10
                    I'm playing with the idea of making theese active, meaning adding a small amp module inside each speaker.
                    The tv would then control the volume level.

                    Anyone have a clue about a amp module that might be suited for a usage like this?
                    -TEK


                    Many of the great achievements of the world were accomplished by tired and discouraged men who kept on working...

                    Comment

                    • kevinm
                      Senior Member
                      • Jun 2013
                      • 417

                      #11
                      Not a module, but I use this for the same purpose you're looking for. It tucks behind the tv and auto-turns on when it senses a signal. Runs my bedroom TV speakers

                      Comment

                      • TEK
                        Super Senior Member
                        • Oct 2002
                        • 1670

                        #12
                        That's look interesting.
                        Is 15w/4ohm powerful enough to drive the in-khans?
                        -TEK


                        Many of the great achievements of the world were accomplished by tired and discouraged men who kept on working...

                        Comment

                        • ---k---
                          Ultra Senior Member
                          • Nov 2005
                          • 5202

                          #13
                          I always see posts by the tube amp lovers saying all they need is 10W or 15W. So what do I know? Probably in a small room. But, I like big amps. Dayton also has a 60W amp in similar fashion for not much more money that might be better fit. https://www.parts-express.com/dayton...-wpc--300-3800

                          Since you're just wanting to put the amp in the speaker, you can probably experiment with a low power receiver that you've got laying around and see what happens and then go from there.

                          Probably not the right board for your project, and I haven't built one, but, the amp boards have me intrigued.
                          For $50, you get 250W https://www.parts-express.com/2x250w...board--320-313
                          Seems almost too good to be true. Still have to build/buy a power supply and stuff. Jon can hopefully tell us all about the chip on this one.
                          - Ryan

                          CJD Ochocinco! ND140/BC25SC06 MTM & TM
                          CJD Khanspires - A Dayton RS28/RS150/RS225 WMTMW
                          CJD Khancenter - A Dayton RS28/RS150/RS180 WTMW Center

                          Comment

                          • TEK
                            Super Senior Member
                            • Oct 2002
                            • 1670

                            #14
                            Just ordered the parts for this project from parts-express (as well as some small items for the Wavecor Ardent)...

                            Not doing anything in the amp area for now - will stay with an external amp that I already own.
                            But the actual building has still not started (as you understand as there are now pictures yet)!
                            -TEK


                            Many of the great achievements of the world were accomplished by tired and discouraged men who kept on working...

                            Comment

                            • ---k---
                              Ultra Senior Member
                              • Nov 2005
                              • 5202

                              #15
                              I have mine currently hooked up to an Audio Source 100 amp. Although it is called an Amp 100, it only produces 60W. I'm not finding this sufficient while playing from a sound card. It gets just short of loud and no where near impress your friends loud. I need to do some more investigation. But, I would hold off on the low watt chip amps until you get them built and see what your room needs.
                              - Ryan

                              CJD Ochocinco! ND140/BC25SC06 MTM & TM
                              CJD Khanspires - A Dayton RS28/RS150/RS225 WMTMW
                              CJD Khancenter - A Dayton RS28/RS150/RS180 WTMW Center

                              Comment

                              • TEK
                                Super Senior Member
                                • Oct 2002
                                • 1670

                                #16
                                Originally posted by ---k---
                                I have mine currently hooked up to an Audio Source 100 amp. Although it is called an Amp 100, it only produces 60W. I'm not finding this sufficient while playing from a sound card. It gets just short of loud and no where near impress your friends loud. I need to do some more investigation. But, I would hold off on the low watt chip amps until you get them built and see what your room needs.
                                I'll do that, thanks!
                                -TEK


                                Many of the great achievements of the world were accomplished by tired and discouraged men who kept on working...

                                Comment

                                • TEK
                                  Super Senior Member
                                  • Oct 2002
                                  • 1670

                                  #17
                                  Hi

                                  There has been some last minutes change in the requirements for these.
                                  From the plan beeing that the in-khan-neatos should be flush mounted with the tv, close to the tv-screen. The effect of this would be that the tv and the speakers kindof would create a big baffel causing the speaker to almost behave as in-wall.

                                  Now, change in requirements have resultet in these going to be mounted on-wall away from the tv. The front of the speaker will be 22cm from the wall.

                                  All parts are ordered for the in-wall crossover.

                                  How bad is this? Should/must I do some modifications to the crossover?
                                  -TEK


                                  Many of the great achievements of the world were accomplished by tired and discouraged men who kept on working...

                                  Comment

                                  • ---k---
                                    Ultra Senior Member
                                    • Nov 2005
                                    • 5202

                                    #18
                                    I'm sure CJD could offer suggestions, but I'd say, since all that parts are ordered, try it out and let's go from there. You're anticipated mounting is probably close to what I have now with the in-wall.
                                    - Ryan

                                    CJD Ochocinco! ND140/BC25SC06 MTM & TM
                                    CJD Khanspires - A Dayton RS28/RS150/RS225 WMTMW
                                    CJD Khancenter - A Dayton RS28/RS150/RS180 WTMW Center

                                    Comment

                                    • cjd
                                      Ultra Senior Member
                                      • Dec 2004
                                      • 5568

                                      #19
                                      There's very little you can do to combat the random null that happens from bounce off the wall unless you can apply some treatment to mitigate it a bit. Baffle step should be close enough for student work, so overall you're likely in good shape in that area. 1563.5Hz bounce for 22cm so not really random but... you may hear that (and have trouble understanding some bits of speech.) I agree though, try it, see how it goes. Widening the baffle may help, even if they're set out from the walls.
                                      diVine Sound - my DIY speaker designs at diVine Audio

                                      Comment

                                      • TEK
                                        Super Senior Member
                                        • Oct 2002
                                        • 1670

                                        #20
                                        OK, I think it's time to get this build started. Elements and crossover parts are already "on site".
                                        The final design will be a bit different from the one in the initial post. I will start according to the drawing below, and then add some design feature as the build comes along.
                                        So, what you know for now is not the final result - stay tuned for more...

                                        Will try to shoot some photoes of the process...

                                        Click image for larger version

Name:	capture.jpg
Views:	1
Size:	32.8 KB
ID:	860306
                                        -TEK


                                        Many of the great achievements of the world were accomplished by tired and discouraged men who kept on working...

                                        Comment

                                        • TEK
                                          Super Senior Member
                                          • Oct 2002
                                          • 1670

                                          #21
                                          Here we go again

                                          Click image for larger version

Name:	image.jpg
Views:	1
Size:	79.5 KB
ID:	860307

                                          Will do rabbit joints between the side walls and the front and back, so the side walls needs to be 7" 1/2 insted of just 7".
                                          Hope I'm able to build the revised cut plan in my head as I go along:W
                                          -TEK


                                          Many of the great achievements of the world were accomplished by tired and discouraged men who kept on working...

                                          Comment

                                          • TEK
                                            Super Senior Member
                                            • Oct 2002
                                            • 1670

                                            #22
                                            I'm done cutting and adjusting the outer box for both speakers.

                                            Used my DIY router table to route the joints - worked out really good.


                                            This is the result from the routing:
                                            Click image for larger version

Name:	IMG_5486.jpg
Views:	1
Size:	69.6 KB
ID:	860309
                                            As you can see I'm using rabbit joints (is that the correct name of this joint?)

                                            And then it's time to do a dry test for the outer box:
                                            Click image for larger version

Name:	IMG_5487.jpg
Views:	1
Size:	73.9 KB
ID:	860310
                                            Seems to fit nicely togheter so far:T
                                            -TEK


                                            Many of the great achievements of the world were accomplished by tired and discouraged men who kept on working...

                                            Comment

                                            • dar47
                                              Senior Member
                                              • Nov 2008
                                              • 876

                                              #23
                                              Rabbit is on the end of a board with perpendicular surface joins, Dodo is in the middle of a board. Half lap is on the end or middle with the surface in the same plain.:T People tend to interchange them though.

                                              For speaker building if your only using say 18mm or 22mm board on the side and top, it's a vary small addition surface area for gluing compared to a butt joint. If your laminating boards say 2 sides and 1 or 2 tops it provides much more surface area for glue and helps keep things square, that's when I would use a Rabbit. Dado's are always good and give more surface area for glue.

                                              Comment

                                              • TEK
                                                Super Senior Member
                                                • Oct 2002
                                                • 1670

                                                #24
                                                Thanks for the explanation dar!

                                                It does not give a lot of extra glue area (but it does give some), but I belive that the extra edge make it less possible to get air gaps and leaks than with a butt joint. It also makes it much easier to assemble the box and add pressure as the pices almost keeps together by themself.
                                                -TEK


                                                Many of the great achievements of the world were accomplished by tired and discouraged men who kept on working...

                                                Comment

                                                • TEK
                                                  Super Senior Member
                                                  • Oct 2002
                                                  • 1670

                                                  #25
                                                  A new tool :-)
                                                  Have been looking for one of these for a loong time. Finally got one for a nice price...

                                                  Click image for larger version

Name:	bormaskin (2).jpg
Views:	1
Size:	60.5 KB
ID:	860346
                                                  Last edited by TEK; 29 November 2015, 19:57 Sunday. Reason: Rotate the picture
                                                  -TEK


                                                  Many of the great achievements of the world were accomplished by tired and discouraged men who kept on working...

                                                  Comment

                                                  • TEK
                                                    Super Senior Member
                                                    • Oct 2002
                                                    • 1670

                                                    #26
                                                    OK, made a little progress today.

                                                    During the Wavecor Ardent build I made a DIY circle jig. Now it's time to get that out again.

                                                    Click image for larger versionName:	image.jpgViews:	1Size:	80.1 KBID:	860342

                                                    After figuring out the radius of all the driver cutouts I can adjust the jig to the correct radious using the method shown below. This method is very accurate and I get quite precise cutouts every time. But this time I did make the cutouts a bit larger than the drivers. Quite fed-up with drivers that get's stuck in the speaker because the cutout is to small.
                                                    Click image for larger versionName:	image.jpgViews:	1Size:	73.5 KBID:	860343

                                                    Cutting all the cutouts in one go.

                                                    Click image for larger versionName:	image.jpgViews:	1Size:	79.7 KBID:	860344

                                                    Test assembling the box with the drivers in. Everything seems to fit quite nicely together.

                                                    Click image for larger versionName:	image.jpgViews:	1Size:	86.0 KBID:	860345

                                                    The next step will be to add internal bracing and cutouts for the speaker terminals. But before that I have to go get the speaker terminals.
                                                    As the speaker will be wall mounted the speaker terminals cannot stand out from the speaker. Due to that I'm planning on using these that is available close to me.

                                                    Images not available

                                                    Cost almost nothing, and I think they will do ok on this build.
                                                    Last edited by theSven; 02 August 2023, 20:20 Wednesday. Reason: Remove broken image links
                                                    -TEK


                                                    Many of the great achievements of the world were accomplished by tired and discouraged men who kept on working...

                                                    Comment

                                                    • ---k---
                                                      Ultra Senior Member
                                                      • Nov 2005
                                                      • 5202

                                                      #27
                                                      Hey, those are starting to look familiar to me! Nice progress.

                                                      I've used those terminal cups on project before. I think they work well. No judgement from me. I've also just cut a 3" diameter hole in the back, routed the edge, glued behind the hole one of my driver cutouts, then installed terminals through that, essentially making my own terminal cup.

                                                      Also jealous of the drill press. That would be a handy tool to have.
                                                      - Ryan

                                                      CJD Ochocinco! ND140/BC25SC06 MTM & TM
                                                      CJD Khanspires - A Dayton RS28/RS150/RS225 WMTMW
                                                      CJD Khancenter - A Dayton RS28/RS150/RS180 WTMW Center

                                                      Comment

                                                      • TEK
                                                        Super Senior Member
                                                        • Oct 2002
                                                        • 1670

                                                        #28
                                                        Thanks for the kinf words k.

                                                        Some more progress today.
                                                        Does not look like mutch, but took some time to get it done.
                                                        I have cut the divider between the mid and bass section. I decided to route dadoes for it in both the back, side and front.
                                                        Also cut the hole for the speaker terminals.
                                                        And then it was glue time... Looking good so far I think.

                                                        Click image for larger version

Name:	image.jpg
Views:	1
Size:	76.9 KB
ID:	860351
                                                        Click image for larger version

Name:	image.jpg
Views:	1
Size:	102.0 KB
ID:	860352

                                                        I was wondering about add some more bracing to the box - but I think that it will be OK when the front baffel is added.
                                                        Also, the front baffel is double so it will be quite stiff. To avoid any "boom" from the box I have decided that I will line the side walls with this stuff.
                                                        Selvklebende bitumenplater (asfaltgummi) for vibrasjonsdempende lydisolering. Tar effektiv bort resonans- og vibrasjonslyd på bilens hjulhus, bunnplater m.m. Formes etter underlaget med varmepistol. Kan også legges i remser. For god effekt bør minst 1/3 av underlaget dekkes. Overmalbar. 

                                                        This is bitumen. It's heavy asphalt/plastic that has very good vibration damping attributes. It's stick-and-peel, so it's quite easy to apply. I used the same stuff - but quite a bit thicker - for the midt-tone chamber in the Wavecor Ardent.
                                                        At least knocking on the cabinet gives a lot less sound after lining the sidewalls with this stuff.
                                                        I also assume that when I get the front baffel mounted it will stiffen the box a lot more. The box is quite shallow, so even if the bass chamber is a bit long compared to the wall thickness, the area that is not braced is quite small.
                                                        -TEK


                                                        Many of the great achievements of the world were accomplished by tired and discouraged men who kept on working...

                                                        Comment

                                                        • TEK
                                                          Super Senior Member
                                                          • Oct 2002
                                                          • 1670

                                                          #29
                                                          Some small progress today as well.

                                                          Lined the inside walls with bitumen (see previous post for details about that stuff) and with damping mats. The damping mats is glued on with with spray glue.
                                                          Also drilled holes and inserted the cables for the mid-tone so that I can get sound into that as well
                                                          Click image for larger version

Name:	image.jpg
Views:	1
Size:	99.4 KB
ID:	860353

                                                          Detail shoot of the wall lined with bitumen and damping mat.
                                                          Click image for larger version

Name:	image.jpg
Views:	1
Size:	100.5 KB
ID:	860354

                                                          Then it was time to glue up the front baffel. As you see I'm adding glue to both sides as the MDF edges sucks up a lot of glue.
                                                          Click image for larger version

Name:	image.jpg
Views:	1
Size:	96.6 KB
ID:	860355

                                                          The front baffel was a near perfect fit to the cabinet. And as I had made dado's and rabbit joints it was like putting on a exactly fitted lid.
                                                          Using the furniture hammer to ensure that it get into place (that furniture hammer is a recommended tool when working with stuff that is supposed (or not supposed but just do it) fit tightly together.
                                                          Click image for larger version

Name:	image.jpg
Views:	1
Size:	88.2 KB
ID:	860356

                                                          And the usual clamp photo :T
                                                          As you can see I put the two cabinets upside down on top of each other and clamped it all together. Notice the plastic between the boxes. That's so that glue spill or drips shall not glue the front baffles together.
                                                          Click image for larger version

Name:	image.jpg
Views:	1
Size:	80.5 KB
ID:	860357
                                                          -TEK


                                                          Many of the great achievements of the world were accomplished by tired and discouraged men who kept on working...

                                                          Comment

                                                          • cjd
                                                            Ultra Senior Member
                                                            • Dec 2004
                                                            • 5568

                                                            #30
                                                            Looking good! Except that one wire is upside down...
                                                            diVine Sound - my DIY speaker designs at diVine Audio

                                                            Comment

                                                            • TEK
                                                              Super Senior Member
                                                              • Oct 2002
                                                              • 1670

                                                              #31
                                                              Hmm, what might that crazy norwegian be up to now?
                                                              Click image for larger version

Name:	image.jpg
Views:	1
Size:	89.4 KB
ID:	860383
                                                              -TEK


                                                              Many of the great achievements of the world were accomplished by tired and discouraged men who kept on working...

                                                              Comment

                                                              • TEK
                                                                Super Senior Member
                                                                • Oct 2002
                                                                • 1670

                                                                #32
                                                                Now, to something totally different.
                                                                I saw "Hunger Games - The Mockingbird, part 1" yesterday.
                                                                Not that much to say about the movie itself - but there was one scene where the main character song this song:
                                                                The Hanging Tree, with James Newton Howard and Jennifer Lawrence.

                                                                I'm not sure why, but it kind of catched me. Very soft and nice melody!
                                                                You Tube (audio): https://youtu.be/F3hTW9e20d8

                                                                You Tube (from the movie): https://youtu.be/r-Oi43EsQNU
                                                                -TEK


                                                                Many of the great achievements of the world were accomplished by tired and discouraged men who kept on working...

                                                                Comment

                                                                • TEK
                                                                  Super Senior Member
                                                                  • Oct 2002
                                                                  • 1670

                                                                  #33
                                                                  Hi

                                                                  I need help with a math question. Can anyone help me out here?
                                                                  In this figure, what is the radius (r)?

                                                                  Click image for larger version

Name:	hva er radiusen.png
Views:	1
Size:	7.4 KB
ID:	860385
                                                                  -TEK


                                                                  Many of the great achievements of the world were accomplished by tired and discouraged men who kept on working...

                                                                  Comment

                                                                  • Steve Manning
                                                                    Moderator
                                                                    • Dec 2006
                                                                    • 1888

                                                                    #34
                                                                    Looks to me like 5" TEK
                                                                    Hold on to your butts - It's about to get Musical!


                                                                    WEBSITE: http://www.smjaudio.com/

                                                                    Comment

                                                                    • Steve Manning
                                                                      Moderator
                                                                      • Dec 2006
                                                                      • 1888

                                                                      #35
                                                                      Drawing would more like this in actuality .....


                                                                      Click image for larger version

Name:	TEK_resize.jpg
Views:	1
Size:	26.2 KB
ID:	860386
                                                                      Hold on to your butts - It's about to get Musical!


                                                                      WEBSITE: http://www.smjaudio.com/

                                                                      Comment

                                                                      • TEK
                                                                        Super Senior Member
                                                                        • Oct 2002
                                                                        • 1670

                                                                        #36
                                                                        Thanks a lot Steve, that looks great!
                                                                        I will not have time to utilize this information today - but will be used in one of the first upcoming day... Then the usage will be revealed as well - even tough I guess someone might have guessed it by now
                                                                        -TEK


                                                                        Many of the great achievements of the world were accomplished by tired and discouraged men who kept on working...

                                                                        Comment

                                                                        • TEK
                                                                          Super Senior Member
                                                                          • Oct 2002
                                                                          • 1670

                                                                          #37
                                                                          Ohh... sorry Steve, but now when I look closer it's not right.
                                                                          I'm looking for the radius of the circle that will touch both top edges of that 9" side, and where the center of the circle will be 1/2" away from the 9" side.
                                                                          Like the read circle shown in your figure.

                                                                          Click image for larger version

Name:	hva er radiusen2.jpg
Views:	1
Size:	26.3 KB
ID:	860387
                                                                          -TEK


                                                                          Many of the great achievements of the world were accomplished by tired and discouraged men who kept on working...

                                                                          Comment

                                                                          • Steve Manning
                                                                            Moderator
                                                                            • Dec 2006
                                                                            • 1888

                                                                            #38
                                                                            Yep, that will change things, so let's try this then ......

                                                                            Click image for larger version

Name:	TEK 2_resize.jpg
Views:	1
Size:	26.1 KB
ID:	860388
                                                                            Hold on to your butts - It's about to get Musical!


                                                                            WEBSITE: http://www.smjaudio.com/

                                                                            Comment

                                                                            • TEK
                                                                              Super Senior Member
                                                                              • Oct 2002
                                                                              • 1670

                                                                              #39
                                                                              Thanks a lot Steve, your numbers was spot on at has come to good use :-)
                                                                              First, as this circle was very big - I had to make a temporarly tool to cut out the template I needed.

                                                                              Click image for larger version

Name:	image.jpg
Views:	1
Size:	92.2 KB
ID:	860389

                                                                              Using the template to check the arch
                                                                              Click image for larger version

Name:	image.jpg
Views:	1
Size:	62.1 KB
ID:	860390

                                                                              And one speaker is starting to look as it should
                                                                              Click image for larger version

Name:	image.jpg
Views:	1
Size:	73.0 KB
ID:	860391
                                                                              -TEK


                                                                              Many of the great achievements of the world were accomplished by tired and discouraged men who kept on working...

                                                                              Comment

                                                                              • Steve Manning
                                                                                Moderator
                                                                                • Dec 2006
                                                                                • 1888

                                                                                #40
                                                                                Your welcome TEK ....... glad that it gave you what you needed.
                                                                                Hold on to your butts - It's about to get Musical!


                                                                                WEBSITE: http://www.smjaudio.com/

                                                                                Comment

                                                                                • kevinm
                                                                                  Senior Member
                                                                                  • Jun 2013
                                                                                  • 417

                                                                                  #41
                                                                                  Hey tek,

                                                                                  Probably being dense - but would you mind sharing what you did? It looks like you shaved off the top/bottom of the cabinet to make it curved?

                                                                                  Comment

                                                                                  • TEK
                                                                                    Super Senior Member
                                                                                    • Oct 2002
                                                                                    • 1670

                                                                                    #42
                                                                                    Originally posted by kevinm
                                                                                    Hey tek,

                                                                                    Probably being dense - but would you mind sharing what you did? It looks like you shaved off the top/bottom of the cabinet to make it curved?
                                                                                    Sure - and you are spot on.

                                                                                    I first added 1/2" MDF to the top, bottom and the area above and below the baffel with the element cutouts.
                                                                                    The I made all those curved (yes, both top and bottom as these will hang on the wall).
                                                                                    I used the radius from Steve to make a template that I can use just to check if I have get the curve correct. The curve itself was done with a electrical planer as well as a orbital sander and finally for hand.

                                                                                    I will do this on both speakers. The "outer baffel", that's the pice that the drivers will sit on, is loose and will not be fastned yet.
                                                                                    The speakers itself will be spray-painted white, while the "outer baffel" will be spray-painted in dark metallic gray.

                                                                                    I'm a bit unsure about the process to follow from here and until I start painting.
                                                                                    I will need to use bondo to get the radius "perfect", but I'm not sure when I will do that.

                                                                                    I'm thinking about using shellac to seal the wood before epoxy. THis is so that the wood will not draw that much epoxy.
                                                                                    I have ready mixed shellac standing - and it will be thossed away if I do not use it. This process is also very easy. Just takes a couple of minutes. Cleanup is easy as well.

                                                                                    Finishing process, alternativ 1
                                                                                    - Get the finish as good as I can without adding any bondo
                                                                                    - Spray them with a couple of layers of shellac
                                                                                    - Foam roll them with 2 layers of epoxy to seal it all
                                                                                    - Apply bondo and finial sanding
                                                                                    - If nessesarly (if I sand trough) add more layers of epoxy
                                                                                    - Spray paint a base count
                                                                                    - Spray paint the rest

                                                                                    Finishing process, alternativ 2
                                                                                    - Get the finish perfect, inlcluding adding bondo
                                                                                    - Spray them with a couple of layers of shellac
                                                                                    - Foam roll them with 2 layers of epoxy to seal it all
                                                                                    - Light sanding
                                                                                    - Spray paint a base count
                                                                                    - Spray paint the rest

                                                                                    I do know that some here do not think epoxy is necessarily.
                                                                                    I'm going to use it anyway as I think that is the best way to hopefully avoid any edges paragraphing trough the paint.

                                                                                    My main consern is if I should add bondo and get everything correct before or after adding shellac and epoxy. I'm also a bit unsure if shellac before the epoxy may cause any issue.
                                                                                    -TEK


                                                                                    Many of the great achievements of the world were accomplished by tired and discouraged men who kept on working...

                                                                                    Comment

                                                                                    • Steve Manning
                                                                                      Moderator
                                                                                      • Dec 2006
                                                                                      • 1888

                                                                                      #43
                                                                                      Nice work on the curved surfaces TEK ........ nice simple method for getting the job done. Just as an fyi, something I saw a while back and have not tired yet for an alternative method with a router. This video illustrates the concept well, https://www.youtube.com/watch?v=6GH1fr1DjUA. In your case the guide rails would be convex and not concave and you can get surfacing router bits with an 1 1/2" or larger diameter to speed up the process.
                                                                                      Hold on to your butts - It's about to get Musical!


                                                                                      WEBSITE: http://www.smjaudio.com/

                                                                                      Comment

                                                                                      • TEK
                                                                                        Super Senior Member
                                                                                        • Oct 2002
                                                                                        • 1670

                                                                                        #44
                                                                                        Originally posted by Steve Manning
                                                                                        Nice work on the curved surfaces TEK ........ nice simple method for getting the job done. Just as an fyi, something I saw a while back and have not tired yet for an alternative method with a router. This video illustrates the concept well, https://www.youtube.com/watch?v=6GH1fr1DjUA. In your case the guide rails would be convex and not concave and you can get surfacing router bits with an 1 1/2" or larger diameter to speed up the process.
                                                                                        Hmm, I did evaluate building a jig. I saw some example before I started, but those often involved using wheels and was quite a bit more complex than what I felt was necessarily.
                                                                                        The one you linked to seems much easier. There is however some issues with getting this to handle the shape of the speakers, both when laying down and when standing up. The current method went quite fast - so for this build I will just stick to the manual way.
                                                                                        Will be a bit of bondo work together with the template to get it correct, but I hope and think it will be quite OK.

                                                                                        But thanks for the input. I will take that with me for later usages. If I had routed the plates before attaching them to the speakers I think it would be quite easy to follow that method.

                                                                                        No one that has some input on the "bondo before or after shellac/epoxy" discussion?
                                                                                        -TEK


                                                                                        Many of the great achievements of the world were accomplished by tired and discouraged men who kept on working...

                                                                                        Comment

                                                                                        • BobEllis
                                                                                          Super Senior Member
                                                                                          • Dec 2005
                                                                                          • 1609

                                                                                          #45
                                                                                          I think I'd go with two coats of epoxy instead - the first to seal, since mdf will soak up quite a bit. Be sure to wash with water and an abrasive pad between coats to remove the amine blush. Do this before sanding as well or you will clog up your sandpaper in no time. I'd be concerned with epoxy to shellac bond.

                                                                                          Comment

                                                                                          Working...
                                                                                          Searching...Please wait.
                                                                                          An unexpected error was returned: 'Your submission could not be processed because you have logged in since the previous page was loaded.

                                                                                          Please push the back button and reload the previous window.'
                                                                                          An unexpected error was returned: 'Your submission could not be processed because the token has expired.

                                                                                          Please push the back button and reload the previous window.'
                                                                                          An internal error has occurred and the module cannot be displayed.
                                                                                          There are no results that meet this criteria.
                                                                                          Search Result for "|||"